Chicken Pattern Fabric Egg Holder

Chicken Pattern Fabric Egg Holder projects are a wonderful combination of practical sewing and charming farmhouse-inspired décor.
One of the biggest advantages of making a Chicken Pattern Fabric Egg Holder is that it allows you to transform simple cotton fabrics into something decorative and functional.
This tutorial explains every stage of the process, from selecting fabrics and cutting the pattern pieces to assembling the chicken shape and adding the finishing touches. Every step has been designed to help beginners achieve professional-looking results while also offering useful tips for experienced sewists who want to personalize their designs. By following this guide carefully, you will be able to recreate the project with confidence while improving your sewing skills and learning techniques that can be applied to many other fabric crafts.
The first step in creating your Chicken Pattern Fabric Egg Holder is selecting suitable fabrics. Quilting cotton is highly recommended because it is durable, easy to sew, lightweight, and available in countless colorful prints that perfectly match farmhouse or country-style décor.
Choose one fabric for the main body of the chicken, another coordinating fabric for the wings, and small contrasting fabrics for the comb, beak, and tail. Mixing floral, gingham, polka dot, or small geometric prints creates a cheerful handmade appearance.
Before cutting, wash, dry, and iron every fabric piece. Prewashing prevents future shrinkage and ensures that all fabrics behave consistently after the finished holder is cleaned.
Prepare paper templates for the chicken body, wings, comb, beak, tail feathers, and the egg pocket. Carefully trace each template onto the fabric using a washable fabric marker while paying attention to the grain direction.
Cut two mirrored body pieces measuring approximately 12 inches high by 10 inches wide. These dimensions comfortably accommodate several standard chicken eggs while maintaining the rounded chicken silhouette shown in the project.
In addition to the fabric pieces, prepare lightweight fusible interfacing, polyester batting for soft structure, coordinating thread, fabric scissors, sewing clips, pins, stuffing for decorative sections if desired, and your sewing machine equipped with a universal needle.
Begin by attaching the fusible interfacing to the wrong side of the main body pieces. This provides additional stability and helps the holder maintain its shape after repeated use.
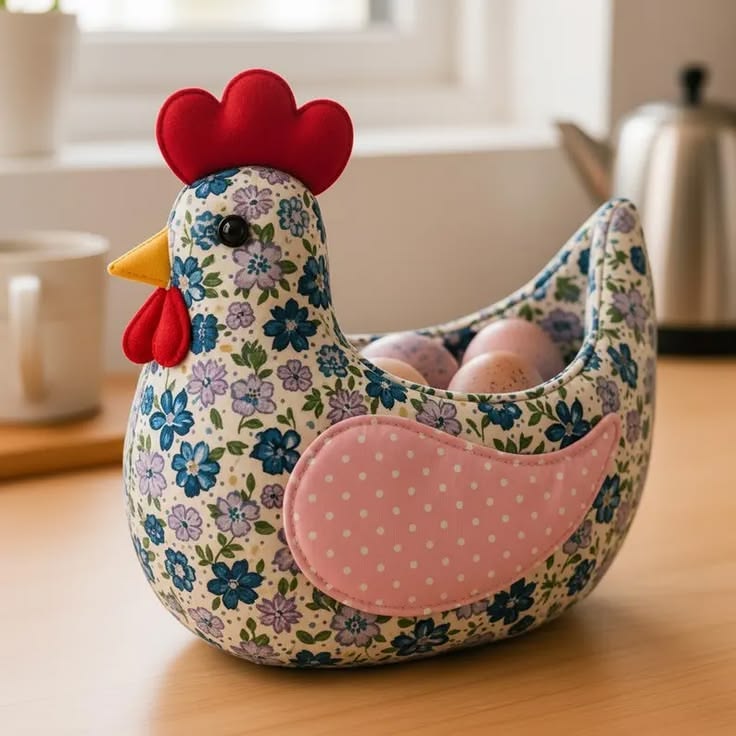
Layer the exterior fabric with the batting if you want a slightly padded appearance similar to the project in the photo. Quilting the layers together using simple vertical or diagonal lines also adds texture and durability.
Place the two chicken body pieces right sides together and sew around the outer edge using a ¼-inch seam allowance. Leave the bottom edge open for turning the project right side out.
Clip the curved seam allowances carefully without cutting through the stitching. This allows the rounded body to lie smoothly after turning and eliminates bulky fabric around the curves.
Turn the chicken body right side out through the opening, gently push out the curved edges with a blunt turning tool, and press everything neatly with a warm iron.
Close the bottom opening with a narrow topstitch after inserting any additional batting if necessary. At this stage, your chicken body should already resemble the overall shape of the finished project.
The most functional part of the Chicken Pattern Fabric Egg Holder is the egg pocket located on the front of the chicken. Cut a large oval or curved pocket that follows the natural contour of the body.
Finish the upper edge of the pocket by folding it twice and stitching neatly. Decorative lace, ric-rac trim, or contrasting bias tape can be added before attaching the pocket to the body.
Position the pocket on the lower front section of the chicken and stitch carefully along both sides and the bottom, leaving the upper edge open. This compartment will securely hold several eggs while maintaining easy access.
Cut the wings from coordinating fabric, lightly stuff them if desired, and stitch them onto both sides of the body. Decorative quilting or embroidery can make the wings even more eye-catching.
Create the comb using bright red fabric and the beak using yellow or orange fabric. Sew these details securely along the top edge before adding embroidered or safety eyes to give the chicken a friendly expression.
Finish the design by adding a fabric tail made from several folded strips or layered fabric pieces. This detail enhances the country-inspired appearance while balancing the overall shape of the project.
Press the entire project once more after completing all stitching. Proper pressing instantly improves the appearance and helps every seam lie flat for a professional finish.
Inspect every seam carefully, especially around the pocket, because this area supports the weight of the eggs. Reinforce these stitches if necessary to ensure long-lasting durability.
If you want the holder to hang on a kitchen wall, sew a sturdy fabric loop onto the back of the chicken before completing the final assembly. This creates both decorative and practical storage.
Personalize your Chicken Pattern Fabric Egg Holder with embroidery, decorative buttons, appliqué flowers, personalized initials, or machine quilting designs. These finishing touches make every project unique and suitable for gifting.
You can easily resize the pattern to hold more or fewer eggs. Simply enlarge or reduce the body template while adjusting the pocket proportionally to maintain balance and functionality.
Once completed, place fresh eggs inside the pocket and enjoy a charming handmade kitchen accessory that combines organization, decoration, and sustainable sewing in one delightful project.
Yes. This project uses simple sewing techniques and basic pattern pieces, making it an excellent choice for beginners who want to improve their sewing skills.
High-quality quilting cotton is recommended because it is easy to sew, durable, washable, and available in many attractive prints.
Depending on the finished size, most designs comfortably hold between four and eight standard chicken eggs.
Yes. Machine wash on a gentle cycle or hand wash with mild detergent, then allow it to air dry to preserve its shape.
Batting is optional but recommended because it adds softness, structure, and additional protection for the eggs.
Absolutely. Embroidery, appliqué, lace, decorative stitching, bows, buttons, and patchwork details all work beautifully with this project.
Yes. A handmade egg holder makes a thoughtful gift for housewarmings, birthdays, Easter celebrations, Mother’s Day, or anyone who enjoys farmhouse-style kitchen décor.
Definitely. This project is ideal for using leftover fabric pieces, making it an economical and environmentally friendly sewing project.
The Chicken Pattern Fabric Egg Holder is a creative sewing project that combines practicality with charming farmhouse style. Throughout this tutorial, you learned how to choose appropriate fabrics, prepare the pattern pieces, sew the chicken body, construct a secure egg pocket, attach decorative details such as the wings, comb, beak, and tail, and apply professional finishing techniques for a polished result.
By carefully following each step, you can recreate the project shown in the photo while adapting the colors, fabrics, and decorative elements to match your own personal style.
Beyond being a beautiful kitchen accessory, this project is also a wonderful opportunity to recycle fabric scraps, practice essential sewing skills, and create meaningful handmade gifts. I hope this guide has inspired you to start your own Chicken Pattern Fabric Egg Holder project. If you enjoyed this tutorial, please leave your sincere opinion and share your suggestions or creative ideas for future sewing projects. Your feedback is always welcome and helps inspire even more handmade creations.