
Crochet Cowboy Hat Pattern

Creating Christmas lights in crochet-Step by Step Tutorial decorations is a delightful way to add handmade charm to your holiday season. Crochet Christmas lights have become increasingly popular because they combine creativity, tradition, and warmth in a single craft project. When you make your own crocheted lights, you bring a personal touch to your holiday décor, and the process itself becomes an enjoyable and relaxing activity. This tutorial is designed to guide beginners and experienced crocheters through each step with clarity and simplicity, ensuring that anyone can complete the project successfully.
As you dive into the world of Christmas lights in crochet-Step by Step Tutorial, you will discover how easy it is to use yarn, a crochet hook, and basic stitches to create festive light bulbs. These crocheted pieces can be placed on the Christmas tree, used as garlands, or incorporated into gift wrapping. Because the pattern is straightforward and highly customizable, you can create lights in any color palette you wish. Many people choose classic Christmas colors like red, green, and gold, while others explore vibrant modern tones or soft pastels.
Handmade decorations hold a special place in holiday traditions. By following this Christmas lights in crochet-Step by Step Tutorial, you can craft ornaments that last for years and carry sentimental meaning. Crocheting festive lights is also an excellent project to use leftover yarn, making it cost-effective and eco-friendly. Whether you are creating these decorations for your home, to give as a gift, or to sell at holiday markets, the process is both enjoyable and rewarding. Before exploring the detailed steps, gather your materials and set aside a quiet moment to enjoy the experience of creating something unique and beautiful.
Starting your Christmas lights in crochet-Step by Step Tutorial begins with choosing the right materials. You will need yarn in various colors, preferably in medium weight so the stitches remain clear and firm. Using bright and cheerful colors helps your crocheted lights stand out and gives them the festive look that holiday decorations are known for. A standard crochet hook that matches your yarn weight works perfectly for this project. You may also want to have a yarn needle on hand for sewing and weaving in ends.
Understanding basic crochet stitches is essential for successfully completing this project. Most Christmas lights in crochet-Step by Step Tutorial patterns use simple stitches like chain stitch, single crochet, and slip stitch. These stitches form the structure of the light bulbs, ensuring they maintain their shape and look polished. Even beginners who are new to crochet can follow along easily, as these stitches are widely used in beginner-friendly patterns.
Once your materials are ready, it is helpful to prepare your yarn by separating the colors you plan to use. A range of colors makes your final garland look lively and visually appealing. Planning your color sequence ahead of time also saves you from needing to rearrange the lights later. Following the Christmas lights in crochet-Step by Step Tutorial, you can create a long garland or individual ornaments depending on your preference.
Creating a comfortable workspace is another important step. Crafting small items like crochet lights requires good lighting and a clean surface where your materials stay organized. Keeping your yarn and tools within reach helps you maintain steady progress without interruption. The more comfortable and focused you are, the more enjoyable your crafting experience becomes.
Before beginning the crochet work, take a moment to warm up your hands by practicing a few chain stitches. This improves your tension and ensures your stitches remain consistent throughout the project. Consistent tension is key when working on decorative pieces, as it results in uniform shapes and a neat finish. As you continue through the Christmas lights in crochet-Step by Step Tutorial, these small preparations will support your success.
With your materials organized, your stitches practiced, and your workspace ready, you are now fully prepared to begin creating your crocheted Christmas lights. The next section will guide you through the step-by-step process of forming each bulb and assembling your decoration.
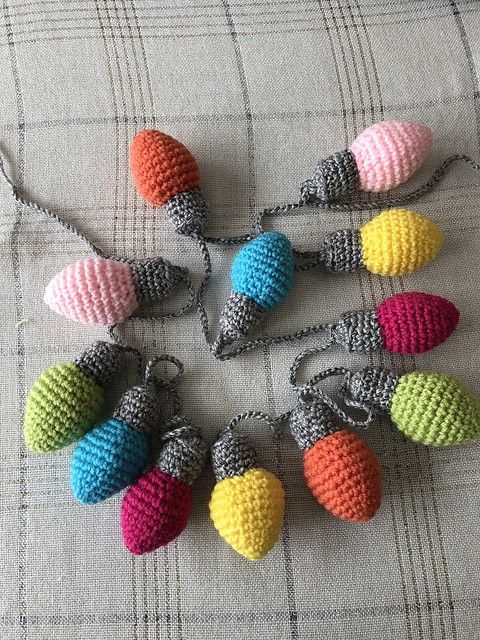
To begin forming the crocheted bulbs for your Christmas lights in crochet-Step by Step Tutorial, start with a magic ring or a small chain circle. This base is essential for shaping the rounded part of the light. After closing your magic ring, you will work several single crochet stitches into the center, increasing gradually to form the bulb’s wider middle section. Working in continuous rounds helps keep the shape smooth and seamless.
As you progress, the increases will create the light bulb’s iconic oval shape. This is the part where creativity shines through because different numbers of increases produce different sizes of bulbs. Following the Christmas lights in crochet-Step by Step Tutorial, you can experiment with various sizes to create a dynamic and visually interesting garland. Larger bulbs may require slightly more stuffing, while smaller ones remain lightweight and easy to handle.
Stuffing is an important step, as it helps the bulb maintain its shape. Use a small amount of fiberfill or leftover yarn scraps to gently fill the bulb before closing it. Avoid overstuffing, as it can distort the shape and make it difficult to crochet the final rounds. Soft, breathable stuffing helps the bulb stay round while remaining lightweight enough to hang easily.
Once the bulb is closed, it is time to crochet the top cap. This part is typically made in a contrasting color such as gray, silver, or gold to mimic the metal part of real Christmas lights. Following the Christmas lights in crochet-Step by Step Tutorial, the cap is formed using simple stitches and then slipped over the top of the bulb. It can be sewn in place using a yarn needle to ensure it stays secure and aligned.
After attaching the cap, you can add a small loop to the top if you plan to hang the bulbs individually on your tree. A simple chain serves as a perfect hanging loop. If you intend to create a garland, however, you will attach the bulbs later by stringing them together on a long crochet chain. Each method creates a beautiful decoration, and choosing the right one depends on your holiday décor style.
When you finish one bulb, continue the process using different colors to create a festive variety. Crocheting multiple bulbs becomes quicker and easier as you become familiar with the pattern. As you repeat these steps from the Christmas lights in crochet-Step by Step Tutorial, you will gain confidence and develop your own rhythm, making the creation process enjoyable and satisfying.
Once you have crocheted several bulbs, it is time to assemble your garland. Following the Christmas lights in crochet-Step by Step Tutorial, begin by making a long chain in a neutral or festive color. This chain will serve as the string that holds all your crocheted bulbs together. The length of the chain depends on how long you want your garland to be and how many bulbs you have created.
When your chain is ready, attach each bulb by sewing or crocheting it directly onto the chain. Spacing them evenly helps create a polished look. You can measure the intervals or simply estimate by eye. The handmade nature of your garland gives it charm, so perfect precision is not required. This ensures that your finished Christmas lights in crochet-Step by Step Tutorial project looks natural and beautifully arranged.
Consider adding small details to your bulbs or chain to make your garland more festive. Tiny bows made of ribbon, embroidered stars, or small beads can enhance the visual appeal of your decoration. These additions provide texture and dimension, making your garland stand out on your tree or mantlepiece.
Another creative detail is adding surface crochet to create the appearance of light reflections on the bulbs. Using a slightly lighter shade of yarn, surface crochet adds curved lines or sparkles that mimic how real lights shine. Although optional, these touches bring elegance to your Christmas lights in crochet-Step by Step Tutorial project.
If you want your garland to remain flexible for storage and future use, avoid attaching decorations that are too heavy. Lightweight embellishments work best and ensure the garland hangs properly. You can also block your garland lightly after assembly to help it lay flat and reduce twisting. Blocking is especially useful if your chain is curling more than desired.
Once your garland is complete, admire your work and try displaying it in different spots. It looks beautiful on Christmas trees, above doorways, around windows, or wrapped around stair railings. The versatility of crocheted Christmas lights makes them a favorite project for many crafters and a cherished part of holiday décor.
One of the best things about following a Christmas lights in crochet-Step by Step Tutorial is the freedom to personalize your creations. You can experiment with different yarn textures, such as metallic yarns, glossy cotton, or fluffy yarns, to create various visual effects. Metallic yarns add sparkle, while cotton provides a crisp, clean shape. Each type brings a unique charm to your bulbs.
Color combinations are another way to make your garland special. You can choose traditional Christmas colors, but you can also explore unique palettes such as winter pastels, jewel tones, or even monochrome themes. Selecting a palette that matches your home’s holiday decorations helps your handmade garland blend seamlessly into your décor.
You can also modify the bulb shape to create themed versions. For example, elongated bulbs, vintage-style lights, or mini Christmas lanterns all follow similar crochet principles. By adapting the pattern from the Christmas lights in crochet-Step by Step Tutorial, you can create different shapes without needing an entirely new pattern. This flexibility allows you to craft an entire collection of unique ornaments.
Personalization extends to adding names or initials to the bulbs. Simple embroidery or surface crochet allows you to incorporate personalized messages that make the garland more meaningful. This is especially thoughtful if you plan to give the ornaments as holiday gifts. Handmade items with personal touches are usually treasured for many years.
If you enjoy adding extra décor to your home, consider making multiple garlands using different themes. A candy-themed garland using bright pinks, blues, and greens creates a fun playful look. A rustic garland using natural-colored yarn adds a cozy, farmhouse-inspired touch. Whatever style you choose, the Christmas lights in crochet-Step by Step Tutorial provides the foundation for endless creativity.
Lastly, remember that crocheting Christmas lights is an enjoyable experience, not just a crafting task. Take your time, explore your creativity, and enjoy the festive spirit as you work. Your handmade decorations will carry not only beauty but also cherished memories of the effort and love you put into them.
Are crocheted Christmas lights difficult to make?
No, they are beginner-friendly. They use simple stitches such as chain stitch and single crochet, making them accessible to crafters of all levels.
How long does it take to crochet one light bulb?
Depending on your experience, one bulb usually takes between 10 and 20 minutes to complete.
Can I make the garland using leftover yarn?
Yes! This project is perfect for using yarn scraps because each bulb requires only a small amount.
Do the crocheted lights actually light up?
No, these are decorative ornaments. However, you can combine them with real lights by wrapping them carefully around LED strings.
How do I store crocheted Christmas lights after the holidays?
Store them in a clean, dry box and avoid heavy items on top to prevent deformation.
Can I wash the crocheted lights?
Yes, if needed. Hand-washing gently and air-drying is the best method to preserve their shape.
This Christmas lights in crochet-Step by Step Tutorial has guided you through choosing materials, crocheting bulbs, assembling the garland, and personalizing your decorations.
With simple stitches and a little creativity, you can create beautiful handmade lights that brighten your home and bring joy to your holiday season.
I hope this tutorial inspires you to continue crafting and exploring your creativity. Please leave your honest opinion and suggestions—I would love to hear your thoughts!


