
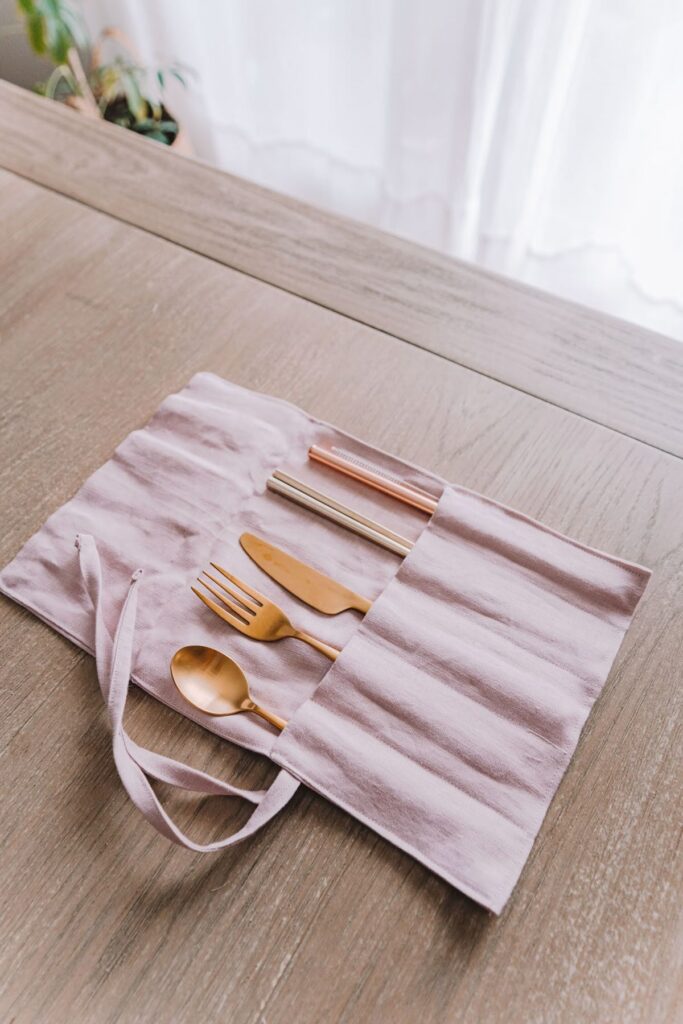
How to sew a fabric storage basket tutorial

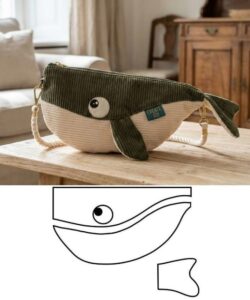
If you are looking for a practical and stylish way to organize your table setting, this easy to make fabric cutlery holder-Step by Step Tutorial is the perfect project for you. A fabric cutlery holder is not only functional but also adds a handmade charm to your dining experience. Whether you are planning a family dinner, a festive celebration, or simply want to keep your kitchen organized, this project is beginner-friendly and a fun sewing activity.
The best part of creating your own fabric cutlery holder is that you can customize it to match your kitchen décor or seasonal themes. From choosing colorful fabrics to experimenting with different patterns, you can make each holder unique. By following this Step by Step Tutorial, you will learn how to cut, sew, and finish a holder that can be reused over and over again. Not only is it eco-friendly, but it also reduces the need for disposable tableware.
Another reason to love this easy to make fabric cutlery holder project is its versatility. It can be used for everyday dining, special gatherings, or even as a thoughtful handmade gift for friends and family. By mastering this simple sewing craft, you will have the ability to create beautiful and practical table accessories with very little cost. Now let’s dive into the full Step by Step Tutorial and learn exactly how to create your own.
To start this easy to make fabric cutlery holder-Step by Step Tutorial, it’s important to gather all the materials beforehand. Having everything ready will make the process smoother and much more enjoyable. You don’t need expensive supplies, just a few basic items that most sewing enthusiasts already have at home.
First, you will need your choice of fabric. Cotton is the best option for beginners since it is easy to cut and sew. You can go for plain colors or prints depending on your style. Second, you will need scissors or a rotary cutter to ensure precise cuts. Sharp tools will help avoid frayed edges and make your project look neat.
Third, you will need thread that matches or contrasts with your fabric, depending on the look you want. Using a sewing machine is recommended for stronger stitches, but you can also sew by hand if you prefer. A ruler or measuring tape will help you keep the correct dimensions. Finally, you will need pins or fabric clips to hold everything in place before stitching.
Gathering your materials not only prepares you but also helps you visualize the final product. For example, you may decide to use festive fabrics for holidays or minimalist designs for everyday use. This flexibility makes the project enjoyable and creative. By the end of this step, you will already feel excited to see your cutlery holder taking shape.
Another tip is to prewash your fabric before starting. This prevents shrinkage and ensures your cutlery holder keeps its shape after being washed. This small step makes a big difference in the durability of your project. Beginners often skip this, but it’s a simple trick for a more professional finish.
Lastly, make sure your workspace is well-lit and organized. Having a clutter-free area will allow you to focus on cutting and sewing without distractions. With your materials ready, you’re now set to begin crafting your easy to make fabric cutlery holder.
The second step in this easy to make fabric cutlery holder-Step by Step Tutorial is cutting and preparing the fabric. This is where accuracy plays a big role, as precise measurements will ensure your final product looks polished and functional. Don’t worry if you’re a beginner—this part is easier than it sounds.
Start by measuring a rectangle of fabric around 14 x 18 inches. This size works well for holding standard cutlery like forks, knives, and spoons. If you want a larger or smaller holder, you can adjust the measurements accordingly. Once you mark your fabric with chalk or a fabric pen, carefully cut it with sharp scissors or a rotary cutter.
Next, you’ll want to prepare the edges. To prevent fraying, fold each edge inward about half an inch and press it with an iron. This not only secures the fabric but also gives your project a professional look. By pressing your folds before sewing, you’ll make the stitching process much easier.
Now, fold the fabric in half lengthwise to create the pocket for your cutlery. The lower portion of the fabric will form the pocket, while the upper portion remains open to display the cutlery neatly. Pin or clip the sides in place so the layers don’t shift while you sew.
At this stage, you can also add decorative touches. For example, you might stitch on a ribbon, lace trim, or even a personalized label. These details make your fabric cutlery holder unique and add a special handmade charm. Don’t be afraid to experiment with embellishments.
Double-check your measurements before moving on to sewing. Taking the time to confirm everything is aligned will save you from mistakes. Remember, accuracy in cutting and preparation ensures your final product will look neat and well-crafted.
Now comes the most exciting part of this easy to make fabric cutlery holder-Step by Step Tutorial—sewing it together. This step transforms your fabric pieces into a practical holder ready for use.
Start by sewing the hemmed edges of the fabric to secure them. Use a straight stitch along all sides, making sure to backstitch at the beginning and end for durability. Once your edges are sewn, fold the fabric again to create the pocket for your cutlery.
Next, sew along the two vertical sides of the folded fabric. This seals the pocket while leaving the top open. Be sure to stitch slowly and evenly to keep the lines straight. If you’re hand sewing, use a strong backstitch to ensure the seams can handle repeated use.
To create divisions for each piece of cutlery, sew vertical lines within the pocket. For example, you can make three sections—one for a fork, one for a knife, and one for a spoon. Use a ruler to measure equal spacing so the sections are neat and even.
Once your stitching is complete, trim any loose threads and press the holder with an iron. This step helps set the stitches and gives your cutlery holder a crisp, clean appearance. It’s a small detail, but it makes the project look more professional.
If you want to add extra functionality, you can attach a small loop or ribbon to the side of the holder. This makes it easy to roll up and tie the cutlery holder for storage or transport. This feature is especially handy if you plan to use it for picnics or travel.
By the end of this stage, you’ll have a fully functional fabric cutlery holder that looks beautiful and practical. It’s rewarding to see how simple fabric pieces transform into something so useful.
The final step in this easy to make fabric cutlery holder-Step by Step Tutorial is decorating and using your new creation. This is where you can really show off your creativity and personalize your project.
One option is to add embroidery or appliqué designs to your holder. For instance, stitching small flowers, initials, or seasonal motifs makes each holder unique. If you’re making them as gifts, you can personalize them with the recipient’s name.
Another idea is to use contrasting fabrics for the pocket and the backing. This creates a fun and stylish look. You can mix solid colors with patterned prints for a more modern design. The possibilities are endless, and this is where your creativity shines.
Once decorated, your holder is ready to be used. Place cutlery inside the sections and set it on the table for a neat and organized look. It instantly elevates the dining experience and adds a handmade touch to your setup.
These holders are not just for home use. They’re also perfect for outdoor gatherings, picnics, or parties. Instead of carrying loose cutlery, you can roll them up neatly in the holder, making it both practical and beautiful.
Over time, you may find yourself making several cutlery holders for different occasions. Holiday themes, birthday parties, or even everyday casual dining can all have their own versions. Once you start, it’s hard not to want a collection.
1. Can I wash my fabric cutlery holder?
Yes, most fabric cutlery holders can be machine-washed. Use mild detergent and cold water to preserve the fabric and stitching.
2. Do I need a sewing machine for this tutorial?
No, while a sewing machine makes the process faster, you can hand-sew your cutlery holder using basic stitches.
3. What type of fabric works best for this project?
Cotton is recommended for beginners because it’s easy to sew, but you can also use linen, canvas, or recycled fabric.
4. Can I make different sizes of cutlery holders?
Absolutely! You can adjust the measurements to fit children’s cutlery, picnic utensils, or even large serving spoons.
5. How long does it take to make one cutlery holder?
For beginners, it takes about one hour. With practice, you can finish one in 20–30 minutes.
6. Can I sell handmade fabric cutlery holders?
Yes, they make wonderful handmade products for craft fairs, online shops, or gifts. Just ensure good finishing for a professional look.
In this easy to make fabric cutlery holder-Step by Step Tutorial, you learned how to choose materials, cut and prepare fabric, sew the pieces, and add decorative touches. This project is practical, customizable, and beginner-friendly, making it an ideal sewing craft for anyone.
Now that you know how to create your own reusable fabric cutlery holder, it’s time to put your creativity into practice. Whether you’re making them for personal use, gifting, or selling, these holders add charm and function to any table setting.
I would love to hear your opinion! Share your thoughts and suggestions about this tutorial, and let me know how your cutlery holders turned out. Your feedback will help improve future projects and inspire more creative ideas.


