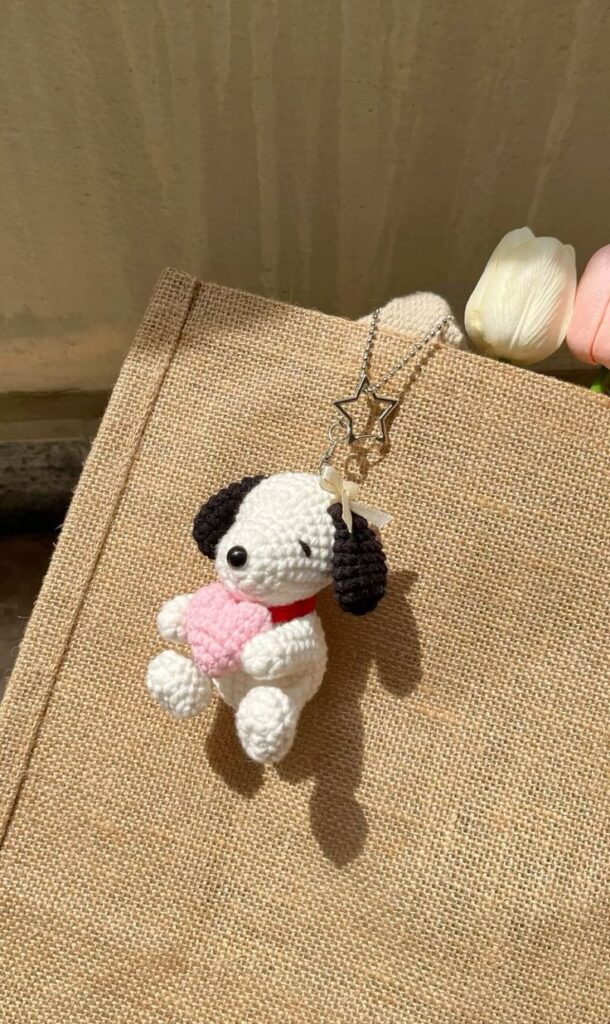
Crochet Snoopy Keychain: Step-by-Step Crochet Patterns and Complete Guide
Advertising
If you’re searching for a fun, quick, and adorable project, making a crochet Snoopy keychain is the perfect choice. The crochet Snoopy keychain is not only a cute accessory but also a wonderful gift idea for Peanuts fans. This project allows you to showcase your creativity while practicing your crochet skills with enjoyable and easy-to-follow crochet patterns.
The crochet Snoopy keychain is a small project but full of personality. Snoopy’s recognizable features come to life through detailed crochet patterns, making it a rewarding item to create. Whether you’re making it for yourself or as a handmade gift, this crochet Snoopy keychain will be a unique piece that is sure to bring smiles.
Advertising
In this article, you’ll find a complete guide on how to make a crochet Snoopy keychain, including step-by-step instructions, detailed fabric cuts, measurements, and recommended materials. By following the provided crochet patterns, you’ll be able to create an accurate and charming Snoopy miniature that fits perfectly as a keychain.
Image From Pinterest
Materials and Tools Needed for Your Crochet Snoopy Keychain
Before starting the crochet Snoopy keychain, make sure you gather all the essential tools and materials to complete the project efficiently. Having everything prepared will ensure a smooth crocheting experience.
Yarn Selection Choose soft acrylic or cotton yarn for the crochet Snoopy keychain. You will need white yarn for Snoopy’s body and black yarn for his ears, nose, and spots. You may also use red yarn if you want to add Snoopy’s iconic collar. Using the right yarn weight ensures your keychain is lightweight and durable.
Crochet Hook Size A 2.5 mm crochet hook is perfect for this project to keep the stitches tight and the keychain compact. Smaller hook sizes help prevent the stuffing from showing through the stitches.
Fabric and Keychain Hardware You don’t need fabric cuts for the structure, but if you’d like to add small fabric details, cut a 5 cm x 1 cm (2 in x 0.4 in) piece of red felt to create Snoopy’s collar. Also, make sure to have a metal keyring and a small lobster clasp to attach your finished Snoopy to your keys or bag.
Stuffing Material Use polyester fiberfill to gently stuff the crochet Snoopy keychain. The stuffing should be firm but not overfilled to maintain the keychain’s soft and squeezable texture.
Additional Accessories Prepare stitch markers, scissors, a yarn needle for sewing pieces together, and black embroidery thread to stitch Snoopy’s eyes and facial details.
Crochet Patterns Preparation Always review the complete crochet patterns before starting. Understanding each piece’s construction — the head, ears, body, and small details — helps you stay organized and ensures accurate assembly of the crochet Snoopy keychain.
How to Crochet the Basic Structure of the Snoopy Keychain
The crochet Snoopy keychain consists of several small pieces crocheted separately and then sewn together. Following each step carefully will help you create an adorable and well-proportioned keychain.
Crocheting Snoopy’s Head
Begin with white yarn.
Round 1: Make a magic ring and crochet 6 single crochets (SC) into the ring.
Round 2: Increase in each stitch (12 SC).
Round 3: (1 SC, increase) repeat around (18 SC).
Rounds 4-6: SC in each stitch.
Round 7: (1 SC, decrease) repeat around (12 SC).
Add stuffing and close the head.
Crocheting the Ears
Use black yarn.
Chain 5, SC in the second chain from the hook and across (4 SC).
Chain 1, turn, and SC across for 3 more rows.
Fasten off and make two ears. These will be flat and slightly floppy.
Crocheting the Body
Use white yarn.
Round 1: Magic ring with 6 SC.
Round 2: Increase in each stitch (12 SC).
Rounds 3-5: SC around.
Round 6: (1 SC, decrease) repeat around (8 SC).
Stuff the body lightly and close the opening.
Crocheting the Arms and Legs
Make 4 small tubes with white yarn.
Round 1: Magic ring with 5 SC.
Rounds 2-4: SC in each stitch.
No stuffing is needed for the limbs. Leave a long tail for sewing.
Crocheting the Tail
Chain 5, SC back across the chain.
Fasten off and leave a long tail to sew the tail to the back of the body.
Assembling the Pieces
Sew the head to the body.
Attach the ears to each side of the head.
Sew the arms and legs in place symmetrically.
Attach the tail at the lower back.
Embroider the eyes, nose, and mouth using black thread.
Adding Details and Finishing Your Crochet Snoopy Keychain
Finishing the crochet Snoopy keychain involves adding key details that bring Snoopy’s character to life. These finishing touches make your keychain truly special.
Advertising
Creating Snoopy’s Facial Expression
Use black embroidery thread to stitch small oval eyes.
Stitch a small triangular nose at the center.
Add a simple mouth with a curved stitch to make Snoopy look friendly and happy.
Attaching Snoopy’s Ears
Position the black ears slightly to the back of the head.
Sew securely but allow the ears to dangle for that classic Snoopy look.
Check that both ears are evenly placed.
Adding the Collar
Use the 5 cm x 1 cm (2 in x 0.4 in) red felt strip as Snoopy’s collar.
Wrap it around the neck and sew or glue it at the back.
Alternatively, crochet a small red chain to serve as a collar.
Securing the Keychain Attachment
Insert a small keyring or lobster clasp into the top of Snoopy’s head.
Sew securely around the base of the keyring to ensure it doesn’t slip out.
This step transforms your plush figure into a practical crochet Snoopy keychain.
Reinforcing All Parts
Double-check all seams, especially the limbs and keychain attachment.
Make sure all pieces are tightly secured to withstand daily use.
Trim excess threads and weave in all ends for a clean finish.
Optional Customization
Personalize your crochet Snoopy keychain with initials, beads, or additional small charms.
You can even experiment with different yarn colors to create themed variations.
These personal touches make your keychain unique and meaningful.
Tips for Care, Gift Ideas, and Creative Uses
Your crochet Snoopy keychain is now complete, but learning how to care for it and finding creative uses will help you enjoy it for a long time.
Proper Cleaning Tips
Since the keychain is small and delicate, spot clean with a damp cloth.
Avoid machine washing or soaking to protect the yarn and stuffing.
Let it air dry naturally, keeping it away from direct sunlight.
Storage Recommendations
Store your crochet Snoopy keychain in a clean, dry place when not in use.
Avoid placing it under heavy items to prevent flattening the structure.
Keeping it in a fabric pouch can help maintain its shape.
Perfect as a Handmade Gift
This crochet Snoopy keychain makes a thoughtful handmade gift for birthdays, holidays, or just because.
Personalizing it with the recipient’s favorite colors can make it even more special.
Attach a small note to the keychain to add a personal message.
Creative Uses Beyond a Keychain
Besides holding keys, you can attach your crochet Snoopy keychain to backpacks, purses, or pencil cases.
It can also serve as a cute zipper pull for jackets or bags.
You can even use it as a small ornament or part of a decorative mobile.
Expanding Your Crochet Collection
Once you complete your crochet Snoopy keychain, consider making other Peanuts characters to create a full set.
Experiment with different sizes to make matching plushies or charms.
This can be the start of a beautiful collection of handmade crochet items.
Showcasing Your Work
Share your finished crochet Snoopy keychain on social media or in crochet groups.
Use hashtags like #crochetSnoopyKeychain and #crochetpatterns to connect with other crocheters.
Participating in craft fairs is also a great way to display and sell your creations.
By following this complete guide, you now know exactly how to create your own crochet Snoopy keychain using easy-to-follow crochet patterns and simple materials. This project is not only fun and relaxing but also offers endless possibilities for creativity and personalization.
Whether you keep it for yourself or give it as a heartfelt gift, your handmade crochet Snoopy keychain will surely bring joy to everyone who sees it. Happy crocheting!
