Avocado Crochet 🥑: A Fun and Easy Amigurumi Pattern
Advertising
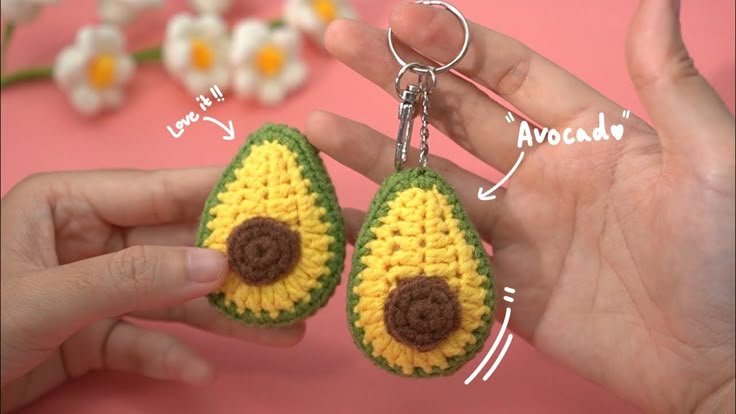
Creating adorable little fruits has never been more popular, and the Avocado Crochet 🥑 trend is at the top of the list! Whether you’re a beginner just learning the ropes or a seasoned yarn artist looking for a quick and satisfying project, making your own amigurumi avocado is the perfect way to combine creativity, fun, and function. With its charming design and soft texture, it makes an excellent keychain, toy, gift, or cheerful desk companion.
The art of amigurumi, which involves crocheting small stuffed toys or characters, has gained massive popularity over the last decade. These tiny creations are perfect for using up leftover yarn and letting your imagination run wild. An amigurumi pattern like this avocado allows for customization in color, size, and personality. Add a smiling face, blush cheeks, or even tiny accessories for extra cuteness.
Advertising
This tutorial will walk you through how to make your very own avocado crochet from start to finish. You’ll find material lists, yarn and stitch recommendations, exact measurements, and a clear step-by-step guide for beginners. Let’s dive into the green goodness!
To begin your amigurumi avocado, you’ll need some basic crochet tools and materials. This project is beginner-friendly and requires only a few supplies that are likely already in your yarn stash.
Yarn Selection: You will need three colors of yarn — green for the outer skin, light green for the inner flesh, and brown for the seed. Choose a worsted-weight cotton or acrylic yarn for best results.
Crochet Hook Size: A 3.5mm or 4mm crochet hook works well with worsted-weight yarn for this project. Smaller hooks create tighter stitches, perfect for stuffing.
Other Tools: Have your stitch marker, tapestry needle, polyester fiberfill stuffing, and scissors on hand. These are essential to shape and finish your avocado properly.
Safety Eyes and Embroidery Thread: If you want to give your avocado a cute personality, add 6mm safety eyes, some pink thread for blush, and black for a smile.
Size Guide: The finished amigurumi avocado will be approximately 4 inches tall and 3 inches wide, but this can vary based on your yarn and hook.
Optional Add-ons: Add a keychain ring at the top, a small magnet at the back, or even crochet a pair of legs and arms for a more whimsical result.
🥑 Step-by-Step Instructions to Make the Avocado Crochet
Now that you have everything you need, let’s start crafting your avocado amigurumi pattern. We’ll begin with the body, move on to the seed, and finish with assembly and optional details.
Start with the Avocado Flesh (Front Side) Using light green yarn, make a magic ring and work 6 single crochets (sc) into the ring. In the next round, increase in each stitch (12 sc). Continue increasing in a circular pattern until you have 36 sc total, shaping an oval by placing increases on only two ends. Crochet 6–8 rounds without increases to build height. Fasten off and weave in ends.
Create the Avocado Skin (Back Side) Repeat the same process using dark green yarn. Begin with a magic ring and work increases similar to the front side. Make the same stitch count and shape to match the front. Do not fasten off yet — this piece will help you join the front. Add an optional hanging loop now if making a keychain.
Crochet the Avocado Seed Use brown yarn to make a magic ring and 6 sc. Work in continuous rounds, increasing to 18 sc. Add 2–3 rounds without increases, then begin decreasing. Once you’re near the end, stuff the seed lightly with fiberfill and close the opening.
Add Eyes and Face (Optional) Position the safety eyes 5 stitches apart, roughly 4 rows down from the top of the front piece. Use embroidery floss to stitch a smile and blush cheeks. These small details give your avocado a sweet and inviting expression.
Join the Front and Back Place the front and back pieces together with the wrong sides facing inward. Using dark green yarn (to match the back), single crochet around the edges to join. As you go, stuff lightly with fiberfill to give shape. Leave the top open slightly for final adjustments, then finish closing.
Sew the Seed to the Center Center the seed on the front side of the avocado. Use brown yarn and a tapestry needle to sew it securely in place. Make sure stitches are tight and discreet. Now your avocado is complete!
💡 Tips to Customize Your Amigurumi Avocado
Your avocado crochet doesn’t have to stop with the basic pattern. There are so many fun and quirky ways to personalize your plushie and bring out its character.
Advertising
Add Accessories Crochet a tiny hat, bow tie, or scarf. This is a fun way to celebrate seasons or holidays with your avocado. Halloween? Tiny witch hat. Christmas? A Santa cap!
Make a Pair Avocados are better with a partner! Make a second one with a smiling face or winking expression and gift them as best friend keepsakes.
Use Variegated Yarn Want a unique look? Try variegated or speckled yarns for the avocado flesh or skin. It gives the illusion of texture and natural avocado mottling.
Turn It Into a Keychain or Bag Charm Sew a keyring loop at the top or attach a clip to create a cute and useful accessory. These make fantastic gifts for kids and adults alike.
Change the Size Using thinner yarn and a smaller hook will make a tiny avocado. Bulky yarn and a 6mm hook will create a pillow-sized plushie!
Add Aromatherapy Before closing your plush, insert a small lavender sachet or essential oil-soaked cotton. It turns your crochet into a calming and functional decor piece.
📦 Storage, Gifting & Selling Avocado Crochet
Your finished amigurumi avocado makes a delightful handmade item. Whether you’re gifting it, keeping it, or selling it, there are some tips to ensure it shines.
Gifting Tips Wrap your avocado crochet in eco-friendly packaging like kraft paper or a reusable fabric pouch. Add a handwritten tag for a personalized touch.
Storing Properly Store amigurumi in a cool, dry place away from direct sunlight. This helps prevent fading and preserves yarn quality.
Selling Your Avocados These plushies are a hit at craft fairs and online shops. Add details in your listings about size, materials, and optional customization.
Product Tags Attach small branded tags or labels if you’re selling. Include washing instructions (usually handwash with mild soap and air dry).
Social Media Sharing Show off your creation on Instagram or Pinterest! Use hashtags like #avocadocrochet #amigurumipattern #crochettoy to reach a wider audience.
Bundle with Other Fruits Create a fruit set — strawberries, bananas, and avocados — for themed collections. These sets are especially popular as nursery decor or photo props.
The Avocado Crochet 🥑 project is a joyful way to explore the art of amigurumi while creating something playful and adorable. With just a few basic supplies and a little time, you can craft a piece that brings a smile to your face (and others’). The charm of the avocado shape, combined with the versatility of amigurumi patterns, makes it a must-try for any crochet enthusiast.
So grab your yarn and hook, and get started with this easy and lovable amigurumi pattern. Whether you’re gifting, decorating, or selling, this little avocado will surely make hearts melt and creativity bloom!


