🦆 Crochet Duck Tutorial – A Cute Amigurumi Pattern for All Skill Levels
Advertising
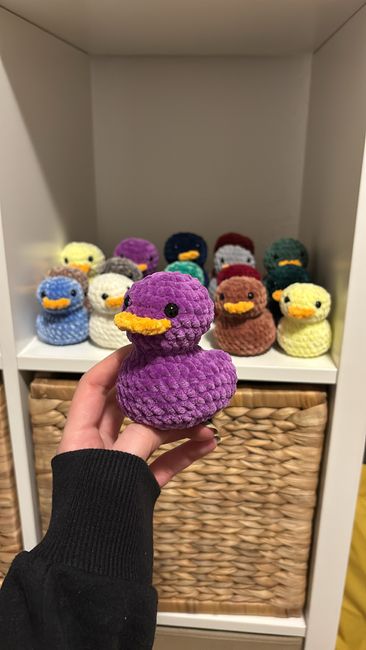
If you’re looking to add an adorable project to your amigurumi collection, this Crochet Duck Tutorial is perfect for you! With its round body, tiny beak, and charming wings, this duck is easy to make and hard to resist. Whether you’re a beginner just learning how to crochet or an experienced artist looking for a relaxing project, this amigurumi pattern offers the perfect mix of simplicity and charm.
The popularity of amigurumi has exploded in recent years, with crocheters around the world falling in love with small, handmade stuffed animals and characters. One of the most beloved animals in this craft is the classic duck—bright, cheerful, and perfect as a toy, decoration, or gift. Plus, with just a few materials and minimal time, you can create your own soft and squishy duck friend.
Advertising
In this post, you’ll find everything you need: a full list of materials, stitch recommendations, and a complete step-by-step guide to crafting your own crochet duck. This Crochet Duck Tutorial is designed with beginners in mind, but produces a polished result that advanced crafters will love too.
Before diving into your project, let’s gather everything you’ll need to make your amigurumi duck come to life. Choosing the right materials ensures your final piece is soft, sturdy, and irresistibly cute.
Yarn Choices Use worsted-weight yarn for the best shape and structure. You’ll need:
Yellow yarn for the duck’s body and wings
Orange yarn for the beak and feet
Optional: Black yarn or safety eyes for the face
Crochet Hook Size A 3.5mm (E) crochet hook is recommended for this yarn weight. A smaller hook keeps your stitches tight so that the stuffing won’t show through.
Stuffing Materials Polyester fiberfill stuffing gives your amigurumi pattern a plush, squeezable feel. Stuff lightly to avoid stretching the stitches too much.
Other Tools You’ll need a tapestry needle for sewing parts together, stitch markers to keep track of rounds, and scissors.
Safety Eyes or Embroidery Floss For eyes, you can use 6mm safety eyes or embroider them using black yarn. Safety eyes are easy to insert before closing the head.
Final Size The finished duck will measure approximately 4 to 5 inches tall, making it ideal for a child’s toy, shelf decoration, or Easter basket filler.
🐣 How to Crochet the Duck’s Body and Head
We’ll begin the Crochet Duck Tutorial by creating the body and head in one continuous piece, starting from the top of the head and working down.
Round 1 – Magic Ring Start with a magic ring using yellow yarn. Work 6 single crochets (sc) into the ring and pull tight.
Round 2 – Increase Work 2 sc into each stitch around (12 stitches). Use a stitch marker to mark the start of your round.
Rounds 3–6 – More Increases Continue increasing in a circular fashion until you reach 36 stitches. Your shape should resemble a small dome.
Rounds 7–12 – Maintain Size Crochet in a spiral for 6 rounds without increasing. This forms the top and sides of the head.
Insert Safety Eyes Place the safety eyes about 5 stitches apart, centered on the front. This is a good time to embroider any facial features as well.
Rounds 13–20 – Shape the Body Gradually increase again until you reach 42–48 stitches, and then hold steady for several rounds. Begin decreasing gradually to close the base, remembering to add stuffing before sealing it completely.
🐤 Beak, Wings, and Feet Instructions
Once the main body is complete, it’s time to add the details that give your amigurumi duck its distinctive personality and style. Let’s break down each part step-by-step.
Advertising
Crochet the Beak Using orange yarn, chain 4. Work 2 sc in the second chain from the hook, 1 sc in next, and 2 sc in the last. Turn, and mirror the other side. Fasten off and leave a tail for sewing.
Attach the Beak Sew the beak onto the head, between the eyes, about 2–3 rounds below the eye placement. Adjust the shape as you stitch to create a slight curve.
Create the Wings (Make 2) Use yellow yarn.
Round 1: Magic ring with 6 sc.
Round 2: Increase to 12 sc.
Rounds 3–4: Sc around.
Flatten and fasten off, leaving a tail.
Sew Wings to Body Attach the wings to either side of the duck’s body. Position them slightly toward the upper half of the torso for a natural appearance.
Crochet the Feet (Make 2) Use orange yarn. Chain 5. Turn and sc across. Chain 1, turn again, and make 3 picots (chain 3, slip stitch in same stitch) across the row for the toes.
Secure the Feet Sew the feet to the bottom of the duck’s body, spaced evenly. You can add extra stitches for stability if the duck will be standing upright.
✨ Optional Features & Finishing Touches
Now that your main pieces are assembled, it’s time to personalize and perfect your duck. Small details can turn a cute project into an unforgettable one!
Add a Bow or Hat Crochet a mini bowtie or top hat to give your duck extra charm. Use contrasting colors like blue, pink, or green for visual pop.
Create a Girl or Boy Duck Add embroidered lashes for a feminine look, or use blushing cheeks and a pastel scarf. Customize each one for gifting!
Keychain or Ornament Option Before closing the top of the head, insert a loop of yarn or a metal ring. Now your amigurumi duck becomes a bag charm or hanging ornament.
Add Texture with Yarn Choice Try using chenille or velvet yarn for a super soft duck, or cotton for a more defined stitch texture. The type of yarn completely changes the personality of the duck.
Make a Family of Ducks Create a mama duck and several ducklings in smaller sizes using thinner yarn and smaller hooks. Display them in a basket or diorama.
Secure All Parts Tightly If you’re giving this to a child, make sure all pieces are firmly attached and safety eyes are secure. You can substitute eyes with embroidery for extra safety.
🎁 Gift Ideas and Display Options
Your new amigurumi duck is adorable on its own, but with a bit of creativity, it becomes a delightful gift, decoration, or collectible. Here’s how to share your work.
Nursery Decor Add your duck to a mobile or place on a nursery shelf. Its cheerful face brightens up any baby’s room.
Easter or Spring Gifts Place the duck in an Easter basket or wrap it as a spring-themed gift. Add a name tag or matching egg for extra sweetness.
Craft Fair Sales Amigurumi patterns like this duck are best-sellers at markets. Offer a variety of colors or pair with other animal designs.
Educational Toys Use your duck in storytime or educational games for toddlers. It’s a great tool for interactive play.
Social Media Sharing Take pictures of your finished duck and post on Instagram or Pinterest using hashtags like #amigurumi, #crochetduck, and #amigurumipattern to connect with other crafters.
Packaging Ideas Present your duck in a clear gift bag tied with a ribbon. Add a small card that includes care instructions: “Spot clean only. Not intended for rough play.”
Creating your own Crochet Duck Tutorial project is more than just a crafting experience—it’s a joyful journey from a ball of yarn to a lovable companion. With just a few stitches and a little patience, you can transform simple materials into a character full of life and charm. This amigurumi pattern is perfect for beginners and fun for experienced crafters too.
Now that you know how to crochet a duck from start to finish, grab your yarn and hook, and get started today. You might just find yourself making an entire duck family!
