
Crochet Cowboy Hat Pattern

Crocheted pumpkin coaster tutorial is a cozy and creative way to bring seasonal charm into your home while practicing essential crochet skills. A Crocheted pumpkin coaster tutorial is perfect for crafters who enjoy making functional items that also serve as decorative accents, especially during autumn. With warm colors, soft textures, and a playful design, this project can easily become a favorite for both beginners and experienced crocheters.
The beauty of a Crocheted pumpkin coaster tutorial lies in its simplicity and versatility. You can adapt the size, yarn type, and color palette to suit your personal style or seasonal decor. Whether you prefer classic orange pumpkins or more modern neutral tones, a Crocheted pumpkin coaster tutorial allows you to express your creativity while making something useful. These coasters can also be gifted or sold as part of a handmade collection.
Working through a Crocheted pumpkin coaster tutorial is also a great way to build confidence in crochet techniques. From learning how to shape a rounded base to adding textured ridges that resemble a pumpkin, each step offers valuable practice. Over time, you will improve your stitch consistency, tension control, and finishing skills, all while enjoying a relaxing and rewarding crafting experience.
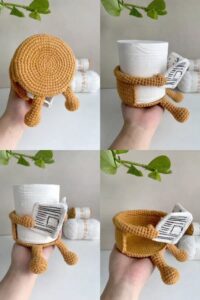
A Crocheted pumpkin coaster tutorial typically begins with creating a circular base that forms the body of the pumpkin. This is usually done using basic stitches like single crochet or half double crochet worked in rounds.
The structure of a Crocheted pumpkin coaster tutorial often includes subtle shaping techniques. These help create the slightly segmented look that resembles a real pumpkin, adding visual interest to the design.
Choosing the right yarn is essential for a successful Crocheted pumpkin coaster tutorial. Cotton yarn is highly recommended because it is durable, absorbent, and able to withstand heat from cups and mugs.
Color selection plays a key role in a Crocheted pumpkin coaster tutorial. Traditional orange shades are popular, but you can also experiment with white, green, or even pastel tones for a modern twist.
Hook size can affect the final result of your Crocheted pumpkin coaster tutorial. A smaller hook creates tighter stitches, making the coaster more sturdy and long-lasting.
Understanding crochet abbreviations and pattern instructions is important when following a Crocheted pumpkin coaster tutorial. Familiarity with basic terms will make the process smoother and more enjoyable.
To start your Crocheted pumpkin coaster tutorial, create a magic ring or chain loop. This will serve as the center of your pumpkin shape and provide a solid foundation.
Continue your Crocheted pumpkin coaster tutorial by working in rounds and increasing stitches evenly. This ensures that the coaster remains flat and evenly shaped.
As you build your Crocheted pumpkin coaster tutorial, you can add texture by working in back loops only or using front post stitches. These techniques create the ridges that resemble a pumpkin.
Once the base is complete, shape your Crocheted pumpkin coaster tutorial by slightly adjusting stitch placement. This helps define the pumpkin segments and gives the design a realistic look.
Next, create the stem for your Crocheted pumpkin coaster tutorial using a contrasting yarn color such as brown or dark green. This small detail adds character to the piece.
Finally, finish your Crocheted pumpkin coaster tutorial by fastening off the yarn and weaving in all loose ends. This ensures a clean and polished final product.
One of the most exciting aspects of a Crocheted pumpkin coaster tutorial is the ability to customize it. You can create pumpkins in different sizes for a varied and interesting set.
Adding layered textures is a great way to enhance your Crocheted pumpkin coaster tutorial. Using bobble stitches or puff stitches can give the pumpkin a more dimensional appearance.
Color experimentation is another fun option in a Crocheted pumpkin coaster tutorial. Try using non-traditional colors like blue, gray, or even metallic yarns for a unique design.
You can also incorporate embroidery into your Crocheted pumpkin coaster tutorial. Small stitched details can add personality and make each coaster one of a kind.
Another variation of the Crocheted pumpkin coaster tutorial includes adding a decorative border. A scalloped or picot edge can give the coaster a more finished and elegant look.
Creating themed sets is a popular idea when working with a Crocheted pumpkin coaster tutorial. Combine pumpkins with other seasonal shapes like leaves or acorns for a cohesive collection.
Consistency is essential when following a Crocheted pumpkin coaster tutorial. Keeping your stitches even will result in a more professional and polished appearance.
Using high-quality materials can improve the outcome of your Crocheted pumpkin coaster tutorial. Good yarn and the right hook size make a noticeable difference.
Take your time while working on a Crocheted pumpkin coaster tutorial. Rushing can lead to uneven stitches or mistakes, so it’s important to work at a comfortable pace.
Blocking your finished Crocheted pumpkin coaster tutorial can help enhance its shape. Lightly dampen the coaster and allow it to dry flat for best results.
Practice is key to mastering any Crocheted pumpkin coaster tutorial. The more you create, the more confident and skilled you will become.
Don’t be afraid to experiment with your Crocheted pumpkin coaster tutorial. Adding personal touches makes your creations unique and more meaningful.
What is a Crocheted pumpkin coaster tutorial?
A Crocheted pumpkin coaster tutorial is a step-by-step guide that teaches how to create a coaster shaped like a pumpkin using crochet techniques.
Is a Crocheted pumpkin coaster tutorial suitable for beginners?
Yes, most designs use basic stitches, making a Crocheted pumpkin coaster tutorial accessible for beginners with some basic knowledge.
What type of yarn is best for a Crocheted pumpkin coaster tutorial?
Cotton yarn is recommended because it is durable, absorbent, and heat-resistant.
How long does it take to complete a Crocheted pumpkin coaster tutorial?
Typically, it takes between one to two hours depending on the complexity of the pattern and your skill level.
Can I wash items made from a Crocheted pumpkin coaster tutorial?
Yes, most coasters can be washed gently by hand or in a machine using a mild cycle.
Can I sell products made from a Crocheted pumpkin coaster tutorial?
Yes, handmade pumpkin coasters are popular items and can be sold at craft fairs or as part of a small business.
The Crocheted pumpkin coaster tutorial is a wonderful project that combines creativity, practicality, and seasonal charm. Throughout this article, you learned about the basics, step-by-step instructions, creative variations, and helpful tips to improve your crochet skills.
By experimenting with colors, textures, and techniques, you can create unique pieces that reflect your personal style. A Crocheted pumpkin coaster tutorial is perfect for decorating your home, gifting, or even starting a small handmade business.
Now it’s your turn to try the Crocheted pumpkin coaster tutorial and enjoy the process of making something special. Share your honest opinion about this guide and feel free to leave suggestions for improvement. Your feedback is valuable and helps create even better content for the crafting community.


