
Twisted Post Quilt Pattern

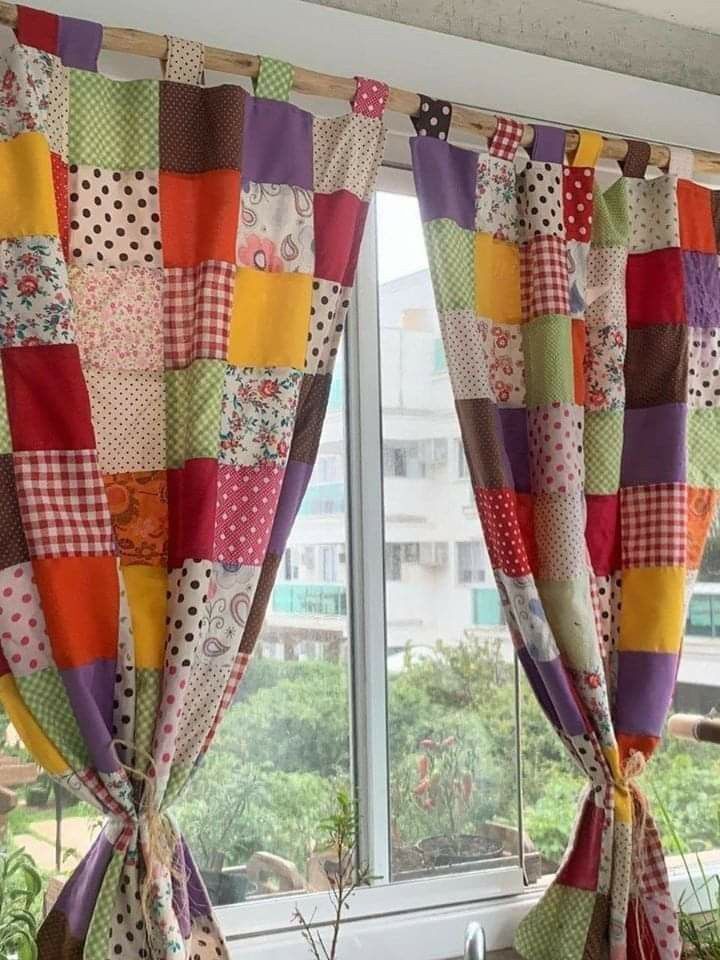
Patchwork curtain tutorial is a wonderful way to transform small fabric pieces into a beautiful and functional home decoration. This Patchwork curtain tutorial introduces a creative sewing project that allows beginners and experienced crafters to combine colors, textures, and patterns to produce a unique curtain design. Patchwork has been loved for generations because it turns leftover fabric into artistic creations that add warmth and personality to any room. By following a structured Patchwork curtain tutorial, you can learn how to assemble fabric pieces in a balanced way while creating something useful for your home.
A carefully planned Patchwork curtain tutorial not only teaches sewing techniques but also encourages creativity and design skills. Curtains play an important role in interior spaces, helping control light, add privacy, and enhance decoration. When you make your own patchwork curtain, you have full control over the colors, sizes, and layout of the fabric blocks. This flexibility allows the project to match different interior styles, from rustic kitchens to cozy craft rooms.
Another reason many people enjoy a Patchwork curtain tutorial is the opportunity to reuse fabric scraps in a meaningful way. Instead of discarding leftover materials from other sewing projects, patchwork allows you to transform them into something beautiful and practical. This process supports sustainable crafting while encouraging thoughtful creativity. Throughout this guide, you will learn how to prepare materials, assemble patchwork blocks, sew the curtain structure, and add finishing touches that make your curtain both decorative and functional.
Before beginning a Patchwork curtain tutorial, it is important to gather the materials needed for the project. Preparing your supplies in advance ensures that the sewing process goes smoothly and helps you stay organized. Most of the materials required are basic sewing tools and fabric pieces.
The most essential element in a Patchwork curtain tutorial is fabric. Patchwork works best with cotton fabric because it is easy to sew and holds its shape well. Many crafters like to combine different colors and patterns to create visually interesting designs.
Another important supply in a Patchwork curtain tutorial is sewing thread. Choosing strong thread that complements your fabric colors helps ensure the curtain remains durable while maintaining an attractive appearance.
Scissors or a rotary cutter are also necessary tools when following a Patchwork curtain tutorial. Accurate cutting is essential in patchwork projects because evenly sized fabric pieces help the pattern align properly.
Pins or sewing clips are extremely useful in a Patchwork curtain tutorial. They keep the fabric pieces in place while sewing, which helps prevent shifting and ensures straight seams.
Finally, a sewing machine or hand sewing needle is required to complete the Patchwork curtain tutorial. While a sewing machine allows faster assembly, patchwork curtains can also be made by hand with careful stitching.
The first step in a Patchwork curtain tutorial is deciding the size of the curtain. Measuring the window accurately helps determine how many patchwork blocks will be required and how large each block should be.
After taking measurements, the Patchwork curtain tutorial continues with cutting the fabric squares or rectangles. Keeping the pieces consistent in size is essential because it ensures the final curtain appears balanced and well-structured.
Once the pieces are prepared, the next stage of the Patchwork curtain tutorial involves arranging the fabric pieces in a layout. Many crafters place the pieces on a flat surface to experiment with color combinations before sewing.
After the layout is finalized, the Patchwork curtain tutorial moves on to sewing the pieces together in rows. Each row is stitched carefully, maintaining consistent seam allowances to ensure proper alignment.
When the rows are completed, the Patchwork curtain tutorial involves joining the rows together to form the full patchwork panel. This stage gradually reveals the full pattern and design of the curtain.
The final step in the Patchwork curtain tutorial includes adding the top casing or loops for hanging. This allows the curtain rod to pass through the fabric so the curtain can be displayed properly.
One of the most enjoyable parts of a Patchwork curtain tutorial is selecting the color palette. Bright and cheerful colors can create a lively atmosphere, while soft neutral tones produce a calm and elegant effect.
Another creative idea in a Patchwork curtain tutorial is mixing different fabric patterns. Floral prints, geometric designs, and solid colors can work together to create a visually dynamic curtain.
Many crafters enjoy experimenting with different patchwork block shapes during a Patchwork curtain tutorial. Instead of simple squares, triangles or diamond shapes can add complexity and artistic interest.
Adding embroidery is another way to personalize a Patchwork curtain tutorial project. Small stitched motifs or decorative lines can highlight certain fabric sections and create additional texture.
A border frame is another popular element in a Patchwork curtain tutorial. Sewing a solid fabric border around the patchwork panel helps define the curtain and gives it a polished appearance.
Finally, layering fabrics can enhance the design of a Patchwork curtain tutorial. Adding a light lining behind the patchwork curtain improves durability and helps control the amount of sunlight entering the room.
Maintaining accurate measurements is one of the most important aspects of a Patchwork curtain tutorial. Even small measurement differences can affect how well the fabric pieces fit together.
Another useful tip for a Patchwork curtain tutorial is pressing the seams after sewing each row. Ironing the seams flat helps the patchwork panel look smooth and professional.
Consistency in seam allowance is also crucial during a Patchwork curtain tutorial. Uniform seam allowances ensure that the patchwork blocks align neatly across the curtain.
Planning the layout carefully can improve the results of a Patchwork curtain tutorial. Taking time to arrange the pieces before sewing allows you to adjust the color balance and visual flow.
Using quality thread and fabric is another important factor in a Patchwork curtain tutorial. Durable materials help the curtain maintain its shape and appearance over time.
Finally, patience and creativity are key elements in completing a Patchwork curtain tutorial. Taking time to enjoy the process often results in a more satisfying and beautifully crafted curtain.
What skill level is required for a Patchwork curtain tutorial?
A Patchwork curtain tutorial can be completed by beginners who know basic sewing techniques such as straight stitching and fabric cutting.
What fabrics work best in a Patchwork curtain tutorial?
Cotton fabrics are commonly used in a Patchwork curtain tutorial because they are easy to sew and maintain consistent shapes.
How long does a Patchwork curtain tutorial project usually take?
The time required for a Patchwork curtain tutorial depends on the size of the curtain and the complexity of the patchwork pattern.
Can I use leftover fabric scraps in a Patchwork curtain tutorial?
Yes, many people enjoy using leftover fabric pieces in a Patchwork curtain tutorial because it allows them to create unique designs while reducing waste.
Do patchwork curtains need lining?
While not required, adding lining during a Patchwork curtain tutorial can increase durability and improve light control.
Can patchwork curtains match different home styles?
Yes, a Patchwork curtain tutorial can be adapted to match many interior styles by adjusting fabric colors, patterns, and block designs.
This article presented a complete Patchwork curtain tutorial, explaining the materials needed, the step-by-step sewing process, creative design possibilities, and helpful tips for achieving professional results. By following this guide, you can transform simple fabric pieces into a decorative curtain that adds warmth and personality to your home.
Working on a Patchwork curtain tutorial not only improves sewing skills but also encourages creativity and resourcefulness. The project allows you to reuse fabric scraps, experiment with patterns, and create something truly unique.
If you enjoyed this guide, feel free to share your honest opinion and suggestions. Your feedback is valuable and helps inspire new ideas and future sewing tutorials for creative home projects.


