
Crochet Cowboy Hat Pattern

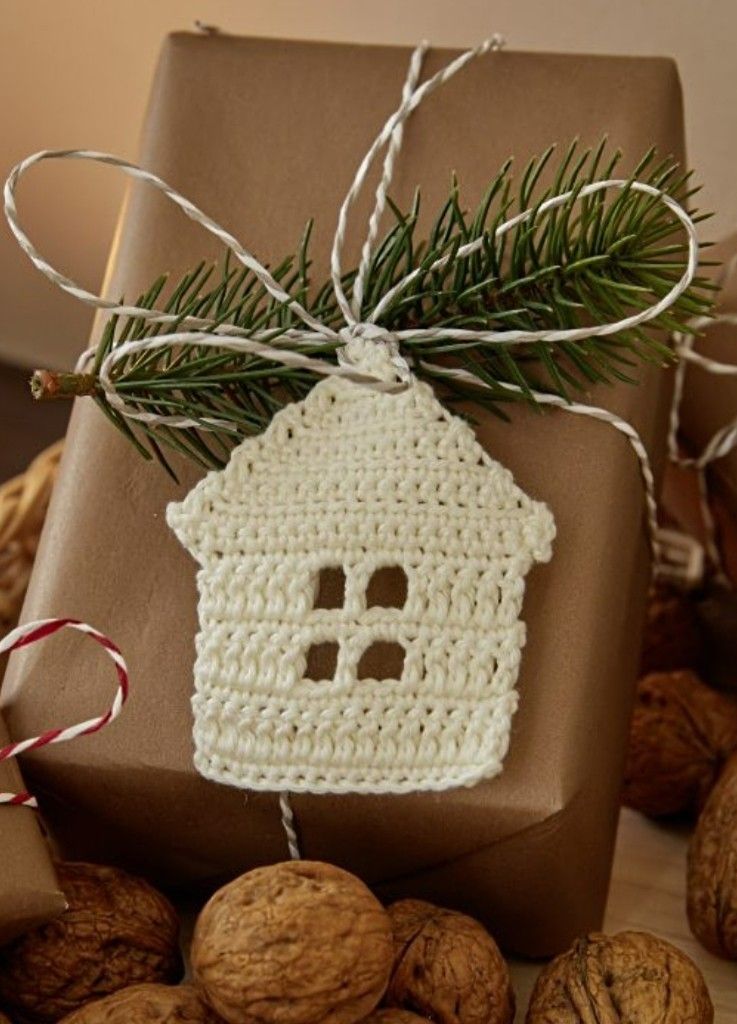
Crochet house tutorial for hanging is a charming and creative way to combine crochet skills with decorative home accents. This Crochet house tutorial for hanging introduces a delightful handmade project that allows crafters to create small decorative houses using yarn and simple crochet techniques. These tiny crochet houses can be used as wall décor, ornaments, seasonal decorations, or thoughtful handmade gifts. Because the project is small and flexible, it is suitable for beginners while still offering plenty of creative possibilities for more experienced crocheters.
A well-designed Crochet house tutorial for hanging is also an excellent opportunity to practice important crochet techniques such as shaping, color changes, and finishing details. Many crafters enjoy making decorative crochet items because they provide a relaxing and rewarding experience. With just a few basic materials and some patience, yarn can be transformed into an adorable hanging decoration that brings warmth and personality to any room.
Another benefit of following a Crochet house tutorial for hanging is the ability to personalize every detail of the design. From colorful roofs and textured walls to embroidered windows and doors, each crochet house can become a unique creation. Handmade decorations like these are especially popular for craft fairs, home décor collections, or seasonal displays. By the end of this guide, you will understand the materials, techniques, and creative ideas needed to successfully complete your own crochet hanging house.
Before starting a Crochet house tutorial for hanging, gathering the correct materials will help ensure a smooth and enjoyable crafting experience. Preparing all tools and supplies in advance allows you to focus on the creative process without interruptions. Fortunately, most of the materials needed are simple and commonly found in crochet kits.
The most important material in a Crochet house tutorial for hanging is yarn. Cotton yarn is often recommended because it creates a structured and neat appearance. However, acrylic yarn can also be used if you prefer a softer texture or want to experiment with different colors.
Another essential tool in a Crochet house tutorial for hanging is the crochet hook. Choosing the correct hook size based on your yarn helps create consistent stitches. Many crocheters prefer a slightly smaller hook for decorative items so that the stitches remain tight and well-defined.
Scissors are also necessary when working on a Crochet house tutorial for hanging. Sharp scissors allow you to cut yarn cleanly and precisely, which helps maintain a tidy finish throughout the project.
A yarn needle is another useful tool in a Crochet house tutorial for hanging. This needle is used to weave in loose yarn ends and to sew decorative elements such as windows, doors, or roof details onto the crochet house.
Finally, small embellishments can enhance the final design in a Crochet house tutorial for hanging. Buttons, embroidery thread, or small beads can be used to create charming details that bring the miniature house to life.
The first step in a Crochet house tutorial for hanging is creating the base shape of the house. This is usually done by crocheting a small rectangular piece that forms the walls of the house. Basic stitches such as single crochet or half double crochet are commonly used.
Once the base structure is created in the Crochet house tutorial for hanging, the next step is shaping the roof. The roof is often crocheted as a triangular piece that sits on top of the rectangle. Color changes can be used to make the roof stand out from the walls.
Another part of the Crochet house tutorial for hanging involves adding texture and details. Some crocheters like to include raised stitches or small decorative patterns to give the house a more interesting appearance.
After the main parts are crocheted, the Crochet house tutorial for hanging continues with assembling the pieces. The roof is attached to the house walls using a yarn needle or slip stitches, creating the recognizable house silhouette.
Next, a small loop is added during the Crochet house tutorial for hanging so the decoration can be hung. This loop is typically made using chain stitches and secured firmly to ensure durability.
The final step in the Crochet house tutorial for hanging involves decorating the house with embroidered windows, doors, or small accents. These finishing touches transform the project into a charming decorative piece.
One of the most exciting aspects of a Crochet house tutorial for hanging is the freedom to experiment with different colors and textures. Bright yarn colors can create playful houses, while neutral tones can produce elegant and minimalist decorations.
Seasonal themes can also be incorporated into a Crochet house tutorial for hanging. For example, pastel colors work beautifully for spring decorations, while warm tones like red and gold can be used for festive holiday designs.
Another creative approach in a Crochet house tutorial for hanging is adding multiple layers of texture. This can be done by using different stitch patterns or combining yarn types to give the house a unique appearance.
Many crafters enjoy turning the Crochet house tutorial for hanging project into a decorative garland. By making several small crochet houses and connecting them with yarn or ribbon, you can create a beautiful wall or window decoration.
Personalization is another wonderful possibility in a Crochet house tutorial for hanging. Embroidering initials, small hearts, or tiny flowers on the house can make the decoration more meaningful and unique.
Finally, combining several crochet houses of different sizes can enhance a Crochet house tutorial for hanging display. This arrangement creates a charming village-like decoration that looks beautiful in craft rooms or living spaces.
Maintaining consistent tension is one of the most important skills when working on a Crochet house tutorial for hanging. Even stitches help the house shape remain balanced and visually appealing.
Another helpful tip in a Crochet house tutorial for hanging is to count your stitches carefully. Keeping track of stitches prevents uneven edges and ensures that each section fits together properly.
Using stitch markers can make the Crochet house tutorial for hanging process easier, especially when working with shaping or color changes. Stitch markers help identify important points in the pattern.
Blocking your finished crochet pieces can also improve the appearance of your Crochet house tutorial for hanging project. Blocking helps straighten edges and gives the house a more polished look.
Practicing on small swatches before beginning the full Crochet house tutorial for hanging can help build confidence. This practice allows you to test stitch patterns and adjust your tension if needed.
Finally, patience and creativity are essential when completing a Crochet house tutorial for hanging. Taking your time ensures that every detail is carefully crafted and that the final result reflects your personal style.
What skill level is required for a Crochet house tutorial for hanging?
Most beginners can complete a Crochet house tutorial for hanging if they know basic crochet stitches such as chain stitches and single crochet.
What type of yarn works best for a Crochet house tutorial for hanging?
Cotton yarn is commonly recommended in a Crochet house tutorial for hanging because it provides good structure and durability for decorative pieces.
How long does a Crochet house tutorial for hanging project usually take?
Depending on the size and level of detail, a Crochet house tutorial for hanging can take anywhere from one hour to a few hours to complete.
Can I customize the design of my crochet house?
Yes, a Crochet house tutorial for hanging can easily be customized using different colors, stitch patterns, and decorative elements.
What are common uses for crochet hanging houses?
Items created through a Crochet house tutorial for hanging can be used as wall decorations, ornaments, gift tags, or decorative garlands.
Is this project suitable for handmade gifts?
Absolutely. A piece made through a Crochet house tutorial for hanging can make a thoughtful and creative handmade gift.
This article explored a complete Crochet house tutorial for hanging, explaining the materials required, the step-by-step process, creative design ideas, and practical tips to help you succeed. By following this guide, you can create a charming decorative crochet house while improving your crochet skills and confidence.
Working on a Crochet house tutorial for hanging allows you to combine creativity with craftsmanship, turning simple yarn into a delightful handmade decoration. Whether you use your crochet house as home décor, a seasonal ornament, or a personalized gift, the project offers endless possibilities for creativity.
If you enjoyed this guide, feel free to share your honest opinion and suggestions. Your feedback is valuable and helps inspire new creative tutorials and handmade ideas for future projects.


