
Crochet Cowboy Hat Pattern

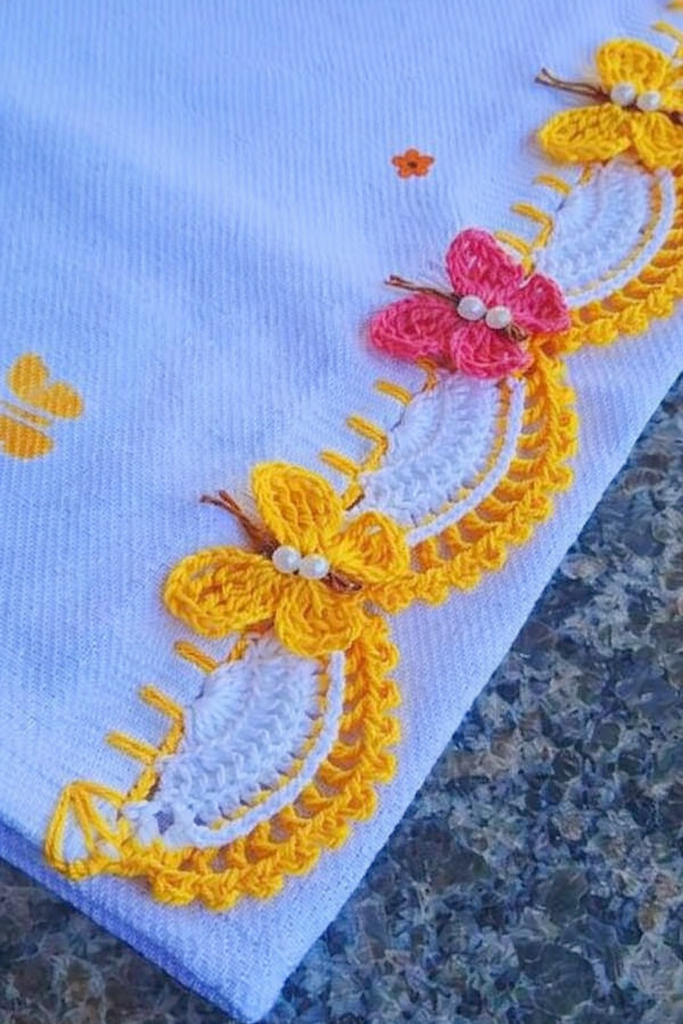
Crochet butterfly border tutorial is a wonderful way to learn how to add delicate beauty and decorative detail to crochet projects. A Crochet butterfly border tutorial helps crafters create a charming edge pattern that resembles small butterflies, making blankets, scarves, tablecloths, and many other handmade pieces look more elegant. Many crochet enthusiasts search for a Crochet butterfly border tutorial because borders are an essential finishing element that can completely transform the appearance of a crochet item. When the right border pattern is used, even a simple project can become visually impressive.
The popularity of the Crochet butterfly border tutorial continues to grow among crochet lovers because butterfly designs symbolize lightness, creativity, and beauty. A well-crafted butterfly border can give handmade pieces a soft and artistic look that attracts attention. By following a Crochet butterfly border tutorial, beginners and experienced crocheters alike can explore new stitch combinations and learn how decorative edges enhance the final presentation of crochet work.
Another reason the Crochet butterfly border tutorial is widely appreciated is its versatility. This border style can be adapted for many different crochet projects. Whether someone is finishing a baby blanket, decorating a shawl, or adding detail to a pillow cover, the Crochet butterfly border tutorial offers a creative way to elevate the overall design. With practice and imagination, the butterfly border can become a signature decorative element in many crochet creations.
A Crochet butterfly border tutorial usually begins with learning the basic concept behind decorative crochet edges. Borders are designed to frame the main crochet piece and create a balanced and finished appearance.
One of the first things beginners learn in a Crochet butterfly border tutorial is the importance of evenly spaced stitches. Proper stitch placement ensures that the butterfly shapes appear consistent along the edge.
Another key element of a Crochet butterfly border tutorial is understanding stitch combinations. Butterfly shapes are often formed using chains, double crochet stitches, and sometimes slip stitches.
A well-explained Crochet butterfly border tutorial also teaches how to maintain consistent tension while crocheting the border. Even tension helps the butterflies appear neat and symmetrical.
Beginners following a Crochet butterfly border tutorial are encouraged to practice on small sample pieces before adding the border to a finished project. This allows them to understand the pattern more clearly.
Finally, the Crochet butterfly border tutorial often emphasizes patience and attention to detail. Decorative borders require careful stitching to achieve the desired aesthetic result.
Creating a beautiful edge using a Crochet butterfly border tutorial requires only a few simple materials. These basic tools make it easy for crochet enthusiasts to begin experimenting with decorative borders.
The most important material for a Crochet butterfly border tutorial is yarn. The type of yarn used can influence the final appearance of the butterfly shapes and overall border texture.
A crochet hook is another essential tool when following a Crochet butterfly border tutorial. The hook size should match the yarn to ensure comfortable stitching and consistent loops.
Scissors are necessary for trimming yarn when finishing the border. Clean and precise cutting helps maintain the neat look of the completed Crochet butterfly border tutorial design.
A yarn needle is often used to weave in loose ends after the border is finished. This step ensures the durability and professional appearance of the crochet project.
Some crafters also like to use stitch markers while following a Crochet butterfly border tutorial. These markers help identify pattern repeats and maintain accurate stitch placement.
Finally, a completed crochet item such as a blanket, shawl, or cloth serves as the base where the Crochet butterfly border tutorial will be applied.
Most patterns in a Crochet butterfly border tutorial begin by attaching yarn to the edge of the finished crochet piece. This starting point determines where the decorative border will develop.
The first row of a Crochet butterfly border tutorial often consists of simple stitches that prepare the edge for the butterfly shapes. This foundation row helps stabilize the border.
Next, chain stitches are typically used to create the wings of the butterfly design. These chains form the delicate shapes that give the Crochet butterfly border tutorial its distinctive appearance.
As the pattern continues, groups of stitches are worked together to shape the butterfly bodies and wings. These combinations create the repeating motif seen in the Crochet butterfly border tutorial.
Throughout the process, careful counting of stitches is important. Accurate counting ensures that each butterfly shape appears evenly spaced along the edge.
Once the final row is complete, the yarn is fastened off and the ends are woven in. At this stage, the Crochet butterfly border tutorial reveals a beautiful decorative edge.
One of the most exciting aspects of a Crochet butterfly border tutorial is the opportunity to explore creative variations. With slight modifications, the border can take on many different styles.
For example, changing the yarn color can highlight the butterfly shapes. Using contrasting colors in a Crochet butterfly border tutorial can make the design more visually striking.
Another idea is experimenting with different yarn textures. Soft cotton yarn creates a delicate look, while thicker yarn produces a bold version of the Crochet butterfly border tutorial.
Some crafters like to incorporate beads or decorative thread into their projects. These additions can add sparkle and uniqueness to the Crochet butterfly border tutorial.
Another creative variation is adjusting the size of the butterflies. By modifying the chain lengths, the Crochet butterfly border tutorial can produce either small or larger butterfly motifs.
Combining multiple border patterns can also create interesting results. A Crochet butterfly border tutorial can be paired with simple lace borders for a layered decorative effect.
Finally, seasonal color themes can inspire unique designs. Pastel colors can create a spring-inspired Crochet butterfly border tutorial, while warm tones may suit autumn-themed projects.
What is a Crochet butterfly border tutorial?
A Crochet butterfly border tutorial is a crochet guide that teaches how to create a decorative edge with butterfly-shaped stitch patterns.
Is a Crochet butterfly border tutorial suitable for beginners?
Yes, many patterns are beginner-friendly and use basic crochet stitches that are easy to learn with practice.
What projects can use a butterfly border?
A Crochet butterfly border tutorial can be used to decorate blankets, scarves, shawls, tablecloths, pillow covers, and other crochet items.
What yarn works best for this border?
Cotton yarn and lightweight acrylic yarn are commonly used in a Crochet butterfly border tutorial because they highlight the delicate stitch details.
How long does it take to crochet a butterfly border?
The time required depends on the size of the project, but many borders from a Crochet butterfly border tutorial can be completed within a few hours.
Can the design be customized?
Yes, the Crochet butterfly border tutorial can be personalized by adjusting colors, yarn types, and stitch sizes.
The Crochet butterfly border tutorial is an excellent way for crochet enthusiasts to enhance their handmade creations with a delicate and artistic finishing touch. In this article, we explored the fundamentals of a Crochet butterfly border tutorial, including the materials needed, the basic step-by-step process, and several creative variations that can make each project unique.
Learning a Crochet butterfly border tutorial allows crafters to transform simple crochet items into beautiful pieces that stand out through elegant detailing. Decorative borders not only improve the visual appeal of a project but also demonstrate craftsmanship and creativity.
If you enjoyed learning about the Crochet butterfly border tutorial, feel free to share your honest opinion and suggestions. Your feedback can inspire new ideas and help other crochet enthusiasts discover creative ways to decorate their handmade projects.


