
Crochet Cowboy Hat Pattern

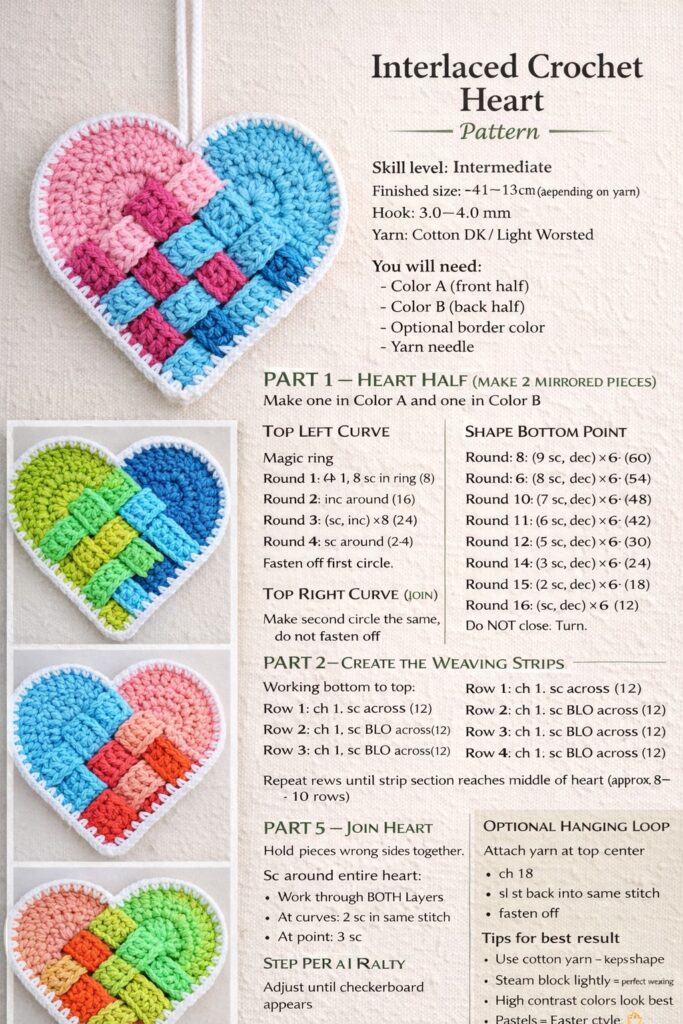
How to crochet Danish heart is a delightful and creative project that blends traditional charm with modern crochet techniques. If you have ever admired the woven Scandinavian heart ornaments and wondered how to crochet Danish heart designs using yarn instead of paper, this comprehensive guide will walk you through every essential step. This craft is perfect for seasonal decorations, thoughtful handmade gifts, or adding a cozy Nordic touch to your home décor. By learning how to crochet Danish heart, you can create beautiful ornaments that reflect warmth, craftsmanship, and attention to detail.
Understanding how to crochet Danish heart patterns involves more than simply forming a heart shape. It requires careful shaping, color coordination, and sometimes a clever interlocking technique that mimics the traditional woven design. While the classic Danish heart is usually made from paper strips, crocheting it adds texture and durability. This allows your finished piece to last for years, making it suitable for holiday decorations or keepsakes. With patience and the right materials, anyone can master this technique.
In this detailed guide about how to crochet Danish heart, you will learn about selecting yarn, shaping the heart structure, creating the woven effect, assembling the final ornament, and adding decorative details. The article follows high-quality content standards and SEO best practices to ensure clarity and usefulness. By the end, you will feel confident creating charming crocheted Danish hearts that are both decorative and meaningful.
Selecting the appropriate materials is the first important step in learning how to crochet Danish heart successfully. Cotton yarn is highly recommended because it provides structure and crisp stitch definition. Its durability ensures that your crocheted heart maintains its shape over time.
Lightweight yarn works especially well for ornaments. When practicing how to crochet Danish heart, thinner yarn allows for more detailed shaping and a delicate finish. However, medium-weight yarn can also be used if you prefer a slightly larger and sturdier result.
Hook size plays a significant role in achieving clean stitches. Using a hook slightly smaller than the yarn label recommendation creates tighter stitches, which help the heart keep its form. Consistent tension throughout the project is essential for symmetry.
You will need basic crochet tools such as scissors, a yarn needle for weaving in ends, and stitch markers to keep track of shaping rows. These tools simplify the process and improve accuracy.
Color choice is especially important when exploring how to crochet Danish heart designs inspired by traditional Scandinavian patterns. Classic combinations include red and white, but you can experiment with soft pastels, neutral tones, or festive holiday colors.
Finally, consider adding a ribbon or crocheted chain loop for hanging. This small addition transforms your Danish heart into a charming ornament suitable for decorations or gift embellishments.
To fully understand how to crochet Danish heart, it is essential to grasp the basic structure. The Danish heart typically consists of two mirrored heart shapes that interlock to form a small pocket. This pocket design is one of its most recognizable features.
Begin by crocheting two identical heart panels. Each panel can be created using basic stitches such as single crochet or half-double crochet. Gradual increases and decreases help shape the rounded top and tapered bottom.
Maintaining symmetry between both panels is crucial when practicing how to crochet Danish heart. Count stitches carefully and follow the same pattern for each piece to ensure they align properly during assembly.
The woven or interlocking effect is achieved by carefully inserting one heart panel through slits or loops in the other. Some crochet patterns simulate this woven appearance using color changes rather than physical weaving.
Blocking the heart panels before assembly can improve their shape. Lightly dampen and lay them flat to dry, ensuring clean curves and smooth edges.
Once the two panels are complete and properly shaped, you are ready to assemble them into the classic Danish heart form.
To begin learning how to crochet Danish heart, start with a magic ring or foundation chain and work the top curves of the heart. Increase stitches gradually to create rounded edges.
Continue working rows evenly until reaching the widest part of the heart. From there, begin decreasing stitches to form the pointed bottom. Maintaining even tension ensures balanced shaping.
After completing the first heart panel, repeat the same steps for the second piece. Consistency is key when mastering how to crochet Danish heart, as mismatched panels may not interlock smoothly.
If your pattern includes woven slits, carefully create chain spaces or designated openings during the crocheting process. These openings allow the panels to be woven together later.
To assemble, gently weave one heart panel through the slits of the other, following the pattern’s instructions. Take your time during this step to maintain alignment and avoid stretching stitches.
Finish by attaching a hanging loop at the top. Securely weave in all loose ends to ensure durability and a polished final appearance.
One of the joys of learning how to crochet Danish heart is exploring creative variations. You can experiment with color-blocking techniques to achieve a bold woven effect.
Adding embroidery details enhances visual interest. Small stitched snowflakes, initials, or decorative lines personalize your crocheted Danish heart.
You may also experiment with textured stitches such as bobble stitches or front-post stitches. These techniques add depth and dimension while maintaining the classic heart silhouette.
Miniature versions of how to crochet Danish heart projects make lovely gift toppers or tree ornaments. Adjusting yarn weight and hook size allows you to scale the design easily.
Consider stuffing the pocket lightly for added dimension. While traditional Danish hearts remain flat, a slightly padded version can create a softer decorative piece.
Finally, creating coordinated sets in matching colors makes thoughtful handmade gifts. Handmade ornaments often carry sentimental value and become cherished keepsakes.
Is how to crochet Danish heart suitable for beginners?
Yes, beginners can start with simple heart patterns and gradually learn the interlocking technique. Basic crochet skills are sufficient.
What type of yarn works best?
Cotton yarn is ideal because it holds its shape and provides clear stitch definition.
How long does it take to crochet a Danish heart?
Depending on experience level, it can take one to two hours to complete a single ornament.
Can I wash a crocheted Danish heart?
If made with washable yarn, it can be gently hand washed and laid flat to dry.
Do I need to weave the panels together?
Some patterns include a woven effect, while others simulate it through color changes. Choose the method that best matches your skill level.
Conclusion
In this complete guide on how to crochet Danish heart, you learned how to select appropriate materials, shape symmetrical heart panels, assemble the interlocking structure, and explore decorative variations.
By mastering shaping techniques, maintaining consistent tension, and experimenting with color combinations, you can create beautiful crocheted Danish hearts for seasonal décor or meaningful gifts. This project combines tradition with creativity, resulting in a timeless handmade ornament.
If you found this article helpful, please share your honest opinion and leave your suggestions. Your feedback inspires new ideas and helps improve future creative tutorials.


