
Crochet Cowboy Hat Pattern

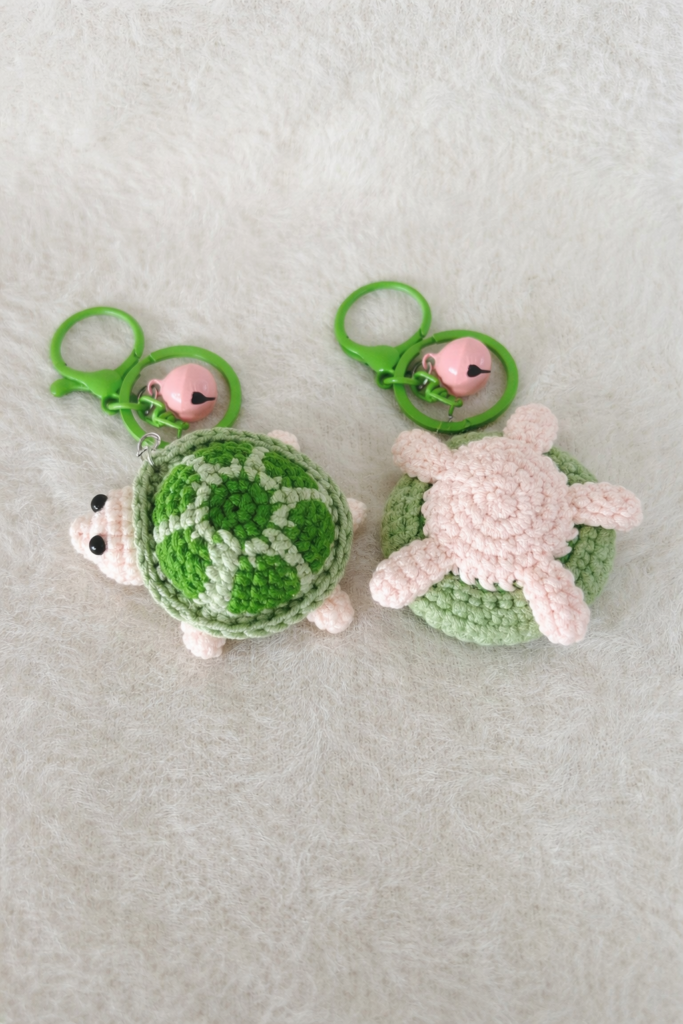
Crocheted baby turtle projects are among the most adorable and rewarding creations in the world of handmade crafts. If you have ever wanted to create a soft, charming, and beginner-friendly amigurumi, a Crocheted baby turtle is the perfect choice. This delightful project combines simple crochet techniques with creative shaping, resulting in a lovable miniature turtle that can be used as a toy, decoration, or thoughtful handmade gift. The appeal of a Crocheted baby turtle lies in its rounded shell, tiny flippers, and sweet expression, all crafted carefully with yarn and patience.
Creating a Crocheted baby turtle allows crafters to explore texture, color combinations, and three-dimensional shaping. Whether you prefer realistic earthy tones or playful pastel shades, this project offers endless customization possibilities. Because of its compact size and soft structure, it is also a popular choice for baby gifts, nursery décor, and handmade keepsakes. With attention to detail and proper technique, even beginners can achieve professional-looking results.
In this comprehensive guide, you will learn everything you need to know about making a Crocheted baby turtle, from selecting materials and understanding basic stitches to assembling and customizing your finished piece. This article follows SEO best practices by naturally incorporating the main keyword while delivering valuable and original information. By the end, you will feel confident starting your own project and bringing your crochet turtle to life.
Choosing the right materials is essential when making a Crocheted baby turtle. Soft cotton or acrylic yarn works well, depending on your preference. Cotton yarn provides excellent stitch definition, while acrylic yarn offers a softer and more flexible texture.
A crochet hook appropriate for your yarn weight is important for maintaining tight stitches. For amigurumi projects like a Crocheted baby turtle, using a slightly smaller hook than recommended helps prevent gaps and keeps stuffing securely inside.
You will also need fiberfill stuffing to give your turtle its rounded shape. High-quality polyester fiberfill is lightweight, washable, and ideal for soft toys.
Safety eyes are commonly used to create a cute and expressive face. However, if the turtle is intended for a baby or toddler, embroidered eyes are a safer alternative for a Crocheted baby turtle.
Other necessary tools include a yarn needle for sewing pieces together, scissors, and stitch markers. Stitch markers are particularly helpful when working in continuous rounds.
Before beginning, consider preparing a small gauge swatch. Although gauge is less critical for toys than garments, consistent tension ensures your turtle maintains a symmetrical and polished appearance.
The foundation of a Crocheted baby turtle lies in mastering basic amigurumi techniques. Most parts are crocheted in continuous rounds, starting with a magic ring. This technique creates a tight and seamless center.
Single crochet stitches are typically used throughout the project. Their tight structure makes them perfect for forming the turtle’s body and shell.
Increasing and decreasing stitches shape the round body and head. Evenly spaced increases create smooth curves, while invisible decreases help maintain a clean appearance.
The turtle shell often features textured patterns. Some designs incorporate back-loop-only stitches or color changes to create a segmented shell effect on the Crocheted baby turtle.
Flippers and the head are usually crocheted separately and sewn onto the body. Careful placement ensures symmetry and balance in the final design.
Stuffing should be added gradually as you crochet. Overstuffing can distort the shape, while under-stuffing may result in a flattened appearance. Proper stuffing technique enhances the quality of your Crocheted baby turtle.
To begin your Crocheted baby turtle, start with the shell. Create a magic ring and work several rounds of single crochet increases to form a dome shape. The shell should be slightly rounded but not overly tall.
After completing the shell, crochet the bottom body piece separately. This piece is usually flatter and slightly smaller than the shell to create a snug fit when assembled.
The head is worked in continuous rounds, beginning with increases to form a sphere. Gradually decrease toward the neck area to shape the head naturally.
Flippers are typically small oval shapes. Crochet four identical pieces to ensure balance. These small details give the Crocheted baby turtle its adorable personality.
Once all parts are complete, sew the head and flippers securely to the body. Take time to position them evenly before final attachment.
Finally, add facial details. Whether you use safety eyes or embroidery, subtle features make your Crocheted baby turtle look lively and charming.
One of the best aspects of making a Crocheted baby turtle is the opportunity for customization. You can experiment with different shell colors to create unique combinations.
Adding simple embroidery details to the shell can create decorative patterns. Small stitched lines or geometric shapes enhance visual interest.
For a playful twist, consider making miniature accessories such as a tiny bow or a small crocheted flower to attach to your Crocheted baby turtle.
You can also adjust the size by using thicker yarn and a larger hook. This approach creates a bigger turtle while maintaining the same basic pattern.
If you prefer a more realistic design, choose earthy tones like green, brown, or olive. For nursery décor, soft pastel shades can create a gentle and calming aesthetic.
Blocking is generally not necessary for amigurumi, but gently shaping your turtle after stuffing ensures a polished and symmetrical finish.
Is a Crocheted baby turtle suitable for beginners?
Yes, this project is beginner-friendly. Basic knowledge of single crochet, increasing, and decreasing is sufficient to complete it.
What type of yarn is best?
Soft cotton or acrylic yarn works well. Choose a yarn that feels gentle if the turtle will be used as a toy.
How do I make the turtle safe for babies?
Use embroidered eyes instead of safety eyes, and ensure all pieces are securely stitched to avoid loose parts.
How long does it take to complete?
A small Crocheted baby turtle can typically be completed within a few hours, depending on experience level.
Can I wash the finished turtle?
Most acrylic and cotton yarn turtles can be hand-washed gently and air-dried. Always follow yarn care instructions.
Can I sell my handmade turtle?
Yes, you can sell handmade crochet items as long as they are made by you. Focus on high-quality finishing for best results.
Conclusion
In this complete guide to creating a Crocheted baby turtle, we explored essential materials, foundational techniques, step-by-step construction, and creative customization ideas. From forming the rounded shell to attaching delicate flippers and adding expressive facial features, each step contributes to a charming and professional-looking result.
A Crocheted baby turtle is a delightful project that combines simplicity with creativity. Whether you are making it as a gift, decoration, or personal keepsake, this handmade piece reflects patience and craftsmanship.
If you found this tutorial helpful, please leave your honest opinion and share your suggestions. Your feedback is greatly appreciated and helps inspire future crochet guides and creative ideas.


