
Crochet Cowboy Hat Pattern

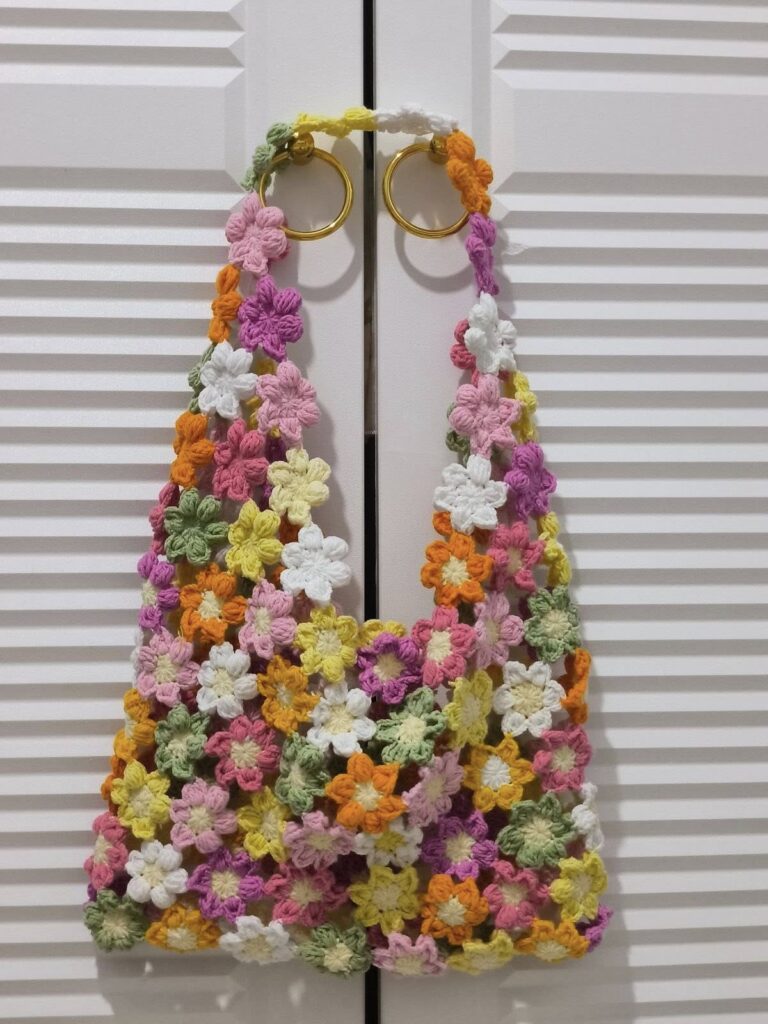
Crocheted flower bag is a beautiful and versatile handmade accessory that combines creativity, texture, and timeless charm. If you are searching for a complete guide about creating a Crocheted flower bag, this article will walk you through every essential detail. From selecting the right yarn to assembling floral motifs and finishing with professional touches, this comprehensive guide is designed to help beginners and experienced crocheters alike. The growing popularity of the Crocheted flower bag reflects the renewed appreciation for handcrafted fashion and sustainable design.
A well-made Crocheted flower bag is not only a practical item but also a statement piece. The delicate floral elements add depth and personality, transforming a simple crochet project into an elegant accessory. Many crafters appreciate how customizable this design can be, allowing them to experiment with color palettes, stitch patterns, and shapes. Whether you prefer soft pastel flowers or vibrant contrasting tones, this project can easily adapt to your style preferences.
In this detailed tutorial, we will explore materials, techniques, construction steps, and customization ideas for a Crocheted flower bag. By following SEO best practices, this article naturally incorporates the main keyword while providing valuable and original information. You will learn how to create floral motifs, assemble panels, reinforce structure, and finish your bag with confidence. With patience and attention to detail, your handmade bag can become a cherished accessory or thoughtful gift.
Choosing the right materials is the first important step in creating a Crocheted flower bag. Cotton yarn is often recommended because it provides structure, durability, and a clean stitch definition. Medium-weight yarn is ideal for maintaining the shape of the bag while keeping it comfortable to carry.
Selecting an appropriate crochet hook is equally important. Most medium-weight yarns work well with a 4.0 mm to 5.0 mm hook. Using the recommended hook size ensures proper tension and helps your Crocheted flower bag maintain consistent stitch size throughout the project.
You will also need essential tools such as scissors, a yarn needle for sewing pieces together, and stitch markers. Stitch markers are particularly helpful when working in rounds or when tracking the beginning of floral motifs.
Color selection plays a key role in the visual impact of your Crocheted flower bag. Consider choosing complementary shades for the flowers and a neutral tone for the bag body. Thoughtful color combinations enhance the beauty of the floral design.
Optional materials include fabric lining, magnetic snaps, buttons, or zipper closures. Adding a lining increases durability and prevents stretching, especially if the bag will be used frequently.
Before starting your project, creating a small gauge swatch is recommended. This helps ensure that your stitches are consistent and that your final bag dimensions meet your expectations.
The heart of a Crocheted flower bag lies in its floral motifs. Flowers are typically worked in the round, beginning with a magic ring or a small chain joined into a circle. This technique creates a tight center and a neat starting point.
Petals can be formed using a combination of chain stitches, double crochet stitches, and slip stitches. Adjusting the height and number of stitches changes the shape and fullness of each petal.
Layered flowers add extra dimension to a Crocheted flower bag. By crocheting a second round of petals behind the first layer, you create a three-dimensional effect that enhances visual appeal.
Experimenting with different stitch textures can also elevate the design. Puff stitches, cluster stitches, or treble crochet stitches create fuller and more decorative petals.
Color changes between rounds allow for striking contrasts. For example, using a bright center and softer outer petals can make each flower stand out against the bag’s background.
Once the flowers are complete, weave in all loose ends securely. Proper finishing ensures that the motifs remain durable and ready for assembly.
After completing multiple floral motifs, the next step in creating a Crocheted flower bag is planning the layout. Arrange the flowers on a flat surface to visualize the final design before joining them.
You can join motifs using slip stitch, whip stitch, or join-as-you-go techniques. Each joining method creates a different visual effect, so choose one that complements your style.
Depending on the desired size, you may create panels of connected flowers for the front and back of the bag. Additional plain crochet panels can be added to form the sides and base for extra structure.
Reinforcing seams is essential for durability. A well-constructed Crocheted flower bag should be able to hold daily essentials without stretching or weakening.
Handles can be crocheted separately using tight rows of single crochet or half-double crochet stitches. For added strength, consider crocheting the straps tightly or inserting a fabric strip inside.
Once assembled, inspect all seams and attachments carefully. Securely attached handles and well-joined motifs ensure that your bag is both beautiful and functional.
One of the greatest advantages of a Crocheted flower bag is its versatility. You can adjust the size by adding more floral motifs or increasing the dimensions of each motif.
Adding a fabric lining gives the bag a professional finish. Choose a sturdy cotton fabric that complements your color scheme and sew it carefully inside the bag.
Closures such as buttons or magnetic snaps enhance functionality. They keep belongings secure while maintaining the handmade aesthetic of the bag.
Decorative edging around the top can elevate the overall look. Scalloped edges, crab stitch borders, or simple single crochet trims add subtle detail.
Seasonal variations are also possible. Bright floral combinations are perfect for spring and summer, while deeper tones work beautifully for autumn collections.
Blocking the finished Crocheted flower bag helps even out stitches and refine its shape. Taking time for this final step ensures a polished and professional result.
What skill level is required to make a Crocheted flower bag?
This project is suitable for beginners with basic crochet knowledge. Familiarity with working in the round and simple stitches is helpful.
What yarn is best for durability?
Cotton yarn is highly recommended because it provides structure and reduces stretching over time.
How do I keep my bag from losing shape?
Using tight stitches, reinforcing seams, and adding a fabric lining can significantly improve structure and longevity.
Can I wash a Crocheted flower bag?
Most cotton yarn bags can be gently hand-washed and air-dried. Always follow the yarn manufacturer’s care instructions.
How long does it take to complete?
The time required depends on the size and complexity of the design. On average, a medium-sized bag may take several days to complete.
Can I sell my handmade bag?
Yes, handmade crochet items can be sold if you create them yourself. Ensure high-quality craftsmanship and accurate descriptions when presenting your product.
Conclusion
In this complete guide about creating a Crocheted flower bag, we explored materials, floral motif techniques, assembly methods, customization ideas, and finishing touches. By mastering these steps, you can confidently design a durable and stylish accessory that reflects your creativity.
A Crocheted flower bag combines timeless charm with modern fashion, making it a versatile piece for everyday use or special occasions.
With careful planning, consistent stitches, and thoughtful finishing, your handmade bag can become a treasured addition to your wardrobe. If you found this guide helpful, please leave your honest opinion and share your suggestions. Your feedback is valuable and helps inspire future creative crochet content.


