
Crochet Cowboy Hat Pattern

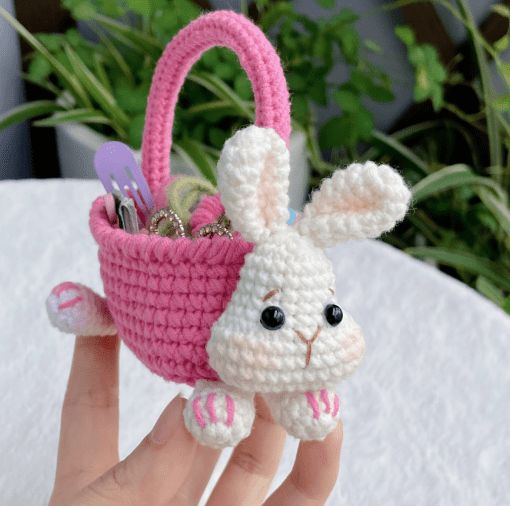
How To Crochet Bunny Basket Easy is a delightful and creative project that brings charm, functionality, and handmade warmth into your home. If you have been searching for a beginner-friendly yet impressive crochet idea, How To Crochet Bunny Basket Easy is the perfect combination of simplicity and cuteness. This project is ideal for seasonal décor, Easter celebrations, gift baskets, or even as a playful storage solution for children’s rooms. Throughout this complete guide, you will learn everything you need to confidently create your own bunny basket from scratch.
Learning How To Crochet Bunny Basket Easy does not require advanced skills, expensive tools, or complicated techniques. With basic crochet stitches and a little patience, anyone can transform yarn into an adorable bunny-shaped basket. This pattern is especially popular because it combines decorative appeal with practical use. Whether you are a beginner exploring crochet for the first time or an experienced crafter looking for a quick weekend project, this guide will walk you through each essential detail in a clear and accessible way.
In this article, we will explore materials, stitches, shaping techniques, assembly, customization ideas, and finishing touches related to How To Crochet Bunny Basket Easy. We will also discuss helpful SEO-friendly crafting tips, yarn choices, and design variations. By the end, you will not only understand the structure of a bunny basket but also gain confidence in creating personalized crochet projects that can be shared, gifted, or even sold responsibly within crafting communities.
When starting How To Crochet Bunny Basket Easy, selecting the right materials is the first important step. Cotton yarn is often recommended because it provides structure and durability. Acrylic yarn can also work well if you choose a thicker weight to ensure the basket holds its shape. Medium-weight yarn (worsted weight) is typically ideal for beginners.
A suitable crochet hook is essential for achieving proper tension. Most worsted weight yarn works best with a 4.0 mm to 5.5 mm hook. Using a slightly smaller hook than recommended on the yarn label can create tighter stitches, which helps the basket maintain firmness and structure.
You will also need a yarn needle for sewing pieces together and weaving in ends. Stitch markers are helpful when working in rounds, especially for beginners learning How To Crochet Bunny Basket Easy for the first time. They help track the start of each round and prevent mistakes.
Scissors are another basic but necessary tool. Sharp scissors allow clean cuts and make finishing touches easier. Having a measuring tape nearby can also ensure that your basket reaches the desired height and width.
Optional materials include fiberfill stuffing for the bunny ears or decorative details. While the basket itself does not need stuffing, adding slight structure to the ears can enhance the final look and make your How To Crochet Bunny Basket Easy project more polished.
Finally, small embellishments such as safety eyes, embroidered facial features, or a pom-pom tail can personalize your basket. Always ensure any decorative additions are securely attached, especially if the basket is intended for children.
Understanding foundational stitches is key when learning How To Crochet Bunny Basket Easy. The most common stitches used in this project include chain stitch (ch), single crochet (sc), and slip stitch (sl st). These simple stitches create a sturdy fabric perfect for baskets.
Working in continuous rounds is a common technique for basket bases. Instead of turning your work, you crochet in a spiral. This technique ensures a smooth and seamless appearance, which is ideal for the body of the bunny basket.
Increasing stitches evenly is important when forming the circular base. By placing two single crochets into the same stitch at specific intervals, the base gradually expands without curling. Mastering increases will ensure your How To Crochet Bunny Basket Easy project lies flat at the bottom.
Once the base is complete, you stop increasing and begin working single crochets evenly around. This shift creates the vertical walls of the basket. Maintaining consistent tension is essential to keep the sides straight and stable.
For the bunny ears, you may work in rows instead of rounds. Crocheting flat pieces and sewing them onto the basket allows for better shaping and positioning. Slight decreases toward the tip of the ears can create a more realistic look.
Finishing techniques such as slip stitching the final round neatly and weaving in ends securely give your How To Crochet Bunny Basket Easy project a professional appearance. Taking time to finish carefully makes a significant difference in the overall quality.
To begin How To Crochet Bunny Basket Easy, create a magic ring or chain four and join to form a circle. Work several rounds of increases to create a flat circular base. The size of the base will determine the width of your basket.
Continue increasing evenly until you reach the desired diameter. For a small decorative basket, 12–15 cm may be sufficient. For a larger basket, you can expand further. The key is ensuring the base remains flat without rippling.
Once the base is ready, stop increasing and crochet one single crochet into each stitch around. This transition creates the sides of the basket. You will notice the piece naturally curves upward, forming the basket walls.
Work multiple rounds without increases to build height. Typically, 8–15 rounds will create a balanced proportion. Adjust the number of rounds depending on how tall you want your How To Crochet Bunny Basket Easy basket to be.
Next, crochet two separate ear pieces. Start with a chain, work single crochets across, and shape the ears by decreasing slightly at the top. Make sure both ears are symmetrical in size and shape.
Finally, attach the ears securely to the inside rim of the basket. Add optional facial details and a small pom-pom tail. Your How To Crochet Bunny Basket Easy project is now structurally complete and ready for display.
One of the most enjoyable aspects of How To Crochet Bunny Basket Easy is customization. You can experiment with pastel colors for spring themes or neutral tones for year-round décor. Color choice greatly influences the final aesthetic.
Adding a contrasting inner ear color creates dimension and visual interest. You can crochet a smaller oval in pink or another soft shade and sew it onto the main ear piece for added detail.
Personalizing facial expressions with embroidery allows you to give each bunny basket a unique personality. A simple stitched smile and whiskers can transform the overall appearance while keeping the design safe and child-friendly.
Handles can also be added for functionality. Crocheting a sturdy chain and reinforcing it with single crochet stitches creates a strong handle suitable for carrying lightweight items.
Texture variations such as using puff stitches or ribbed patterns on the basket walls can elevate the design. These subtle details add depth while maintaining the simplicity of How To Crochet Bunny Basket Easy.
You may also adapt the size to suit different purposes. Mini versions can serve as table decorations, while larger baskets are perfect for organizing craft supplies or seasonal treats.
What skill level is required for How To Crochet Bunny Basket Easy?
This project is beginner-friendly. Basic knowledge of single crochet, increasing, and working in rounds is sufficient to complete the basket successfully.
What type of yarn works best?
Cotton yarn is highly recommended because it provides structure. However, thick acrylic yarn can also be used if tighter stitches are maintained.
How do I make the basket sturdier?
Using a smaller hook size than suggested on the yarn label helps create tighter stitches. You can also double-strand your yarn for added thickness.
Can I wash the bunny basket?
Yes, but follow the yarn manufacturer’s care instructions. Cotton yarn baskets are typically machine washable on gentle cycles, though air drying is preferable.
How long does it take to complete?
For beginners, How To Crochet Bunny Basket Easy may take 3–5 hours. Experienced crocheters may finish it in 1–2 hours depending on size and complexity.
Is this basket suitable for selling?
Yes, handmade crochet baskets can be sold, provided you create them yourself. Ensure high-quality finishing and accurate descriptions when presenting your product.
Conclusion
In this comprehensive guide on How To Crochet Bunny Basket Easy, we explored materials, essential stitches, construction steps, and creative customization ideas. You learned how to build a sturdy base, shape the basket walls, design adorable bunny ears, and add personalized finishing touches. By mastering these simple techniques, you can confidently create a charming and functional crochet project suitable for décor, gifts, or organization.
Crafting a bunny basket is not only enjoyable but also a rewarding way to express creativity through handmade art.
With patience and practice, your skills will continue to improve, opening doors to even more exciting crochet designs. If you found this guide helpful, please leave your honest opinion and share your suggestions. Your feedback helps inspire future creative tutorials and supports a positive crafting community.


