
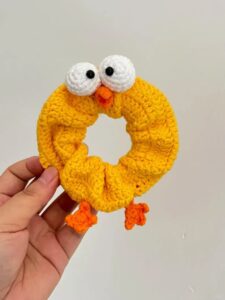
Crochet Cowboy Hat Pattern

How to make a crochet scrunchie is one of the most searched topics among crochet lovers who want to combine creativity, sustainability, and style in a single handmade project. Learning how to make a crochet scrunchie allows beginners and experienced crafters alike to create beautiful hair accessories using simple techniques, basic materials, and a lot of imagination. This small but charming project has gained popularity because it is fast to make, beginner-friendly, and perfect for personal use or small handmade businesses.
Understanding how to make a crochet scrunchie also opens the door to exploring texture, yarn types, stitch combinations, and color palettes. Crochet scrunchies are not just functional accessories; they are expressive pieces that reflect personality and craftsmanship. From minimalist designs to ruffled, voluminous styles, crochet scrunchies fit effortlessly into modern fashion trends while maintaining a handmade charm.
Another reason why people are eager to learn how to make a crochet scrunchie is the low cost and high satisfaction of the process. With leftover yarn, a basic crochet hook, and an elastic band, you can produce multiple scrunchies in a short time. This makes the project ideal for stress relief, gifting, or even generating extra income through handmade sales.
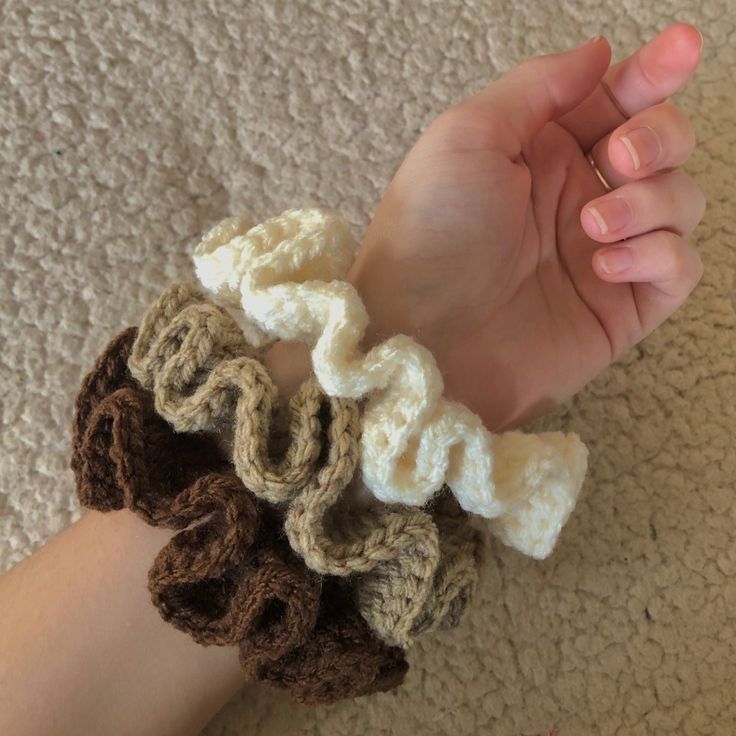
Learning how to make a crochet scrunchie starts with understanding what a crochet scrunchie actually is. It is a fabric-covered elastic hair tie made by crocheting stitches directly around an elastic band. This structure gives the scrunchie volume, softness, and durability while protecting hair from breakage.
One of the most important concepts in how to make a crochet scrunchie is stitch consistency. Because the stitches are worked around elastic, maintaining even tension ensures the scrunchie stretches properly without losing shape. Consistent stitches also give the final piece a professional appearance.
Another essential part of how to make a crochet scrunchie is choosing the correct yarn weight. Medium-weight yarn is commonly used, but lighter yarns create delicate scrunchies, while bulky yarns result in dramatic, fluffy designs. The choice depends on personal style and intended use.
Understanding hook size is also critical when learning how to make a crochet scrunchie. A hook that is too large may create loose stitches that expose the elastic, while a hook that is too small can make the fabric stiff. Matching hook size to yarn type ensures flexibility and comfort.
Color selection plays a major role in how to make a crochet scrunchie visually appealing. Neutral tones are great for everyday wear, while bold colors and multicolor yarns add personality. Seasonal color palettes can also increase appeal for gifting or selling.
Finally, mastering the basics of how to make a crochet scrunchie builds confidence. Once the foundation is understood, it becomes easier to experiment with patterns, textures, and decorative stitches.
When exploring how to make a crochet scrunchie, selecting the right materials is essential. The primary materials include yarn, an elastic hair tie, and a crochet hook. These simple tools make the project accessible to everyone.
Yarn choice is central to how to make a crochet scrunchie successfully. Cotton yarn is popular because it is breathable and durable, while acrylic yarn offers softness and affordability. Velvet or chenille yarns create luxurious scrunchies but require careful handling.
The elastic hair tie is the foundation of how to make a crochet scrunchie. Strong, seamless elastics work best because they maintain elasticity over time. Avoid thin elastics, as they may not hold the crochet fabric securely.
Crochet hooks come in various sizes, and choosing the correct one affects the outcome of how to make a crochet scrunchie. A medium-sized hook is generally recommended for balanced tension and stitch definition.
Scissors and a yarn needle are supporting tools in how to make a crochet scrunchie. Scissors are used for cutting yarn, while the yarn needle helps weave in ends neatly for a clean finish.
Having all materials prepared before starting how to make a crochet scrunchie improves workflow and reduces mistakes. Organized preparation leads to a smoother crafting experience and better results.
The first step in how to make a crochet scrunchie is attaching the yarn to the elastic band. This is usually done by making a slip knot and securing it around the elastic before starting the first stitch.
Once attached, the next phase of how to make a crochet scrunchie involves crocheting single crochet stitches around the elastic. The goal is to completely cover the elastic without stretching it excessively.
As you continue learning how to make a crochet scrunchie, spacing becomes important. Stitches should sit closely together, but not overcrowded. Proper spacing ensures flexibility and prevents stiffness.
After completing the first round, many designs add a second round to create volume. This step in how to make a crochet scrunchie often includes increases or decorative stitches such as double crochet or shell patterns.
Joining the final stitch neatly is another key aspect of how to make a crochet scrunchie. A smooth join keeps the scrunchie seamless and comfortable to wear, without bulky knots.
The final step in how to make a crochet scrunchie is finishing off. Weaving in yarn ends securely ensures durability and gives the scrunchie a polished, professional look.
One helpful tip when mastering how to make a crochet scrunchie is to practice on inexpensive yarn first. This allows experimentation without fear of wasting materials.
Adding texture is a creative way to enhance how to make a crochet scrunchie. Puff stitches, bobbles, and ruffles transform a simple scrunchie into a statement accessory.
A common mistake in how to make a crochet scrunchie is stretching the elastic while crocheting. This can cause the scrunchie to lose elasticity once finished. Always crochet loosely around the elastic.
Another frequent issue in how to make a crochet scrunchie is uneven tension. Taking breaks and maintaining a relaxed grip on the hook helps avoid tight or inconsistent stitches.
Customizing size is an advanced aspect of how to make a crochet scrunchie. Thicker hair may require more stitches, while fine hair benefits from lighter designs.
With practice, how to make a crochet scrunchie becomes second nature, allowing crafters to develop unique styles and even signature designs.
What is the best yarn for how to make a crochet scrunchie?
Cotton and acrylic yarns are ideal because they are durable, easy to work with, and comfortable for everyday use.
Is how to make a crochet scrunchie suitable for beginners?
Yes, learning how to make a crochet scrunchie is beginner-friendly and requires only basic crochet stitches.
How long does it take to learn how to make a crochet scrunchie?
Most people can complete their first crochet scrunchie in under an hour once they understand the basics.
Can I wash a crochet scrunchie?
Yes, handmade scrunchies can be washed gently, depending on the yarn type used in how to make a crochet scrunchie.
Why does my crochet scrunchie feel stiff?
Stiffness usually occurs when stitches are too tight. Relaxing tension improves the final result in how to make a crochet scrunchie.
Can I sell items made from how to make a crochet scrunchie tutorials?
In most cases, handmade crochet scrunchies can be sold, especially when they are your own creations.
Learning how to make a crochet scrunchie is a rewarding journey that combines creativity, practicality, and relaxation.
Throughout this article, you learned the fundamentals of how to make a crochet scrunchie, including materials, techniques, step-by-step guidance, and helpful tips to avoid common mistakes. Crochet scrunchies are versatile accessories that allow endless customization while remaining accessible to all skill levels.
By mastering how to make a crochet scrunchie, you gain a valuable skill that can be used for personal enjoyment, thoughtful gifts, or even small business opportunities. If you enjoyed this guide, leave your honest opinion and share your suggestions — your feedback helps improve future content and inspires new ideas.


