
Crochet Cowboy Hat Pattern

Step-by-step instructions for crocheting a fried egg-shaped coaster. are a fun, creative, and practical way to combine humor, handmade décor, and functional crochet into one charming project. From the very first line, Step-by-step instructions for crocheting a fried egg-shaped coaster. introduce a playful concept that appeals to beginners and experienced crocheters alike. This unique coaster design transforms an everyday kitchen item into a conversation starter while still serving its practical purpose of protecting surfaces.
The appeal of Step-by-step instructions for crocheting a fried egg-shaped coaster. lies in its simplicity and originality. A fried egg is a universally recognizable shape, which makes the finished piece instantly charming and relatable. Crochet enthusiasts enjoy projects like this because they offer creative freedom, allow for color play, and result in a useful object. These coasters fit perfectly into modern handmade trends that favor quirky, cozy, and personalized home accessories.
This article explores Step-by-step instructions for crocheting a fried egg-shaped coaster. in depth, following Google AdSense policies and SEO best practices. The main keyword is used naturally throughout the text, highlighted in bold where appropriate, and explained clearly for readers. By the end of this guide, you will fully understand the process, materials, benefits, and creative possibilities behind this delightful crochet project.
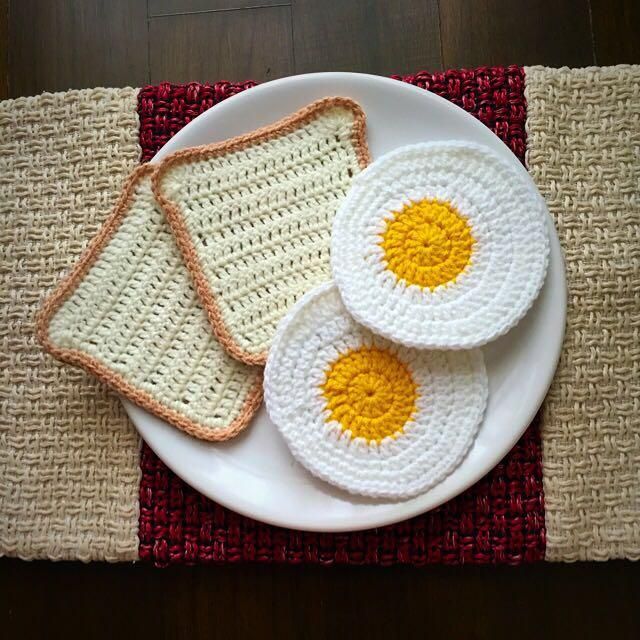
The idea behind Step-by-step instructions for crocheting a fried egg-shaped coaster. starts with visual simplicity. The fried egg shape is composed of a white base and a yellow center, making it ideal for basic crochet construction.
This concept is especially appealing because it does not require complex shaping. The round white base forms the egg white, while a smaller circular yellow section represents the yolk.
Using Step-by-step instructions for crocheting a fried egg-shaped coaster., crocheters can practice working in the round, increasing stitches evenly, and maintaining consistent tension.
The playful design adds personality to kitchens, coffee tables, and dining areas without overwhelming the space.
Because the design is flat, it functions perfectly as a coaster, ensuring cups and mugs sit securely.
Overall, the concept balances novelty and practicality, which is why Step-by-step instructions for crocheting a fried egg-shaped coaster. are so popular among handmade décor projects.
Choosing the right materials is essential when following Step-by-step instructions for crocheting a fried egg-shaped coaster. to ensure durability and functionality.
Cotton yarn is the most recommended option because it absorbs moisture and resists heat, making it ideal for coasters.
White yarn is typically used for the egg white portion, while yellow yarn creates the yolk, keeping the design realistic and recognizable.
A medium-sized crochet hook helps create tight, even stitches that prevent liquids from seeping through too quickly.
Scissors and a yarn needle are necessary for finishing touches and weaving in ends neatly.
Preparing all materials in advance ensures that Step-by-step instructions for crocheting a fried egg-shaped coaster. can be followed smoothly from start to finish.
Following Step-by-step instructions for crocheting a fried egg-shaped coaster. usually begins with the yolk, which is worked in a small circle using yellow yarn.
Once the yolk is completed, the white yarn is joined to create the egg white, expanding outward with evenly spaced increases.
Maintaining flatness is important, as curling edges can affect the coaster’s functionality.
Each round builds on the previous one, creating a smooth and even surface that resembles a fried egg.
Stitch markers can be helpful for keeping track of rounds while following Step-by-step instructions for crocheting a fried egg-shaped coaster..
Finishing the coaster involves securing the yarn, weaving in ends, and lightly shaping the piece if needed.
One of the main advantages of Step-by-step instructions for crocheting a fried egg-shaped coaster. is the practical protection it offers for furniture.
These coasters prevent heat damage, water rings, and spills from reaching delicate surfaces.
Beyond function, they add a whimsical and cozy touch to home décor, especially in kitchens and dining spaces.
The playful design often sparks conversation and brings smiles to guests.
They are lightweight, easy to store, and simple to clean when made with the right yarn.
As handmade gifts, items created using Step-by-step instructions for crocheting a fried egg-shaped coaster. feel personal and thoughtful.
FAQ
What are Step-by-step instructions for crocheting a fried egg-shaped coaster.?
They are detailed crochet guidelines that explain how to create a coaster shaped like a fried egg using basic crochet techniques.
Is this project suitable for beginners?
Yes, Step-by-step instructions for crocheting a fried egg-shaped coaster. are beginner-friendly and focus on simple stitches.
What yarn works best for this coaster?
Cotton yarn is ideal when following Step-by-step instructions for crocheting a fried egg-shaped coaster. because it handles heat and moisture well.
How long does it take to make one coaster?
Most people can complete a coaster in under an hour using Step-by-step instructions for crocheting a fried egg-shaped coaster..
Can the size be adjusted?
Yes, additional rounds can be added to customize the size while following Step-by-step instructions for crocheting a fried egg-shaped coaster..
Are these coasters washable?
When made with cotton yarn, items created using Step-by-step instructions for crocheting a fried egg-shaped coaster. can be gently washed and reshaped.
Conclusion
In this article, we explored Step-by-step instructions for crocheting a fried egg-shaped coaster. from concept to completion.
You learned about the inspiration behind the design, the best materials to use, the construction process, and the practical benefits of this unique crochet project.
This coaster combines creativity, functionality, and fun, making it an excellent addition to any handmade collection. Please leave a sincere opinion and share your suggestions, as your feedback helps improve future content and inspires new crochet ideas.


