
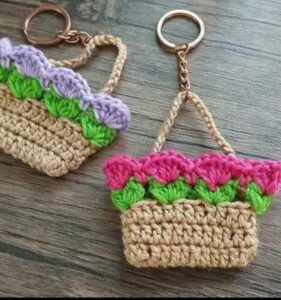
Crochet Cowboy Hat Pattern

Crocheted plant: learn how to make it for decoration.-Step by Step Tutorial is a creative and relaxing guide designed for anyone who wants to add handmade charm to their home decor using crochet. This detailed article will walk you through the entire process with clear explanations, simple language, and practical tips, making it suitable for beginners and experienced crocheters alike. By following this step by step tutorial, you will understand not only how to crochet a decorative plant, but also how to customize it to match your personal style and living space.
Crochet decor has become increasingly popular because it combines creativity, sustainability, and warmth. A crocheted plant is a perfect decorative item for those who love greenery but prefer low-maintenance alternatives. Unlike real plants, crocheted plants do not require watering, sunlight, or special care, making them ideal for offices, apartments, and decorative shelves. This Crocheted plant: learn how to make it for decoration.-Step by Step Tutorial focuses on teaching you the core techniques while encouraging creativity and personalization.
Throughout this article, you will find carefully structured instructions, helpful insights, and SEO-optimized explanations using the main keyword Crocheted plant: learn how to make it for decoration.-Step by Step Tutorial in a natural and informative way. The goal is to help you create a beautiful crocheted plant that enhances your interior decor while improving your crochet skills. Let’s begin this creative journey and explore how handmade crochet can transform your decorative projects.
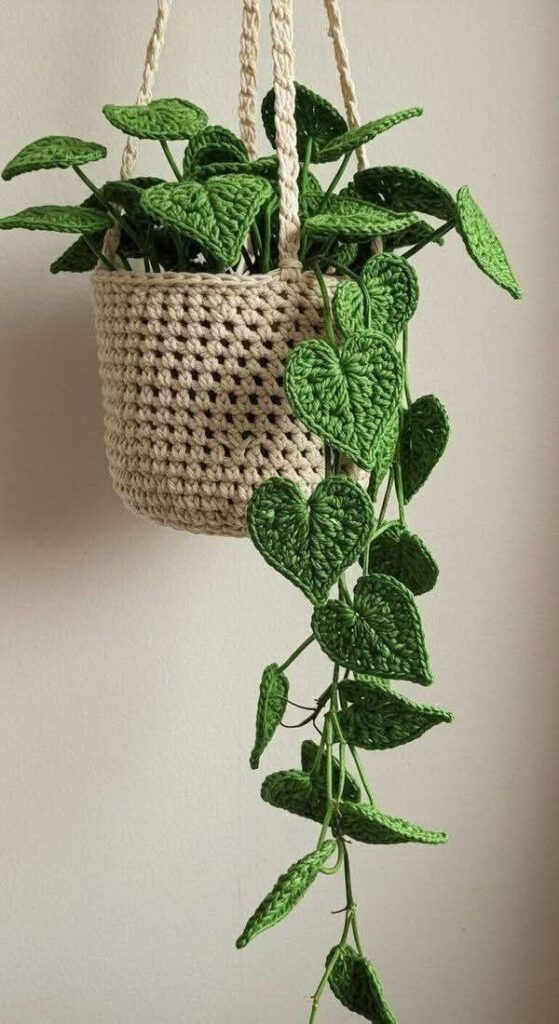
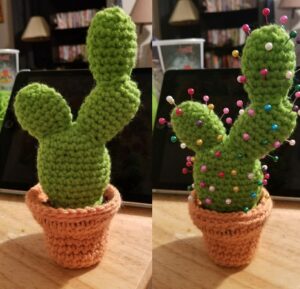
A crocheted plant is a decorative item made entirely from yarn, designed to resemble real plants such as succulents, vines, or leafy greens. In this step by step tutorial, understanding the basics is essential before starting your project. The foundation of any crocheted plant lies in choosing the right stitches, yarn, and structure to create a realistic and visually pleasing result.
The first important concept in making a crocheted plant is structure. Decorative crochet plants usually consist of separate elements such as leaves, stems, and sometimes flowers. These parts are crocheted individually and then assembled. This approach allows greater flexibility in shaping and customizing your final decoration, which is why it is widely used in crochet decor projects.
Another key aspect of a crocheted plant for decoration is texture. Using basic stitches like single crochet, half double crochet, and slip stitches can create a variety of textures that mimic real leaves. In this Crocheted plant: learn how to make it for decoration.-Step by Step Tutorial, we focus on simple stitches that produce elegant results without overwhelming beginners.
Color selection is also crucial. Green is the most common choice, but mixing different shades can add depth and realism. Some crocheters prefer muted tones for minimalist decor, while others enjoy vibrant colors for playful spaces. This tutorial encourages experimenting with colors while maintaining harmony in your design.
Yarn choice directly impacts the final appearance of your crocheted plant. Cotton yarn is often recommended because it holds shape well and offers a clean stitch definition. Acrylic yarn is also popular for its affordability and variety of colors. Understanding yarn characteristics helps ensure your plant looks neat and durable.
Finally, decorative purpose should guide your design. Whether your crocheted plant is meant for a shelf, desk, or hanging decor, the size and shape should match its intended placement. This foundational understanding prepares you for the practical steps in this step by step tutorial.
To successfully follow this Crocheted plant: learn how to make it for decoration.-Step by Step Tutorial, gathering the right materials is essential. Proper preparation ensures a smooth and enjoyable crochet experience, especially for decorative projects that rely on clean finishes.
The most important material is yarn. For a crocheted plant, medium-weight yarn is ideal because it provides stability and structure. Cotton yarn is often preferred for decorative crochet plants due to its firmness and natural appearance. Choosing high-quality yarn will make your final piece more visually appealing.
A crochet hook that matches your yarn size is another essential tool. Typically, a hook size between 3.5 mm and 4.5 mm works well for medium-weight yarn. Using the correct hook size ensures consistent stitches and prevents the plant from appearing too loose or uneven.
Additional tools include scissors for clean cuts and a yarn needle for weaving in ends and assembling parts. These tools help maintain a polished look, which is crucial for decorative crochet items. Neat finishing makes your crocheted plant suitable for display in any room.
Stuffing material may be needed depending on the type of plant you are creating. Some crocheted plants use light stuffing to give leaves volume and shape. Fiberfill is commonly used because it is lightweight and easy to shape without distorting stitches.
Wire or pipe cleaners are optional but useful for adding structure to stems or leaves. They allow you to pose your crocheted plant naturally, enhancing its decorative appeal. This step adds realism and flexibility to your project.
Having all materials ready before starting this step by step tutorial helps maintain focus and creativity. Organized preparation reduces mistakes and ensures a more enjoyable crochet process from beginning to end.
This section of the Crocheted plant: learn how to make it for decoration.-Step by Step Tutorial focuses on creating the main elements of your decorative plant. Each component is designed to be simple, beginner-friendly, and visually effective.
Begin with the leaves, as they are the most prominent part of a crocheted plant. Start with a magic ring or chain foundation, then work single crochet stitches to form the leaf shape. Increasing and decreasing stitches gradually creates a natural curve that resembles real leaves.
Once the basic leaf shape is complete, add texture by working slip stitches or half double crochet stitches along the edges. This technique gives definition and dimension, making your crocheted plant look more realistic and decorative.
Next, create the stem by crocheting a long chain and working single crochet stitches back along the chain. For added strength, you can crochet around a wire or pipe cleaner. This method ensures the stem remains firm and easy to shape.
If your decorative plant includes flowers or buds, crochet them separately using simple circular patterns. Small flowers add charm and visual interest, enhancing the overall aesthetic of your crocheted plant.
After completing all individual parts, assemble them carefully. Use a yarn needle to sew leaves onto the stem, positioning them evenly for balance. Assembly is a crucial step in this step by step tutorial, as it determines the final appearance.
Take time to adjust shapes and angles before securing all parts. Small adjustments can make a significant difference in how natural and decorative your crocheted plant appears.
The final stage of this Crocheted plant: learn how to make it for decoration.-Step by Step Tutorial focuses on finishing details and styling. These steps transform your crochet project into a polished decorative piece suitable for any interior.
Begin by weaving in all loose ends carefully. Clean finishing ensures durability and gives your crocheted plant a professional appearance. This step is essential for decorative items that will be displayed openly.
Shaping the leaves and stems is next. Gently bend wired sections or adjust stuffed areas to create a natural flow. Proper shaping adds realism and enhances the decorative impact of your crocheted plant.
Consider placing your crocheted plant in a decorative pot or basket. This simple addition elevates the overall presentation and makes it blend seamlessly with other decor items. Neutral pots work well for minimalist spaces, while colorful containers add personality.
Styling options are endless. A crocheted plant can be displayed on shelves, desks, windowsills, or even as part of a wall arrangement. This versatility makes it a popular choice in handmade decor.
Maintenance is easy, which is one of the biggest advantages of a crocheted plant. Simply dust it occasionally to keep it looking fresh. Unlike real plants, it will remain vibrant year-round.
Finally, personalization is encouraged. Add beads, embroidery details, or color variations to make your crocheted plant truly unique. Creativity is at the heart of this step by step tutorial.
FAQ
What skill level is required to follow this crocheted plant tutorial?
This tutorial is suitable for beginners with basic crochet knowledge, as well as intermediate crocheters looking for a decorative project.
How long does it take to make a crocheted plant?
Depending on size and complexity, a crocheted plant can take a few hours to complete, making it a perfect weekend project.
What yarn is best for a crocheted plant for decoration?
Cotton yarn is highly recommended due to its durability, stitch definition, and natural appearance.
Can I wash a crocheted plant?
Light hand washing is possible, but gentle dusting is usually sufficient for maintenance.
Are crocheted plants good for home decor?
Yes, they are long-lasting, customizable, and add a cozy handmade touch to any space.
Can I sell crocheted plants made from this tutorial?
Yes, handmade crocheted plants are popular items, as long as you respect originality and craftsmanship.
Conclusion
In this Crocheted plant: learn how to make it for decoration.-Step by Step Tutorial, you learned how to plan, crochet, assemble, and style a beautiful decorative plant using simple techniques and materials.
From understanding the basics to adding finishing touches, this guide was designed to help you create a charming handmade decor piece with confidence. Crochet allows endless creativity, and a crocheted plant is a wonderful way to express your personal style while enhancing your living space.
We hope this tutorial inspired you to explore more crochet decor projects. Please leave your honest opinion about this tutorial and share any suggestions or ideas you would like to see in future articles.


