
Crochet Cowboy Hat Pattern

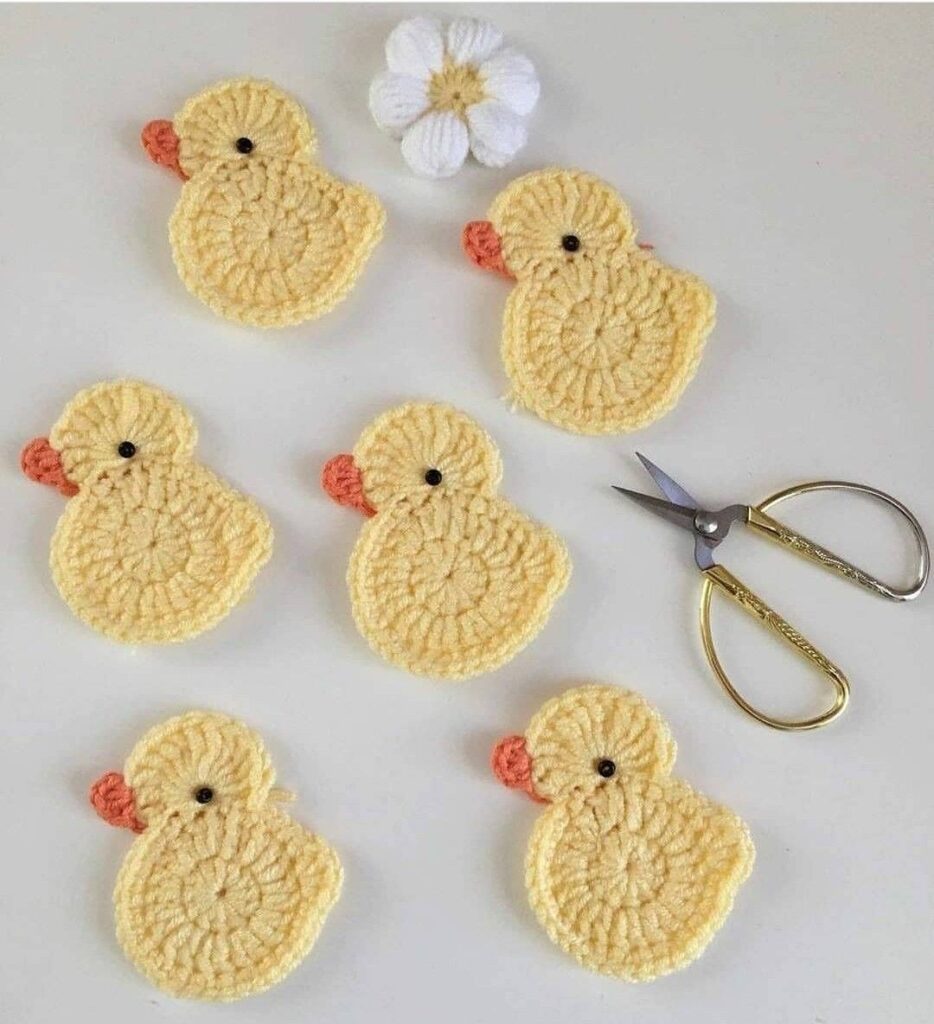
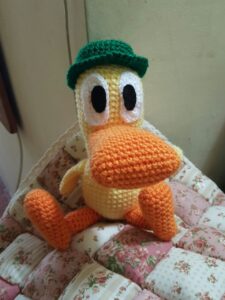
Starting this Crochet Duck Applique-Step by Step Tutorial, you will quickly discover how fun, simple, and relaxing it is to create small decorative crochet motifs that add charm to any handmade project. By learning how to make a cute duck applique, you’ll be able to accessorize blankets, hats, bags, clothing, and home décor pieces while practicing essential crochet skills. This guide focuses on clarity and ease, making it suitable for crafters of all skill levels, especially beginners looking to build confidence. The Crochet Duck Applique-Step by Step Tutorial is designed to be both practical and inspiring.
Creating appliques is one of the most delightful ways to explore texture, color, and creativity in crochet. In this article, you will learn how to make a duck applique from start to finish, using simple stitches and beginner-friendly techniques. The project allows you to experiment with basic shapes, layering, and assembly without feeling overwhelmed. The best part is that a Crochet Duck Applique-Step by Step Tutorial can be adapted to your own preferred style, colors, and yarn types, making each piece uniquely yours.
This project is also an excellent opportunity to practice slow crafting, an approach that encourages you to enjoy each step without rushing. Whether you plan to decorate children’s items, personalize gifts, or create a themed collection of animal appliques, this Crochet Duck Applique-Step by Step Tutorial will guide you through everything you need to know. By the time you finish, you’ll have a charming crochet duck that can be used for endless creative applications, all made with your own hands.
Beginning this section of the Crochet Duck Applique-Step by Step Tutorial, it’s important to understand the materials needed to achieve a neat and adorable result. Most duck appliques can be made with leftover yarn, making this project economical and sustainable. Cotton yarn is often preferred because it provides good stitch definition, but acrylic or blends can also work beautifully.
The crochet hook size you choose will depend on your yarn. Typically, a smaller hook creates tighter stitches, which is ideal for appliques that need to keep their shape. Even if you’re new to crochet, you’ll only need to use basic stitches such as chains, single crochets, increases, and slip stitches, making this project beginner-friendly.
The color palette plays a key role in how your applique turns out. Bright yellow for the body, orange for the beak, and black for small details like the eyes will help your duck look lively and expressive. Even so, you can customize your applique by choosing pastel tones, bold neon colors, or natural earthy shades.
Safety and convenience tools also enhance the experience. Stitch markers help keep track of rounds, while yarn needles allow for easy sewing and finishing. These little details make assembling your duck applique much more enjoyable and efficient. With these materials and stitches in mind, you’re fully prepared to move on.
Before continuing, remember that choosing quality yarn, the right hook, and a comfortable workspace will help you follow the Crochet Duck Applique-Step by Step Tutorial with greater ease. Once your materials are gathered, you are ready to begin shaping your adorable crochet duck.
The first step in shaping the duck’s body is to create a round base using increases. This gentle circular shape forms the main structure of your applique and gives the duck its signature rounded silhouette. Since this is a beginner-friendly project, the body is made with simple rounds, allowing you to practice uniform tension and stitch placement.
As you follow this part of the Crochet Duck Applique-Step by Step Tutorial, keep your stitches tight but not too firm. You want your work to remain flexible while still holding its shape. Increasing evenly around the circle will help the applique lie flat and avoid curling or bulging.
Once the circle reaches the desired size, you can slightly adjust the shape to make it look more like a duck’s body. This can be done by adding an extra increase on one side or working a few shorter stitches on the opposite side. These subtle adjustments make a big difference in the final appearance.
The tail area can be created by working a few extra stitches on one edge. This gives the applique a cute and recognizable duck shape without complicating the pattern. The simplicity of these steps is what makes the Crochet Duck Applique-Step by Step Tutorial perfect for beginners.
As you complete the body, remember that smooth edges are important. Slip stitches along the border can help refine the shape while giving your applique a polished finish. From here, the body will serve as the base for the head and smaller details.
The final step for the body involves securing all yarn ends neatly. A clean finish prevents loose threads and helps your applique look neat and professional. With the body complete, you’re ready to move on to creating the head.
The head is usually made separately as a smaller circle that will later be attached to the body. This helps give the applique a dimensional and charming appearance. Working with the same basic stitches, the head is easy to make and requires only a few rounds. As you follow the Crochet Duck Applique-Step by Step Tutorial, you’ll notice that the head should be proportionate to the body for a balanced look.
Once the head is done, the next detail is the beak. Using orange yarn, you can create a small triangle or rounded shape depending on the expression you want the duck to have. This tiny detail gives personality to your applique and makes it instantly recognizable as a duck.
Eyes may be embroidered or made using a small knot of yarn. Black yarn works best for visibility, but you can experiment with dark brown or navy blue for softer expressions. Placing the eyes slightly above the beak creates a friendly and adorable look.
Attaching the head to the body is a simple task that requires just a few stitches with a yarn needle. Make sure the pieces sit flat against each other and that the stitches are secure but invisible from the front. This step ensures a seamless and professional finish.
Additional decorative details such as wings or small accents can be added using the same basic stitches. These details are optional but can elevate the look of the applique if you enjoy adding extra character. Customization is one of the biggest advantages of the Crochet Duck Applique-Step by Step Tutorial.
Before moving on to the final steps, it’s important to weave in all yarn ends and adjust your applique so that all parts are aligned. This attention to detail will result in a polished project ready for display or attachment.
Now that all crochet components are complete, this section of the Crochet Duck Applique-Step by Step Tutorial will guide you through the assembly process. Begin by laying all the pieces flat to ensure that everything matches the size and proportion you prefer. Assembly is easy when you organize the parts before sewing.
Use a yarn needle with a matching color to sew the head securely onto the body. Small, neat stitches are key to making your applique look clean. Take your time with this step to maintain symmetry and ensure long-lasting durability.
Once the main pieces are attached, you can add optional embellishments like wings, embroidered feathers, or even tiny accessories. These details are completely up to your creativity and can help your applique match a specific theme or project.
Your duck applique can now be applied to a larger item such as blankets, baby clothing, tote bags, or decorative accessories. To attach it, use a few stitches around the edges or choose a fabric-friendly glue if you prefer a non-sewing option. Either method works well as long as the applique stays flat.
Before finishing, shape your applique gently with your hands to help it sit evenly. Cotton yarn usually holds its shape beautifully, while other yarns might need slight adjustments. The final result should look smooth and well-aligned.
At this point of the Crochet Duck Applique-Step by Step Tutorial, your project is complete and ready to be used or gifted. Whether you create a single duck or a whole family of them, the process is enjoyable, creative, and rewarding.
1. What yarn works best for a duck applique?
Cotton yarn is recommended because it provides excellent stitch definition and keeps the applique firm and neat. However, acrylic yarn also works well for beginners.
2. Can beginners follow this tutorial easily?
Yes, the Crochet Duck Applique-Step by Step Tutorial was written specifically with beginners in mind, using simple stitches and easy-to-follow steps.
3. How big does the duck applique typically measure?
The size varies depending on your hook and yarn, but most appliques measure between 7–12 cm, making them perfect for decorating various items.
4. Can I customize the colors of the duck?
Absolutely! You can choose classic yellow or experiment with pastel, neutral, or vibrant shades for a unique look.
5. How do I attach the applique to fabric?
You may sew it with a yarn needle or use fabric glue. Sewing provides greater durability, especially for items that will be washed frequently.
This Crochet Duck Applique-Step by Step Tutorial has guided you through choosing materials, shaping the body, adding details, and assembling your final piece.
By practicing these simple techniques, you can create adorable appliques that bring warmth and charm to many handmade projects.
I hope this article has inspired you to begin creating your own collection of crochet ducks. Please leave your honest opinion and share any suggestions you have for future tutorials.


