
Crochet Cowboy Hat Pattern

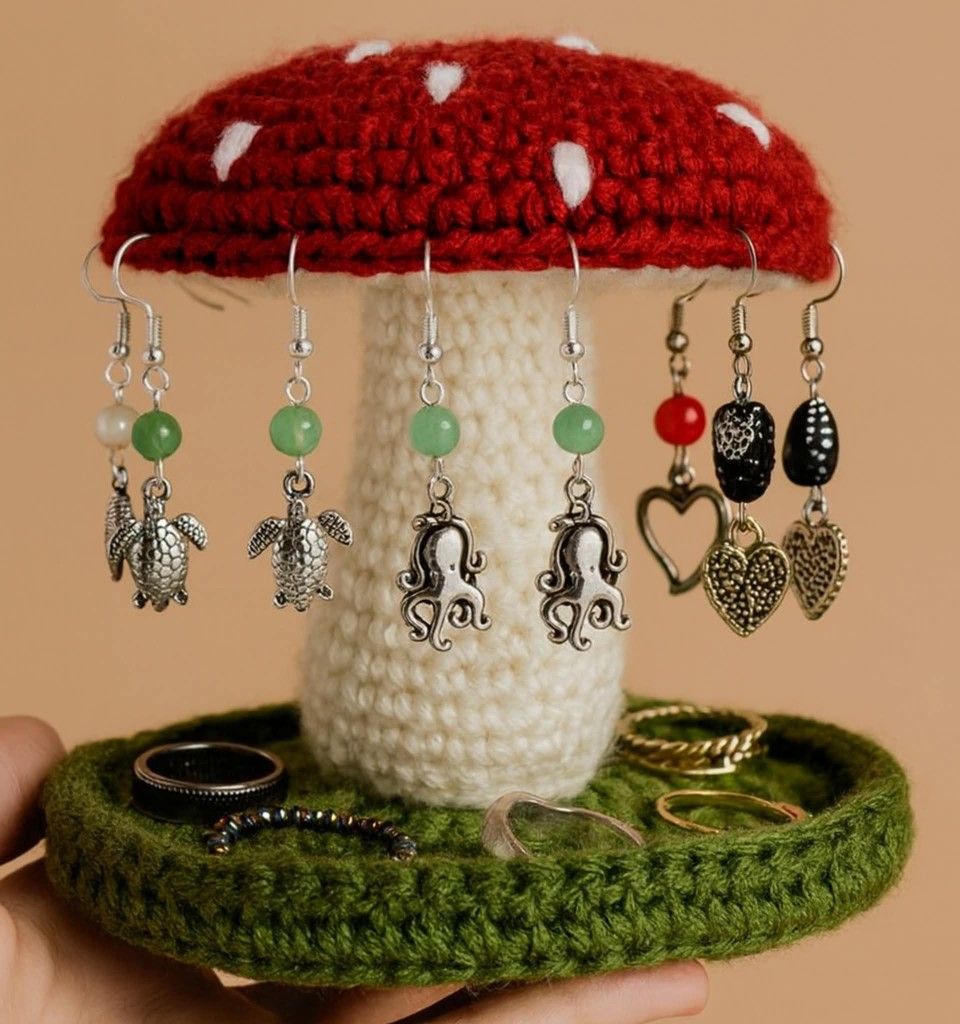
The Mushroom jewelry box-Step by Step Tutorial is a delightful guide for anyone who loves handmade crafts and wants to create a charming storage piece with personality. Right from the beginning, this project combines creativity, practicality, and a touch of whimsy, making it perfect for crafters of all skill levels. Whether you plan to use your jewelry box as a decorative item or as a functional organizer, the Mushroom jewelry box-Step by Step Tutorial will walk you through each stage of the process clearly and simply.
Creating a mushroom-shaped jewelry box adds a magical touch to any room. Its playful shape makes it stand out from traditional storage items, and its structure allows for multiple customization possibilities. With the help of the Mushroom jewelry box-Step by Step Tutorial, you can design your piece in colors, textures, and styles that reflect your taste. Most of the required materials are easy to find, and the techniques are friendly even for beginners, making this an excellent project for learning or practicing crafting skills.
Another great benefit of following the Mushroom jewelry box-Step by Step Tutorial is that it allows you to create a personalized handmade gift. A mushroom jewelry box can be given for birthdays, holidays, or special occasions. Handmade items often carry emotional value, and this adorable design is sure to bring joy to anyone who receives it. Before we explore the details, gather your materials and prepare for a relaxing and inspiring crafting experience.
The first step in the Mushroom jewelry box-Step by Step Tutorial is selecting the right materials. Choosing high-quality supplies ensures that your jewelry box remains sturdy, beautiful, and long-lasting. You can decide whether you want a soft, crocheted mushroom jewelry box or one created from cardboard, felt, or clay. Regardless of the material, the principles remain the same: stability, structure, and visual harmony are essential.
If you choose yarn, cotton or acrylic works best. Cotton offers durability and a clean finish, whereas acrylic provides flexibility and ease of handling. When following the Mushroom jewelry box-Step by Step Tutorial, pick yarn colors that suit your theme—popular choices include red for the cap and beige or white for the stem, but you can experiment with pastels, brights, or even earthy tones. High-quality yarn helps your craft hold its shape and keeps your jewelry safe inside.
For the base of your mushroom jewelry box, you’ll need something that can support weight. If you are crocheting it, stuffing or lightweight foam provides structure. If you are crafting with paper or felt, a round cardboard disk can form the bottom. The Mushroom jewelry box-Step by Step Tutorial emphasizes that a firm base is essential to prevent the box from collapsing or losing its shape over time.
You will also need scissors, glue (if working with felt or cardboard), and a needle for stitching details or assembling pieces. These tools help you attach components securely and neatly. Maintaining precision in this stage of the Mushroom jewelry box-Step by Step Tutorial ensures that the final product looks polished and professional.
Once your materials are ready, decide on the size of your jewelry box. A small box is perfect for rings or earrings, while a larger version can store necklaces or bracelets. Measure carefully, as the size you choose determines how many rounds or layers you’ll create. Taking a few minutes to plan before starting the Mushroom jewelry box-Step by Step Tutorial will make the crafting process easier and more enjoyable.
Finally, prepare a clean work surface with plenty of space. Having everything accessible helps you stay organized as you follow the steps. A tidy environment also prevents materials from getting lost or damaged. With your setup ready, you can confidently begin building your mushroom jewelry box.
One of the most iconic parts of the Mushroom jewelry box-Step by Step Tutorial is shaping the mushroom cap. This section is where your creativity truly begins to shine. The cap serves as both a decorative element and a functional lid for your jewelry box, so it must be crafted with care. Most crafters prefer a dome-like shape because it closely resembles the natural appearance of a mushroom.
To start the cap, form a circular base. If crocheting, begin with a magic ring and increase gradually to create a flat circle. Once you reach the desired diameter, continue crafting without increasing to build height. This process naturally curves the piece into a dome. The Mushroom jewelry box-Step by Step Tutorial highlights that even stitch tension is essential to ensure a smooth shape with no bumps or gaps.
If you’re using felt or paper, trace a large circle and cut two identical pieces. Sew or glue them together while leaving an opening to insert batting or stuffing. The stuffing gives the cap its puffed appearance. After adding the filling, close the opening securely. This technique from the Mushroom jewelry box-Step by Step Tutorial allows you to shape the cap easily and adjust its firmness as needed.
Next, decorate the mushroom cap. The classic look includes white spots, which can be crocheted separately, cut from felt, or painted on. These spots give the mushroom a charming and recognizable design. You may add as many or as few as you like. The Mushroom jewelry box-Step by Step Tutorial encourages using contrasting colors so the details stand out beautifully.
You can also embellish the cap with embroidery, beads, or delicate patterns depending on the style you want to achieve. If creating a whimsical, fairy-tale aesthetic, delicate vines or tiny flowers make lovely additions. A minimalistic style could feature solid colors or gentle gradients. The Mushroom jewelry box-Step by Step Tutorial supports creative freedom and invites you to personalize every detail.
Finally, check that the cap fits comfortably on the base. The lid should sit securely without slipping but should also be easy to remove. Adjusting the edge of the cap, tightening the final stitches, or adding an inner rim made of felt can help enhance the fit. With the mushroom cap completed, your project begins to take shape visually and functionally.
The stem of the mushroom forms the lower half of your jewelry box and serves as the storage compartment. In the Mushroom jewelry box-Step by Step Tutorial, this part must be shaped with stability in mind, as the compartment should protect delicate jewelry pieces and hold its form over time. Begin by forming the cylindrical or slightly flared bottom that will support the cap.
For crochet versions, start with a single crochet circle to form the base, similar to the cap but smaller. Once you reach the diameter you want, stop increasing and continue stitching upward to build the walls of the jewelry box. Consistent stitch height ensures the compartment looks clean and well-structured. Many crafters add a few rounds of half-double crochet for extra thickness. The Mushroom jewelry box-Step by Step Tutorial emphasizes that tight stitches prevent jewelry from snagging.
If crafting with felt or cardboard, cut out a circular bottom and a long rectangular strip. Attach the strip around the circle using strong glue or stitches, forming the hollow stem. Reinforce the edges for added durability. Lining the inside with soft felt creates a protective cushion for your jewelry. The Mushroom jewelry box-Step by Step Tutorial often recommends padding the bottom to absorb small impacts and keep items from scratching.
Next, consider the height of your compartment. Tall stems can store larger items, while shorter stems look more decorative and work perfectly for rings or earrings. Adjust the height gradually, making sure the proportions look balanced with the cap. The Mushroom jewelry box-Step by Step Tutorial explains that maintaining harmony between the stem and cap is essential for visual appeal.
Adding color transitions or textures to the stem makes it more realistic and attractive. Some crafters like creating ribbing by alternating stitch types or sewing thin vertical felt strips to mimic natural mushroom textures. These small touches enhance the design without complicating the project. The Mushroom jewelry box-Step by Step Tutorial encourages experimenting with stitch types to create unique effects.
Finally, finish the top edge of the stem neatly. If crocheting, add a reinforced border to help support the cap. If using fabric, fold the top edge inward and secure it for a clean, structured look. Ensuring the top is smooth helps the cap sit properly. At this stage of the Mushroom jewelry box-Step by Step Tutorial, you can see your piece coming together beautifully.
Personalizing your project is one of the highlights of the Mushroom jewelry box-Step by Step Tutorial. You can enhance your piece with small details that reflect your personality or match your home décor. Decorations make your jewelry box more charming and give it a unique identity.
Consider adding a small handle or knob on top of the cap. This makes lifting the lid easier and can be made from yarn, felt, or a decorative bead. Choose a color that complements the cap. Handles add practicality while remaining visually appealing, and the Mushroom jewelry box-Step by Step Tutorial encourages such small upgrades for convenience.
Another idea is to line the interior with a soft material. Felt is excellent because it prevents scratches and adds a luxurious touch. You can glue it neatly around the inside and bottom of the compartment. A well-lined jewelry box ensures safe storage, making it functional as well as beautiful. This is an important detail included in many versions of the Mushroom jewelry box-Step by Step Tutorial.
You may also personalize your mushroom using embroidery. Simple stitches can create vines, tiny flowers, hearts, or initials. These embroidered additions turn your jewelry box into a meaningful keepsake. The Mushroom jewelry box-Step by Step Tutorial highlights that small handcrafted embellishments make your piece stand out.
If giving your mushroom jewelry box as a gift, consider crafting a matching accessory, such as a small charm or tag. These details make the gift even more special. Handmade gifts carry emotional value, and following the Mushroom jewelry box-Step by Step Tutorial ensures your finished present is thoughtful and well-crafted.
The mushroom jewelry box also works as a decorative piece for shelves, dressing tables, or children’s rooms. Its fairy-inspired design adds warmth and character to any space. Because of its shape and versatility, you can customize it for holidays, seasons, or themes. The Mushroom jewelry box-Step by Step Tutorial offers endless possibilities for creativity and personalization.
1. What materials are best for following the Mushroom jewelry box-Step by Step Tutorial?
Cotton or acrylic yarn, felt, cardboard, stuffing, glue, scissors, and needles are commonly used depending on the crafting method you choose.
2. Is the Mushroom jewelry box-Step by Step Tutorial suitable for beginners?
Yes, the tutorial is beginner-friendly, and the techniques can be learned easily with patience and practice.
3. Can I customize the size of the jewelry box?
Absolutely. You can adjust the size by changing the number of rows, stitches, or the dimensions of your felt or cardboard pieces.
4. What can I store inside the mushroom jewelry box?
It is ideal for rings, earrings, small necklaces, trinkets, and keepsakes.
5. How do I make sure the lid fits correctly?
Carefully shaping the cap and reinforcing the top edge of the stem ensures a secure and comfortable fit.
6. Can I decorate the mushroom cap?
Yes, you can add spots, embroidery, beads, or other embellishments to personalize your design.
The Mushroom jewelry box-Step by Step Tutorial provides a fun and rewarding crafting experience that results in a beautiful and functional handmade piece.
From choosing materials to assembling and decorating the final design, each step encourages creativity and attention to detail.
You now have the guidance you need to create your own unique mushroom jewelry box. I hope this tutorial inspires you—please leave your honest opinion and suggestions so I can continue creating helpful content for you!


