
Crochet Cowboy Hat Pattern

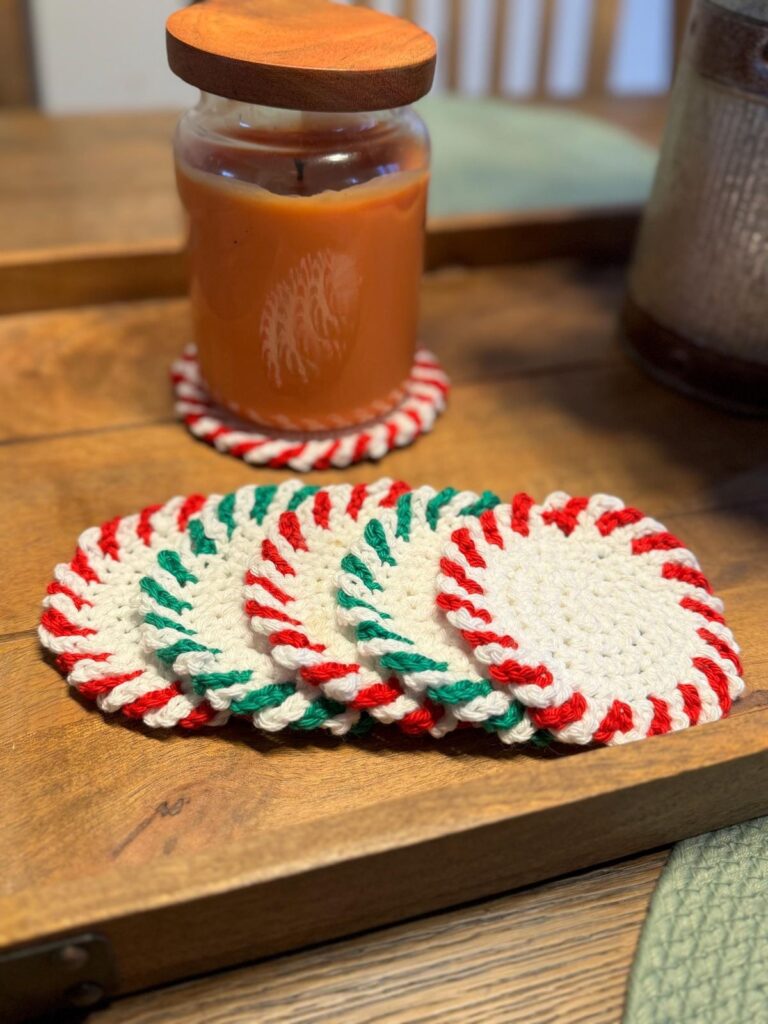
Creating handmade holiday crafts is a wonderful way to add warmth and personality to your festive celebrations, and this Christmas coasters-Step by Step Tutorial will guide you through making beautiful and functional crocheted coasters perfect for the season. Whether you are preparing your home for Christmas gatherings or looking for thoughtful handmade gifts, these Christmas coasters are a charming and meaningful choice. They are easy enough for beginners but enjoyable for experienced crafters as well, making this project versatile and fun.
The idea behind this Christmas coasters-Step by Step Tutorial is to help you create something joyful and practical. Coasters are used daily and become even more meaningful when associated with celebration and tradition. You can choose yarn colors like red, green, white, gold, or silver to create designs that match your holiday aesthetic. Additionally, these coasters can be customized in different shapes, such as stars, snowflakes, Christmas trees, or round motifs inspired by holiday ornaments. Let your creativity guide you as you learn each step.
One of the best aspects of making Christmas coasters is that they are small projects, which means they work up quickly. You can easily make a full set in one or two evenings. This makes them ideal for gift-giving or even selling at seasonal craft fairs if you desire. Handmade items like these hold emotional value and become cherished keepsakes year after year. With the right approach, patience, and creativity, this Christmas coasters-Step by Step Tutorial will help you create something both beautiful and memorable.
To start the Christmas coasters-Step by Step Tutorial, selecting the right materials is essential. The best yarn for coasters is cotton because it is durable, absorbent, and heat resistant. Cotton coasters protect your furniture from both hot and cold beverages without melting or losing shape. Christmas-themed color choices include red, white, green, and metallic yarns for festive flair.
Next, choose a crochet hook size appropriate for your yarn. Most cotton yarns work well with a 3.0 mm to 4.0 mm hook. Using the recommended hook size ensures your stitches are even, and your coasters come out the correct size and thickness. It also helps maintain a firm and sturdy fabric structure.
Prepare a pair of scissors and a yarn needle as well. The scissors will be used to cut your yarn cleanly, while the yarn needle helps you weave in ends neatly so your coaster looks professional and polished. Keeping your tools organized makes the crafting process smooth and more enjoyable.
Before beginning your project, it may be helpful to practice basic stitches if you are new to crochet. The stitches commonly used in coasters, such as slip stitch, single crochet, and double crochet, are foundational and easy to master. Taking time to practice helps build confidence before starting the main pattern.
Choose a comfortable space to work. Good lighting and relaxed posture can make your crafting experience pleasant and reduce hand strain. Crocheting should be an enjoyable and relaxing activity, especially when making festive items for holiday décor.
Once your workspace and materials are ready, you can begin with excitement knowing that each stitch brings you closer to creating a handmade treasure that will brighten your holiday season.
Now that the preparation is complete, the next part of the Christmas coasters-Step by Step Tutorial is forming the base. Many Christmas coaster designs begin with a circular shape. To start, create a magic ring and work six single crochet stitches into it. Pull the ring closed tightly to form a neat center.
The second round typically involves increases. Place two single crochet stitches in each stitch around, making a total of twelve stitches. This gradual increase in each round helps the coaster lay flat, avoiding curling or puckering. Maintaining even tension is key to a smooth finish.
Continue increasing by adding stitches in a systematic pattern. For example, in the third round, do one single crochet in the first stitch, then two single crochets in the next stitch, repeating that pattern around the circle. With each new round, the number of single crochets before each increase grows by one.
You should continue working until the coaster reaches approximately four to five inches in diameter. This size is ideal for mugs and glasses. You can make larger or smaller coasters depending on your preference or the intended use.
Once the circular base is complete, join with a slip stitch and fasten off. If you are making multiple coasters, try to maintain consistent tension across each one so they match in size. Attention to detail makes your final set look cohesive and professional.
The base shape is now ready for additional decorative elements that will transform this simple circle into a festive Christmas-themed work of art.
This part of the Christmas coasters-Step by Step Tutorial brings creativity into play. There are many design options to decorate your coaster base. You can create a Christmas tree motif, a snowflake pattern, a Santa hat, or even a candy cane swirl. The decorations you choose add personality and charm to your coasters.
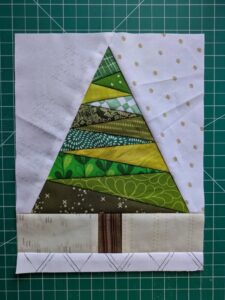
To make a Christmas tree design, you can crochet small triangles in green yarn and attach them to the coaster. Add miniature ornaments by sewing small beads or crocheting embroidered dots. The result is cheerful and recognizable as Christmas décor.
If you prefer a snowflake design, you can crochet using white yarn and create delicate lace-like patterns. Snowflake motifs look elegant and bring a wintery feel to your table. Remember to keep the coaster surface flat for functionality, so avoid raised decorations that interfere with cups.
Another fun design is a Santa hat. Crochet a small red triangle, add a white trim along the base, and attach a small white pom-pom at the tip. Sew it neatly to the edge of the coaster for a playful look that instantly signals holiday cheer.
You can also experiment with candy cane stripes by switching colors every few stitches. Carry the yarn neatly across the back so the stripes remain clean and even. Stripes add a bold and festive appeal perfect for themed table settings.
Don’t hesitate to mix and match elements. Handmade crafts should reflect your personality. Once your design is complete, weave in all loose ends securely to ensure durability when the coaster is used and washed.
The final part of the Christmas coasters-Step by Step Tutorial focuses on polishing your work and making sure your coasters last. After weaving in the ends, gently shape your coaster and allow it to lie flat. If needed, block the coaster by lightly dampening it and letting it dry flat to set the shape.
For added durability and non-slip function, consider adding a felt backing. Cut the felt slightly smaller than your coaster and sew it securely. This helps protect surfaces and keeps your coaster in place during use.
Christmas coasters make great holiday décor. Place them under cups, candles, or small holiday ornaments to create a festive display. They can brighten dining tables, coffee tables, desks, or kitchen counters. Their versatility makes them useful beyond just holding beverages.
These handmade coasters are also wonderful gifts. You can gift sets tied with ribbon, place them in gift baskets, or use them as stocking stuffers. They show care and creativity, making them meaningful presents that recipients will appreciate.
If you enjoy selling handmade crafts, Christmas coasters are excellent products for holiday markets. They are cost-effective to produce, quick to make, and always in seasonal demand.
Finally, remember to care for your coasters by hand washing in mild detergent and air drying. Proper care helps keep them beautiful for many years to come.
1. What yarn is best for Christmas coasters?
Cotton yarn is best because it absorbs moisture, handles heat, and holds shape well.
2. Can beginners follow this Christmas coasters-Step by Step Tutorial?
Yes, beginners can follow it easily since the project uses basic crochet stitches.
3. How long does it take to make one coaster?
Most coasters take about one to two hours depending on skill level.
4. Can these coasters be washed?
Yes, hand wash gently with mild soap and let them air dry flat.
5. Can I sell the coasters I make?
Yes, handmade coasters are great items to sell at craft fairs or seasonal events.
6. Can I use acrylic yarn instead?
It is not recommended due to heat sensitivity. Cotton is a safer and more durable choice.
This Christmas coasters-Step by Step Tutorial has shown how to create meaningful handmade coasters that add beauty and warmth to your holiday season.
From selecting materials, to crocheting the base, adding festive designs, and finishing with thoughtful details, each step contributes to creating something special. Whether you make these coasters for your home, as gifts, or for selling, they are a delightful way to celebrate creativity and the joy of Christmas.
If you enjoyed this tutorial, please leave a sincere comment with your thoughts and suggestions for future crafting guides. Your feedback helps improve and inspire new creative ideas!


