
Crochet Cowboy Hat Pattern

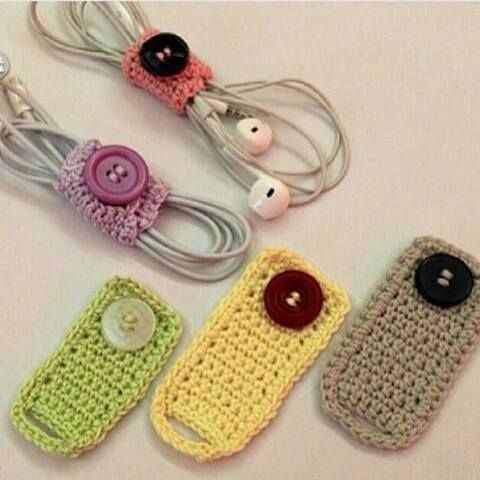
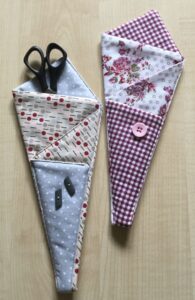
If you are someone who loves to stay organized and also enjoys crafting, this Crochet Cable Holder – Step by Step Tutorial is the perfect project for you. Not only does it help keep your cables neatly in place, but it also adds a handmade charm to your everyday essentials. With just a small amount of yarn and a few simple stitches, you can create a practical and beautiful crochet cable holder in no time. This tutorial is ideal for both beginners and experienced crocheters who love quick, functional, and creative projects.
Creating your own crochet cable holder allows you to keep headphone cords, charging cables, and other small wires from tangling. These tiny crochet accessories can make a huge difference in your daily life, especially if you often deal with messy cords in your bag, desk, or travel pouch. Using leftover yarns is another advantage of this project—making it sustainable, cost-effective, and eco-friendly. Plus, they make excellent handmade gifts for friends, family, or coworkers who appreciate thoughtful and practical crafts.
In this Crochet Cable Holder – Step by Step Tutorial, we’ll go over the materials you need, how to crochet it from start to finish, and a few ideas for personalizing your holder. You’ll also find tips on choosing the best yarns and closures, such as buttons or snaps, to make your project even more functional. Whether you want to create a single holder for yourself or a batch to give as gifts, this easy tutorial will guide you through each step with clarity and simplicity.
Before starting your Crochet Cable Holder – Step by Step Tutorial, make sure you gather all your materials. For this project, you’ll need a small amount of medium-weight yarn, a crochet hook suitable for your yarn (usually size 3.5mm to 4mm), scissors, a tapestry needle, and a button or snap for the closure. The best part is that you can use leftover yarn from previous crochet projects—making it an environmentally conscious craft idea.
Choose yarn that is not too thick or stretchy. Cotton yarn works perfectly for cable holders because it’s durable and provides a neat, structured finish. Acrylic yarn can also work if you prefer brighter colors and softer textures. If you’re using multiple colors, consider combining contrasting shades for a fun, vibrant look. Solid colors can be more elegant, while striped or multicolor yarns give a playful touch.
To prepare, make sure your yarn is untangled and your crochet hook is comfortable to hold. Since the project is small, it’s a great opportunity to practice your tension control and basic crochet stitches. Keep a few spare buttons nearby so you can choose the one that complements your final piece best. A wooden or metallic button can give a rustic or modern touch, depending on your personal style.
Having a clean workspace will make the process smoother. Lay out your materials neatly on a flat surface, and make sure you have good lighting. This is especially important for small items like cable holders, where precision matters. Once you’ve set everything up, you’re ready to move on to the fun part—crocheting your very own cable holder.
This simple preparation step ensures your project goes smoothly and helps prevent interruptions. If you’re crafting multiple holders at once, you can prepare several yarn pieces and buttons in advance. This way, you can easily create a collection of matching cable organizers in one session.
Finally, keep in mind that handmade crochet accessories, such as this cable holder, reflect your creativity. Even though the project is simple, adding your personal touch—like using decorative buttons or colorful yarn combinations—can make each holder unique and special.
Let’s begin the Crochet Cable Holder – Step by Step Tutorial. Start by making a slip knot and chaining about 20 stitches. The number of chains may vary depending on how long you want your holder to be—20 to 25 chains typically fit most small cables. Once you reach your desired length, add one extra chain to turn your work.
In the next step, make a single crochet in the second chain from the hook, then continue making single crochets across the entire chain. This will form the base of your cable holder. When you reach the end, chain one and turn your work. Repeat this process for three or four rows, depending on the thickness you want. The result should be a small rectangular strip.
To shape the ends, you can slightly round one side by decreasing stitches gradually—this gives your holder a softer and more finished appearance. The other side will hold your closure, so you can leave it straight. Once you’re satisfied with the shape, fasten off your yarn and weave in any loose ends using a tapestry needle.
Now it’s time to add the closure. Sew a button onto one end of your crochet piece, and create a small loop at the opposite end using a chain of 8 to 10 stitches. Attach this loop securely by slip stitching it back to the body of your holder. If you prefer, you can use a snap fastener or Velcro instead of a button. Choose what works best for your needs.
Try closing and opening your crochet cable holder to test its functionality. It should fit snugly around your cable without being too tight. Adjust your design if needed by adding or removing a few rows or stitches. This flexibility makes the project easy to customize for different cable sizes.
Once you’ve completed your first holder, you can easily replicate the process with different colors or textures. These crochet cable holders are quick to make, making them great for craft fairs, gift sets, or even personal use at home and work.
One of the best things about this Crochet Cable Holder – Step by Step Tutorial is how easy it is to personalize. You can experiment with various yarn types, colors, and patterns to match your style. Try using variegated yarn for a multi-tone effect or add stripes by changing colors every couple of rows. Each holder can have a completely different look with just small adjustments.
You can also add embellishments such as small crochet flowers, stars, or heart appliqués to make your cable holder even more charming. These decorations not only make the holder more visually appealing but also serve as a creative way to use small leftover yarns.
If you’re making these as gifts, consider matching them to the recipient’s favorite colors or creating themed sets—for example, pastel tones for spring or red and green for the holidays. Personalized handmade gifts are always appreciated, and this project is a perfect way to show you care.
Another customization idea is to change the size of your holder. For thicker cables, simply add more stitches to your foundation chain or make additional rows for width. For thinner cords, reduce the number of stitches. This adaptability ensures your crochet cable holders can accommodate any cable type—from phone chargers to headphones.
You can also play with textures by mixing different crochet stitches. For instance, try alternating between single crochet and half double crochet rows for a unique pattern. Even simple stitches can create interesting designs that add both functionality and beauty.
Finally, you can make a set of matching crochet cable holders in different colors and keep them in your workspace, bag, or car. This way, your cables are always organized, and you can easily recognize which one belongs to which device just by the color of its holder.
There are many benefits to making a crochet cable holder yourself. The first and most obvious is organization. Tangled cables can be frustrating, and having a small crochet accessory to keep them in place makes your life much easier. It saves time and keeps your workspace tidy.
Another great advantage is sustainability. By using leftover yarn from previous projects, you’re reducing waste and making good use of materials that might otherwise go unused. It’s an eco-friendly way to craft something functional and stylish.
Crocheting also provides a sense of accomplishment and relaxation. The rhythmic motion of crocheting helps reduce stress and boosts creativity. Finishing a practical item like a cable holder brings immediate satisfaction, especially when you see how useful it becomes in daily life.
These holders are also perfect for selling at craft fairs or gifting. Handmade items always carry a personal touch that people appreciate. You can easily make a collection of crochet cable holders in different colors and sell them as part of your handmade accessories line.
Another benefit is portability. Crochet cable holders are lightweight and take up almost no space, making them perfect for travelers or anyone who needs to carry multiple cords on the go. They can fit in any small pouch, ensuring your cables stay neat wherever you go.
Lastly, this project helps improve your crochet skills. It’s simple enough for beginners but still offers room for creativity and experimentation for advanced crocheters. Every holder you make helps you refine your technique and explore new design ideas.
1. What type of yarn is best for a crochet cable holder?
Cotton yarn is the most recommended because it’s strong and holds its shape well. However, acrylic yarn can also be used for softer or more colorful designs.
2. Can beginners make this project?
Absolutely! The Crochet Cable Holder – Step by Step Tutorial is ideal for beginners since it requires only basic stitches like chain and single crochet.
3. How long does it take to make one cable holder?
Most people can finish one in less than 30 minutes. It’s a quick and rewarding project perfect for short crafting sessions.
4. Can I wash my crochet cable holder?
Yes, you can hand wash it using mild soap and let it air dry. Avoid harsh detergents to preserve the yarn’s color and texture.
5. What closures can I use instead of buttons?
You can use snaps, Velcro, or even magnetic closures, depending on your preference. Just make sure they’re easy to open and close.
6. Can I sell crochet cable holders online?
Yes, you can. Handmade crochet items like cable holders are popular among customers looking for eco-friendly and unique accessories.
In this Crochet Cable Holder – Step by Step Tutorial, you’ve learned how to make a simple yet functional accessory that keeps your cables neat and stylish.
From choosing the right yarn and crochet stitches to adding creative decorations, this project combines practicality and creativity. It’s a perfect way to use up leftover yarn and make something both beautiful and useful.
Whether you’re making one for yourself, as a gift, or for sale, the crochet cable holder is a project that delivers quick results and long-term benefits. Now that you’ve completed your tutorial, we’d love to hear your thoughts. Share your honest opinion and suggestions below—your feedback helps make our crochet community even more creative and inspiring!


