
Crochet Cowboy Hat Pattern

Creating a beautiful and practical accessory has never been easier than with this Crochet clover bookmark-step by step tutorial. Whether you are an experienced crocheter or a beginner looking for a fun project, this tutorial guides you through each step to create a charming four-leaf clover bookmark. Not only does it serve as a functional tool to keep your place in books, but it also makes a thoughtful handmade gift for friends and family. The Crochet clover bookmark-step by step tutorial combines the artistry of crochet with everyday functionality, giving you a project that is both decorative and useful.
The uniqueness of this project lies in its blend of simplicity and elegance. With the Crochet clover bookmark-step by step tutorial, you can experiment with different yarn colors, textures, and thicknesses to create a personalized accessory. A vibrant green four-leaf clover is the classic choice, symbolizing luck, but you can also explore pastel or metallic yarns for a modern twist. Each clover leaf is carefully crocheted and assembled to create a cohesive and appealing final piece.
Before starting the Crochet clover bookmark-step by step tutorial, it’s important to gather all your materials. You will need a small amount of green yarn, a crochet hook suitable for your yarn weight, scissors, a yarn needle for weaving ends, and optional embellishments such as beads or tiny charms. Having all supplies ready before beginning ensures a smooth and enjoyable crafting experience.
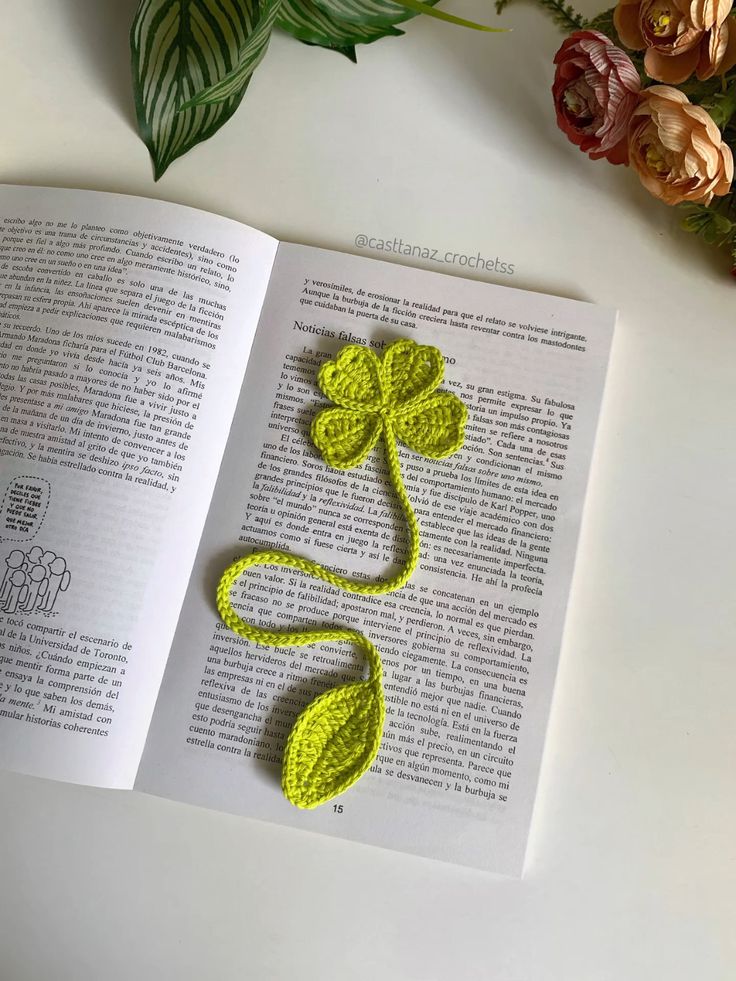
The first step in this Crochet clover bookmark-step by step tutorial involves crafting the clover leaves. Each clover consists of four heart-shaped leaves that are joined together to form the complete clover.
Start by making a slip knot and chaining a small number of stitches according to your chosen pattern size. This will form the base of the first leaf.
Crochet the first heart-shaped leaf using a combination of basic stitches such as single crochet, half-double crochet, and double crochet. Following the stitch pattern precisely will ensure a uniform leaf shape.
Once the first leaf is complete, continue with the next three leaves. It’s important to maintain consistent tension throughout to ensure that all leaves are similar in size and shape.
After all four leaves are crocheted, arrange them together and adjust their positions to form a balanced clover. Pinning them temporarily can help keep the shape while you prepare to join them.
Finally, check for symmetry and size consistency. Each leaf should appear even and proportionate, forming a visually pleasing four-leaf clover for your bookmark.
Joining the leaves is the next crucial step in the Crochet clover bookmark-step by step tutorial. This ensures that your clover is sturdy and can function as a bookmark without coming apart.
Place the leaves in the desired arrangement with their tips pointing outward. Use a yarn needle to carefully stitch the center points together, securing each leaf at the base.
Ensure that the stitches are tight enough to hold the leaves in place but not so tight that the fabric puckers or distorts. Proper tension is key for a neat and professional finish.
Once all four leaves are joined, weave in any loose ends to prevent fraying. Use small, even stitches to maintain a clean look on the front of the clover.
Optional: Add a small embellishment such as a bead or embroidered accent at the center of the clover. This adds charm and can personalize the bookmark to your taste.
Finally, gently shape each leaf with your fingers to smooth out any curling or uneven edges. The clover should now resemble a four-leaf lucky charm, ready for attachment to the bookmark stem.
The stem is what makes your Crochet clover bookmark-step by step tutorial functional. This part allows you to slip the clover into your book pages and keep your spot.
Start by creating a long chain that will serve as the main body of the stem. The length can vary depending on your preference or the size of your books.
Once the chain is completed, work a row of single crochet stitches along the chain to give it a solid, durable structure. This ensures that the stem won’t stretch or tear easily.
After finishing the stem, attach it securely to the base of the clover using a yarn needle. Sew through multiple points for stability, making sure the clover is firmly connected.
Weave in all loose yarn ends neatly. This is essential to ensure that the stem can withstand repeated use without unraveling.
Optional: Add decorative elements along the stem, such as small beads or stitched patterns, to enhance the visual appeal and make your bookmark even more unique.
In this final step of the Crochet clover bookmark-step by step tutorial, you will complete your project with finishing touches that enhance both appearance and durability.
Inspect the clover and stem for any loose threads or uneven stitches. Correcting these small details ensures a polished final product.
Optional: Lightly block the clover and stem to shape and smooth the stitches. This step helps the bookmark lie flat in your book and improves overall appearance.
Check the bookmark’s functionality by slipping it into a book to ensure the clover sits neatly on the page without bending or stretching.
Add any additional embellishments, such as a tiny embroidered letter or charm, to personalize your bookmark and make it stand out as a gift or personal keepsake.
Finally, give the bookmark a gentle press with your fingers to ensure all elements are in place. Your Crochet clover bookmark-step by step tutorial is now complete and ready to use.
1. Can beginners make this bookmark?
Yes, the Crochet clover bookmark-step by step tutorial is beginner-friendly, using basic stitches and simple assembly techniques.
2. What yarn works best for the clover?
Lightweight cotton or acrylic yarn is ideal, providing good stitch definition and durability.
3. How long should the stem be?
The stem can be customized to your book size. Typically, 6-8 inches works well for standard books.
4. Can I make multiple clovers for a set?
Absolutely! You can create a set in different colors or sizes to make a charming gift collection.
5. How do I care for the bookmark?
Hand wash gently and air dry to maintain its shape and color. Avoid wringing or harsh detergents.
6. Can I add charms or beads?
Yes, small embellishments can be sewn onto the clover or stem to personalize your bookmark.
The Crochet clover bookmark-step by step tutorial provides a complete guide to creating a charming and functional bookmark. From crocheting the four leaves to joining them, crafting the stem, and adding finishing touches, every step has been carefully explained for clarity and ease of use.
This project allows you to combine creativity with practicality, resulting in a beautiful accessory that can be used personally or gifted to loved ones.
Now it’s time to try the project yourself. Experiment with yarn colors, textures, and embellishments, and enjoy the satisfaction of creating a handmade, lucky clover bookmark. Leave your honest feedback and suggestions to share your experience and inspire others in the crafting community.


