
Crochet Cowboy Hat Pattern

If you’ve been looking for a fun and creative way to add charm to your table setting, this How to Crochet Ladybug Coaster – Step by Step Tutorial is perfect for you. Crochet lovers are always in search of new ideas to make their homes feel more personal and cozy, and nothing says “handmade love” like a colorful, cheerful ladybug coaster. This small yet delightful project can bring a touch of spring and joy to your kitchen or living room while protecting your surfaces from scratches and heat.
Crocheting your own ladybug coaster is not only fun but also an excellent way to practice your crochet skills. Whether you are a beginner or have years of experience, following a step-by-step crochet tutorial allows you to improve your technique and learn new stitches. What makes this pattern special is its simplicity and versatility—you can create it in traditional red and black, or choose your favorite colors to give it a unique twist. Plus, it makes an adorable handmade gift for friends and family who appreciate thoughtful, creative items.
In this How to Crochet Ladybug Coaster – Step by Step Tutorial, we’ll cover everything you need to know, from choosing the right materials and yarns to understanding the stitches and shaping the perfect ladybug. You’ll be guided through the process in a clear, easy-to-follow way so you can enjoy crafting without feeling overwhelmed. By the end, you’ll not only have a set of cute ladybug coasters but also a new crochet skill that you can apply to other decorative items in your home.
The success of your crochet ladybug coaster starts with choosing the right materials. A good project begins with quality yarn, a suitable hook, and a comfortable working environment. Selecting the proper yarn weight and color combination ensures that your ladybug looks vibrant and durable. Cotton yarn is ideal for coasters because it absorbs moisture well and holds its shape over time.
Next, consider your crochet hook size. A 3.5 mm or 4 mm hook usually works perfectly for ladybug coaster crochet patterns, as it provides the right tension to create a sturdy yet flexible surface. Using a smaller hook can make your coaster too tight, while a larger one may cause it to lose its structure. It’s always good to make a small test swatch before starting your actual project.
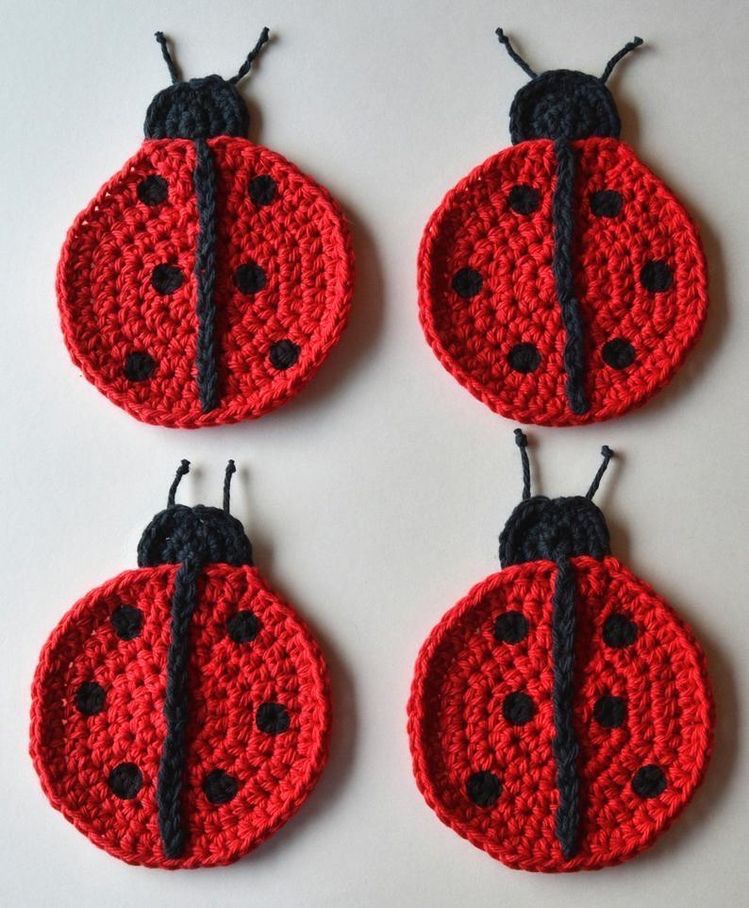
The classic ladybug design features a red body with black spots, but feel free to experiment. You can use pink, yellow, or even pastel tones for a different look. Many crocheters love adding a small white accent for the eyes to make the design more expressive and lively.
You’ll also need a yarn needle for weaving in ends and a pair of scissors for trimming. Keeping your tools organized in a small basket or crochet bag helps you stay focused and prevents losing small accessories while working.
Finally, make sure to have a flat surface where you can block your coasters after finishing. Blocking helps even out the stitches and gives the final shape a polished look. It’s a small step that makes a big difference in the overall appearance of your ladybug coaster crochet project.
With the right materials and setup, you’re now ready to start crocheting your adorable ladybug coaster with confidence and creativity.
Now that your materials are ready, it’s time to dive into the fun part: crocheting! The following step-by-step tutorial will guide you through each stage of making your ladybug coaster, from the body to the tiny details that bring it to life.
Begin by creating a magic ring with your red yarn. This will form the center of your coaster. Work six single crochets into the ring and pull tight to close. Join with a slip stitch to the first stitch. For the next rounds, continue increasing evenly to form a perfect circle. By the time you reach round six or seven, your base should resemble the size of a standard coaster.
Once you have the circular red base, switch to black yarn to crochet the head. The head can be made by stitching across one edge of the circle using half-double crochets or double crochets. The rounded edge of the black section gives the ladybug its signature look.
Next, create the black spots that decorate the ladybug’s back. You can crochet small circles separately and sew them onto the red base or use surface crochet to attach them directly. Arrange the spots symmetrically to maintain a neat appearance.
To add the finishing touches, use white yarn to embroider tiny eyes on the head. If you prefer, you can attach small crochet eyes or use buttons for a playful effect. Make sure to sew them securely so they won’t loosen during washing.
Finally, crochet a simple border around the coaster with black yarn to unify the design and strengthen the edges. Fasten off and weave in all ends with a yarn needle. Congratulations—you’ve completed your first ladybug crochet coaster!
One of the best things about crochet is its flexibility. With the same ladybug coaster pattern, you can create endless variations that reflect your personal style. Try changing the color scheme to match your kitchen decor or the season. For example, a yellow and black combination can create a cheerful bee-inspired design, while green and red can give a festive holiday look.
Another fun idea is to add texture to your coasters. Experiment with different stitches such as puff stitch or bobble stitch to make the ladybug’s body more dimensional. You can also use sparkly or variegated yarns for a more playful touch.
If you love adding embellishments, consider attaching small crochet flowers or leaves around the edge of your ladybug coaster. This adds a whimsical, garden-like feel to your table setup and makes your project truly stand out.
For those who enjoy giving handmade gifts, a set of ladybug coasters tied with a ribbon makes a charming present. You can pair them with a crocheted mug cozy or placemat for a coordinated set. These small handmade items are thoughtful, practical, and always appreciated.
You can also scale the pattern up or down depending on your needs. Using thicker yarn and a larger hook, you can transform your coaster into a decorative hot pad or wall hanging. With finer yarn, you could make mini ladybugs as appliqués to decorate bags or clothing.
Lastly, don’t forget to personalize your work. Adding a small tag with your initials or a handmade label gives your ladybug coaster project a professional finish. It’s these small details that turn a simple craft into a treasured keepsake.
Once your ladybug coasters are finished, proper care will ensure they stay beautiful and functional for a long time. Since they’re made from cotton yarn, they are durable and washable—but it’s important to treat them gently.
Always hand wash your crochet coasters with mild detergent and cool water. Avoid using bleach or harsh chemicals that can damage the fibers and dull the colors. After washing, reshape them gently and lay them flat to dry.
If your coasters lose their shape over time, you can easily re-block them. Simply dampen the coaster, pin it to a flat surface in the desired shape, and let it dry naturally. This method helps maintain the even circular shape that defines your ladybug crochet design.
Storing them properly also extends their lifespan. Keep your coasters in a clean, dry drawer or container, preferably between paper sheets to avoid dust. Don’t fold them tightly—this can distort the stitches.
For decorative use, you can even spray them lightly with a fabric stiffener to make them more rigid. This keeps them in place and adds a crisp appearance to your table.
By following these simple care tips, your handmade ladybug coasters will continue to bring joy and color to your home for years to come.
1. What yarn is best for crocheting ladybug coasters?
Cotton yarn is the best choice because it’s durable, absorbs moisture well, and maintains its shape after washing.
2. Can beginners make this ladybug coaster?
Yes! This How to Crochet Ladybug Coaster – Step by Step Tutorial is beginner-friendly, using simple stitches like single crochet and double crochet.
3. How long does it take to complete one coaster?
On average, it takes about 1–2 hours to make one coaster, depending on your crochet speed and experience level.
4. Can I wash my ladybug coaster in a washing machine?
It’s best to hand wash it to maintain its quality, but gentle machine washing in a mesh bag can also work if you use cold water and mild detergent.
5. Can I use acrylic yarn instead of cotton?
You can, but cotton is preferred for coasters because it resists heat better and provides better absorption.
6. How can I make my ladybug coaster larger?
Simply add more increase rounds to the red base and adjust the size of the black head and spots proportionally.
7. What can I do with leftover yarn from this project?
Leftover yarn can be used for mini ladybugs, keychains, appliqués, or even to create a matching mug cozy.
8. Can I sell my finished ladybug coasters?
Absolutely! Handmade coasters are popular at craft fairs and online shops. Just make sure to use your own photos and description when promoting your work.
In this How to Crochet Ladybug Coaster – Step by Step Tutorial, you learned how to create an adorable and functional crochet project from start to finish.
From selecting materials to adding the final touches, each step helps you improve your crochet skills and express your creativity. This project is simple, enjoyable, and ideal for both beginners and seasoned crafters.
Now that you know how to make your own crochet ladybug coaster, it’s time to grab your hook and yarn and start creating! We’d love to hear your thoughts—please leave a sincere opinion about this tutorial in the comments and share any suggestions you have for future crochet guides. Your feedback helps inspire more beautiful projects and keeps the crochet community growing!


