
Crochet Cowboy Hat Pattern

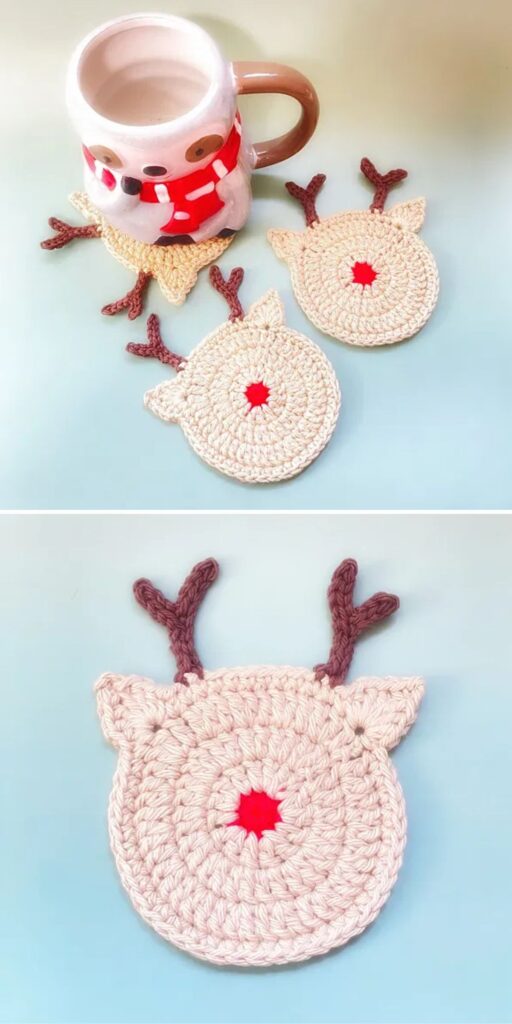
Creating a crochet reindeer coaster- Step by Step Tutorial is a fun and creative way to combine the beauty of handmade crafts with the joy of festive decorations. Coasters are not only practical, protecting your furniture from watermarks and heat, but they also bring warmth and personality to your home. By turning your project into a reindeer design, you get an adorable accessory that is perfect for the holiday season and beyond. Handmade crochet items always carry a sense of charm, and these reindeer coasters are no exception.
When you follow a crochet reindeer coaster- Step by Step Tutorial, you gain more than just a useful craft item. You also enjoy the satisfaction of learning and applying new crochet skills while producing something that can be gifted, sold, or proudly used at home. The tutorial allows beginners and advanced crocheters alike to enjoy the process, as the steps are easy to follow and can be adapted to your own style. Whether you are decorating for Christmas or simply want a cute woodland-inspired coaster, this project offers endless possibilities.
The beauty of a crochet reindeer coaster- Step by Step Tutorial lies in its adaptability. You can experiment with yarn colors, add unique features like buttons for eyes, or keep it simple with a minimalistic design. These projects also serve as great handmade gifts that show thoughtfulness and creativity. Because crochet is a timeless craft, learning how to make themed coasters such as reindeer designs opens the door to countless future projects where you can apply the same skills.
Before starting the crochet reindeer coaster- Step by Step Tutorial, it is important to gather all the necessary materials. This ensures that the project flows smoothly without interruptions. You will need yarn in shades of brown, beige, or tan for the reindeer’s face, as well as white, black, and red if you want to add details like the nose or eyes. A standard cotton yarn is often recommended for coasters because it is durable and washable.
Equally important is selecting the right crochet hook size. For most coaster projects, a hook size between 3.5mm and 4.5mm works well, but you should adjust depending on the thickness of your yarn. A smaller hook creates tighter stitches, which are perfect for functional items like coasters. You will also need scissors for trimming ends and a yarn needle for weaving in the loose threads once your coaster is finished.
The next step in preparing for the crochet reindeer coaster- Step by Step Tutorial is understanding basic stitches. You will typically use chains, slip stitches, single crochets, and double crochets. These fundamental stitches are simple but versatile enough to form the structure of your coaster. If you are new to crochet, practicing these stitches beforehand can help build confidence.
For the design aspect, decide whether you want your reindeer to have a simple flat look or a more dimensional effect with raised features like ears or antlers. Planning ahead helps avoid mistakes and ensures the final coaster matches your vision. A stitch marker may also be useful to keep track of rounds, especially when working in circles.
It is also a good idea to prepare your workspace. Make sure you have proper lighting, a comfortable chair, and all your tools within reach. A relaxed and organized environment will make the crafting process much more enjoyable. By being well-prepared, you can fully immerse yourself in the fun of creating without unnecessary interruptions.
Lastly, remember that crochet projects, especially themed ones like this, require patience. Each stitch brings you closer to the final product. Embrace the process and enjoy the journey as much as the result. With preparation complete, you are ready to dive into the steps of this festive coaster.
To begin the crochet reindeer coaster- Step by Step Tutorial, start with a magic ring or chain loop to create the coaster’s base. This circular foundation is essential because it forms the reindeer’s face. Work several rounds of single crochet or half-double crochet stitches to build up the shape. As you continue, the coaster should remain flat and even, ensuring it will serve its functional purpose.
Once the circular base is complete, it’s time to add details. The reindeer’s ears can be crocheted separately and then stitched onto the coaster. Typically, small triangular shapes made with simple stitches are enough to create recognizable ears. Position them symmetrically at the top of the circle for a balanced design.
The next step in the crochet reindeer coaster- Step by Step Tutorial is creating the antlers. Antlers are what make the design truly festive and unique. They can be crocheted as branched shapes using chains and slip stitches to achieve a lightweight, delicate look. Sew them onto the top of the coaster behind the ears to give the reindeer a realistic appearance.
After the antlers, focus on the facial features. You can crochet small circles for eyes, adding black yarn for pupils. Alternatively, felt or buttons can be attached to make the process quicker. For the nose, red yarn is the classic choice if you want a Rudolph-inspired design, while brown or black yarn works well for a more traditional reindeer look.
Attaching the features carefully is important for durability. Use a yarn needle to securely sew the pieces onto the coaster. This ensures the reindeer’s face stays intact even after repeated use and washing. Taking your time with this step will make a big difference in the overall appearance.
Once all the elements are added, finish by weaving in any loose ends neatly. Block the coaster if necessary to flatten it out and give it a polished look. Now, your reindeer coaster is complete and ready to be admired, used, or gifted.
One of the best aspects of the crochet reindeer coaster- Step by Step Tutorial is how versatile it can be. While the traditional design uses brown yarn for the face and red for the nose, you can experiment with different colors to match your holiday decor. For example, pastel shades create a softer, whimsical look, while bold colors add a playful twist.
You can also personalize each coaster to represent different reindeer characters. Adding unique features like eyelashes, smiles, or scarves gives each coaster a distinct personality. This makes them great conversation starters at holiday gatherings and adds a handmade touch to your festive setup.
Another creative option is to turn the coaster into a set of matching holiday items. Use the same pattern to create reindeer appliqués for blankets, table runners, or even Christmas stockings. Coordinating your crochet projects gives your home a cohesive and festive atmosphere.
For those who enjoy functional gifts, the crochet reindeer coaster- Step by Step Tutorial is perfect. Making a set of four or six coasters tied with a ribbon creates a thoughtful handmade gift that friends and family will appreciate. These gifts are not only practical but also meaningful, as they show time and effort spent in crafting.
You can also add extra touches like glittery yarn or small embroidered snowflakes on the coaster’s surface. These little details elevate the design, making it stand out even more. Creativity has no limits, and each coaster you make can be slightly different, ensuring no two are ever the same.
Finally, remember that customization is about having fun and expressing yourself. Whether you stick to traditional designs or explore imaginative variations, the most important thing is to enjoy the process and create something you are proud of.
When following a crochet reindeer coaster- Step by Step Tutorial, it’s natural to encounter small challenges along the way. One common issue is the coaster curling or not lying flat. This usually happens if your tension is too tight or if you miss increases during circular rounds. Checking your stitch count regularly helps prevent this.
Another tip is to always use yarn that is easy to wash, especially since coasters come into contact with drinks and surfaces. Cotton yarn remains the best choice because of its absorbency and durability. Avoid delicate or fuzzy yarns for this type of project, as they may not withstand frequent use.
If you find your antlers too floppy, try using tighter stitches or doubling the yarn for extra sturdiness. Alternatively, you can use a light starch spray to give them more structure. Antlers are a key feature, so making them neat will enhance the overall look of the coaster.
Some beginners struggle with attaching small pieces like eyes or noses. The best solution is to use a yarn needle and carefully sew each piece into place. Practicing on scrap yarn before attaching them to the coaster can also build confidence.
Time management is another important factor. While this project is relatively small, it still requires patience and attention to detail. Avoid rushing through it, as carefully made stitches always result in a more polished product.
Lastly, don’t be discouraged by small imperfections. Handmade crafts are valued precisely because they are unique and personal. Each coaster tells a story of creativity and effort, which makes it special.
1. How long does it take to complete a crochet reindeer coaster?
Most people can finish one coaster in 1 to 2 hours, depending on their skill level and the complexity of added details like antlers and eyes.
2. What type of yarn works best for crochet reindeer coasters?
Cotton yarn is the best option because it is durable, absorbent, and easy to clean, making it perfect for coasters.
3. Can beginners follow a crochet reindeer coaster- Step by Step Tutorial?
Yes, the project uses basic stitches like single crochet and double crochet, making it suitable for beginners with some practice.
4. How do I make the antlers sturdy enough?
You can use tighter stitches, double-strand yarn, or even a light starch spray to keep the antlers firm and upright.
5. Are crochet reindeer coasters machine washable?
Yes, if you use cotton yarn, they are typically machine washable. However, it’s always best to wash them gently and let them air dry.
6. Can I customize the design of the reindeer?
Absolutely! You can change yarn colors, add different facial expressions, or even accessories like scarves to give each coaster a unique look.
The crochet reindeer coaster- Step by Step Tutorial is a wonderful project that combines functionality with festive charm.
By following the steps carefully, you can create adorable reindeer-themed coasters that are perfect for holiday decor or thoughtful handmade gifts. With simple stitches, creativity, and patience, even beginners can enjoy success in this craft.
Now that you have learned everything from materials to customization ideas, it’s time to try it for yourself. Remember, each handmade piece carries a part of your creativity and effort, making it truly special. I’d love to hear your sincere opinion and suggestions—share your thoughts about this tutorial and let me know how your crochet journey turns out.


