
Crochet Cowboy Hat Pattern

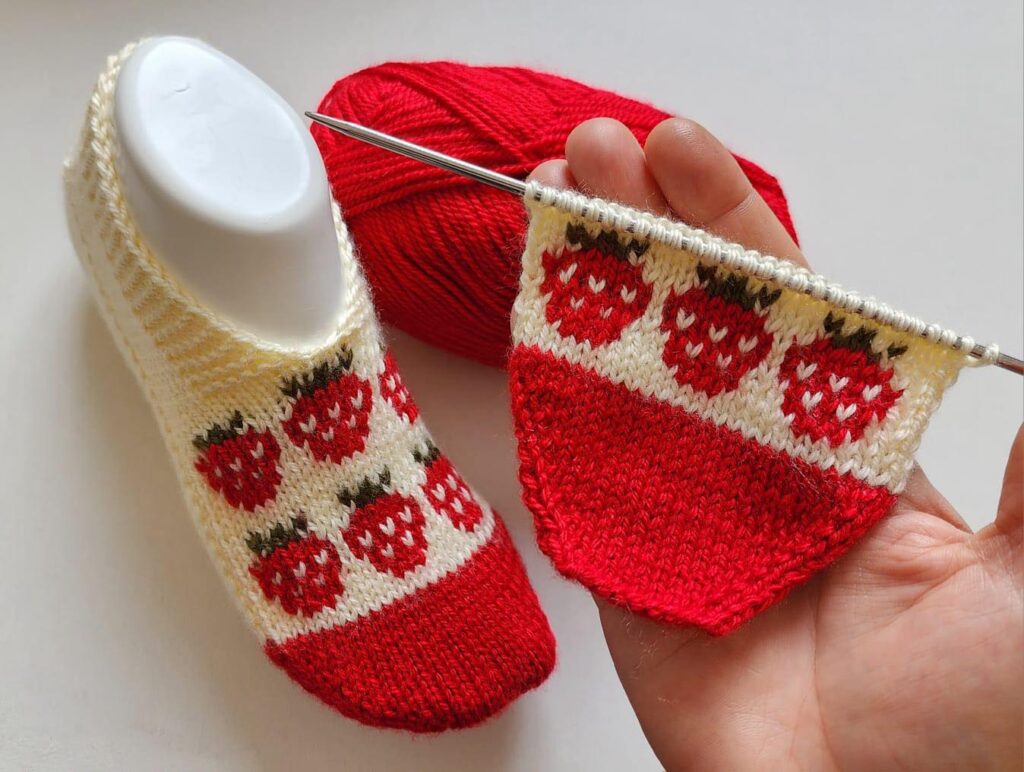
Learning Crochet socks with strawberries- Step by Step Tutorial is a fun and creative way to combine style, comfort, and handmade charm in one project. Crocheting socks can seem intimidating at first, but this tutorial will guide you through each stage so you can create a beautiful and cozy pair featuring adorable strawberry designs. Perfect for personal use or as a heartfelt gift, these socks are practical yet full of personality.
The beauty of making your own crochet socks with strawberries is the opportunity to customize them. You can choose your favorite yarn colors, adjust the size to fit perfectly, and add as many strawberry patterns as you want. Whether you prefer bright reds for a bold look or pastel shades for a softer appearance, this project allows you to express your creativity while making something useful.
Another benefit of following this Crochet socks with strawberries- Step by Step Tutorial is that it suits both beginners and experienced crocheters. The stitches used are simple, and the strawberry details are easy to add once you understand the basic sock structure. Plus, the finished product is both stylish and functional, making it a rewarding project to complete.
Before starting the Crochet socks with strawberries- Step by Step Tutorial, gather all the necessary materials to make the process smooth and enjoyable. The main item you need is yarn. Choose a soft, comfortable yarn such as cotton or a cotton blend to ensure your socks feel good on your feet. Cotton yarn also provides breathability, making the socks ideal for year-round wear.
Next, select a crochet hook suitable for your chosen yarn. Most patterns work well with a 3.5mm to 4mm hook, which provides a tight enough stitch for durability without making the socks too stiff. A hook size that matches your tension will ensure the socks fit comfortably.
You will also need a pair of scissors for cutting yarn and a yarn needle for weaving in ends. A stitch marker can be very helpful, especially if you’re new to crocheting in the round, as it keeps track of where each round begins and ends.
For the strawberry details, gather small amounts of red and green yarn. Red is for the strawberry body, while green is for the little leaves on top. You can also add white yarn for tiny seed details if you want a realistic look.
Stuffing material isn’t necessary for the socks themselves but can be used for creating small three-dimensional strawberry appliqués if you want a textured design rather than flat patterns. This is optional, depending on your preferred style.
Finally, have a measuring tape handy to check the size as you go along. This ensures the socks fit well and are comfortable to wear once finished.
The first step in the Crochet socks with strawberries- Step by Step Tutorial is making the basic sock structure. Start by crocheting the cuff. This is typically worked in rows using simple stitches like single crochet or half-double crochet, then joined into a circle to form the top edge of the sock.
Once the cuff is complete, move on to the leg section. This part is worked in rounds below the cuff and can be as long or short as you prefer. For ankle socks, keep the leg short; for cozy winter socks, add extra length for warmth and comfort.
After the leg, begin shaping the heel. Many crocheters use the short-row technique for heels, which creates a neat, comfortable fit. It involves working back and forth over a portion of the stitches before rejoining them to form the heel’s curve.
Once the heel is done, continue crocheting the foot section in rounds. Measure frequently to ensure the length fits your foot correctly, stopping just before the toes. This step ensures your crochet socks with strawberries will be both attractive and functional.
The toe shaping comes next. Similar to the heel, it requires a bit of decreasing to form a rounded, comfortable tip. When you have only a few stitches left, fasten off the yarn and use the needle to close the toe securely.
At this point, you have a complete sock base ready for the fun part: adding the strawberry decorations that make this project truly special.
The most exciting part of the Crochet socks with strawberries- Step by Step Tutorial is creating the strawberry patterns. You can crochet small strawberry appliqués separately or work the designs directly into the sock using color changes.
For appliqués, start with red yarn and crochet a small triangle or teardrop shape. Add a few stitches of white yarn for seeds, then use green yarn to create tiny leaves at the top. These pieces can be sewn onto the sock wherever you like, giving you complete control over the final look.
If you prefer to integrate the strawberries into the sock pattern itself, use tapestry crochet or simple color changes to form red strawberry shapes directly in the stitches. Add small green stitches on top for leaves to complete the design.
Consider placing strawberries randomly for a playful, scattered look or aligning them in neat rows for a more organized pattern. Either way, the result will be cheerful and eye-catching.
Another option is to create small three-dimensional strawberries by lightly stuffing the red shapes before closing them. These can be sewn on as little charms for a textured, decorative effect.
Whichever method you choose, ensure the decorations are securely attached so they withstand washing and regular wear without coming loose.
The last stage of the Crochet socks with strawberries- Step by Step Tutorial involves final details that make your socks comfortable, durable, and stylish. Begin by weaving in all loose yarn ends using a yarn needle. This step gives the inside of your socks a smooth finish and prevents unraveling over time.
Check the fit of your socks before wearing them. If they feel too loose, you can slightly tighten some stitches around the cuff or ankle area. If they’re too tight, blocking the socks by dampening them and gently stretching can improve the fit.
Consider adding a decorative edge around the cuff using a contrasting color. A scalloped border in green, for instance, can complement the strawberry theme beautifully.
If you want extra comfort, use softer yarn for the foot section since this part touches the skin most. Blended yarns with a bit of stretch, like cotton mixed with acrylic, work well for cozy, long-lasting socks.
For gifting, wrap your crochet socks with strawberries in tissue paper or add a handmade tag. Personalized packaging makes the gift feel even more special and thoughtful.
Finally, take a moment to admire your work. Handmade socks with adorable strawberry details are not only practical but also a wonderful showcase of your creativity and skills.
1. Is this project suitable for beginners?
Yes, the Crochet socks with strawberries- Step by Step Tutorial uses basic stitches and simple techniques, making it beginner-friendly.
2. How long does it take to make one pair of socks?
On average, it takes six to eight hours, depending on your skill level and the sock size.
3. What type of yarn works best for crochet socks?
Soft, breathable yarn like cotton or a cotton blend works well for comfort and durability.
4. How do I wash crochet socks with decorations?
Hand wash gently or use a delicate cycle in a laundry bag to protect the stitches and appliqués.
5. Can I make the socks in different sizes?
Yes, simply adjust the number of stitches and rows according to the desired foot length and width.
6. Can I sell socks made using this tutorial?
Absolutely! Handmade socks with unique strawberry designs are popular at craft fairs and online shops.
In this Crochet socks with strawberries- Step by Step Tutorial, we covered everything from gathering materials to crocheting the sock base, adding strawberry decorations, and finishing with professional touches.
This project combines practicality with creativity, making it enjoyable for all skill levels, now it’s your turn to try making your own crochet socks with strawberries.
Share your honest opinions about this tutorial and let us know if you have ideas or suggestions for future projects—we’d love to hear from you!


