
Crochet Cowboy Hat Pattern

If you have been looking for a creative and functional craft idea, the Crochet bear bookmark- Step by Step Tutorial is the perfect project to try. Not only does it let you practice your crochet skills, but it also gives you the opportunity to create a cute and useful accessory for your books. From beginners to experienced crocheters, everyone can enjoy making this adorable bear-shaped bookmark. In this article, you will learn how to make it in a simple and detailed way.
When we talk about the Crochet bear bookmark- Step by Step Tutorial, we are not just referring to a craft project. We are talking about something that combines creativity, patience, and a love for reading into one beautiful handmade piece. This bookmark is not only practical for keeping your place in books but also serves as a thoughtful gift for book lovers. The best part? It can be customized with colors, sizes, and personal touches to make each piece unique.
The Crochet bear bookmark- Step by Step Tutorial we are sharing today is designed to be easy to follow, even if you have never tried making bookmarks before. With simple materials and clear instructions, you will be able to create your own crochet bear bookmark quickly and efficiently. The tutorial will guide you from start to finish, ensuring that you understand each stage of the process, from choosing yarn to assembling the final piece.
Before diving into the actual steps of the Crochet bear bookmark- Step by Step Tutorial, it is important to gather all the materials you will need. Preparing everything beforehand will make the process smoother and more enjoyable.
To start with, you will need basic crochet tools such as yarn, a crochet hook, a pair of scissors, and a tapestry needle. The type of yarn you choose will affect the texture and durability of your bookmark. Cotton yarn is highly recommended because it is soft, sturdy, and easy to work with, making it perfect for beginners.
Next, think about the color palette. A classic bear bookmark usually comes in brown, beige, or white, but feel free to experiment with colors like pink, blue, or even multicolored yarn for a fun and modern look. The Crochet bear bookmark- Step by Step Tutorial allows room for creativity while keeping the instructions simple.
Stuffing material is also necessary if you want the bear’s head to be slightly three-dimensional. Polyester fiberfill works perfectly for this purpose, giving your bear a soft and cute appearance.
Finally, prepare small accessories if you want to add extra details like a tiny bow tie or embroidered eyes and nose. These finishing touches will give personality and charm to your crochet bear bookmark, making it truly special.
With all materials ready, you will save time and focus on learning the techniques explained in the Crochet bear bookmark- Step by Step Tutorial, ensuring a smooth crafting experience from start to finish.
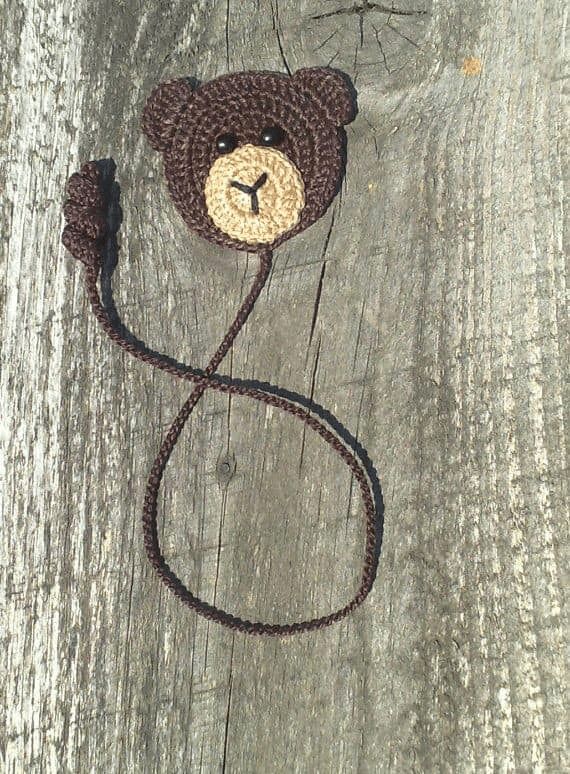
The Crochet bear bookmark- Step by Step Tutorial begins with creating the bear’s head, which is the most recognizable part of the project. Start by making a magic ring and then crochet simple stitches like single crochet or half double crochet, depending on the desired size. Increasing stitches gradually will help shape a perfect round head for the bear.
After finishing the head, the next part is crocheting the ears. Ears are made separately as small circles or semi-circles and then sewn onto the head. Following the Crochet bear bookmark- Step by Step Tutorial carefully will ensure that your ears are symmetrical and properly positioned.
Once the head and ears are complete, move on to the facial details. Using black yarn or embroidery thread, create the bear’s eyes, nose, and mouth. These little touches bring the bear to life and give it a friendly and cute expression. If you prefer, you can also use small safety eyes instead of embroidered ones.
The bookmark itself is usually a long, flat strip attached to the bear’s head. In the Crochet bear bookmark- Step by Step Tutorial, you will learn how to crochet a simple chain and work single crochet stitches along its length until it reaches the desired size. The strip should be thin enough to fit comfortably between book pages but sturdy enough to last.
Attaching the head to the bookmark strip is the final assembly step. Make sure to sew it securely so that the head stays in place even with frequent use. This step completes the main structure of your crochet bear bookmark, and you can now focus on optional decorations.
Adding embellishments such as a small ribbon around the bear’s neck or crocheting tiny paws at the end of the bookmark will give it extra charm. The Crochet bear bookmark- Step by Step Tutorial encourages creativity, so don’t be afraid to experiment with details that make your bookmark unique.
For those who are new to crochet, the Crochet bear bookmark- Step by Step Tutorial might look intimidating at first, but with patience and practice, it becomes very manageable. Start with basic stitches before attempting the full project. This will give you confidence and make the process more enjoyable.
Watching your tension is important. A bookmark that is too tight may curl, while loose stitches might make it floppy. Following the Crochet bear bookmark- Step by Step Tutorial carefully will help you maintain the right balance.
It is also helpful to count your stitches regularly. Losing track of stitches is a common mistake among beginners and can distort the shape of your project. Use stitch markers if needed to stay organized throughout the Crochet bear bookmark- Step by Step Tutorial.
Take breaks when necessary. Crocheting should be relaxing, not stressful. If you feel your hands getting tired, pause for a few minutes before continuing the Crochet bear bookmark- Step by Step Tutorial.
Choosing the right hook size is another tip for beginners. Using the recommended hook for your yarn ensures that the stitches look neat and uniform, which is essential for a professional-looking bookmark.
Lastly, don’t be afraid to unravel mistakes. Even experienced crocheters have to redo stitches sometimes. The Crochet bear bookmark- Step by Step Tutorial is flexible enough to allow corrections without ruining the entire project.
One of the best things about the Crochet bear bookmark- Step by Step Tutorial is the opportunity to personalize each bookmark. Adding different colors, patterns, or accessories can make each one unique and special.
For instance, you can make seasonal versions of the bookmark, such as using red and green for Christmas or pastel colors for spring. The Crochet bear bookmark- Step by Step Tutorial gives you complete freedom to experiment with themes and styles.
You can also add initials or small embroidered messages on the bookmark strip, turning it into a personalized gift for friends and family. This thoughtful detail makes the bookmark even more meaningful.
Some crafters like to create matching sets, such as a bear bookmark with a small crochet pouch for storage. This idea adds functionality and charm, showing how versatile the Crochet bear bookmark- Step by Step Tutorial can be.
Another creative idea is to make different animal bookmarks using the same basic structure. For example, changing the ears and nose shape can turn your bear into a cat, dog, or bunny. The tutorial serves as a foundation for many adorable designs.
Finally, if you sell handmade crafts, offering custom-made crochet bear bookmarks can attract customers looking for unique, handmade gifts. The Crochet bear bookmark- Step by Step Tutorial makes it easy to produce high-quality pieces for personal use or small businesses.
1. Is the crochet bear bookmark suitable for beginners?
Yes, the Crochet bear bookmark- Step by Step Tutorial is beginner-friendly, with simple stitches and clear instructions for each step.
2. How long does it take to make one bookmark?
It depends on your skill level, but most people can complete a crochet bear bookmark in two to three hours.
3. What type of yarn works best for this project?
Cotton yarn is recommended because it is soft, durable, and easy to handle, making it ideal for bookmarks.
4. Can I make the bookmark without stuffing the bear’s head?
Yes, you can skip the stuffing for a flat design if you prefer a simpler version of the Crochet bear bookmark- Step by Step Tutorial.
5. How can I wash the crochet bear bookmark?
Hand-wash gently with mild soap and let it air dry to maintain its shape and color.
6. Can I sell bookmarks made using this tutorial?
Yes, handmade crochet bear bookmarks are great for selling at craft fairs or online shops, as long as you create them yourself.
The Crochet bear bookmark- Step by Step Tutorial offers a fun, creative, and relaxing way to make something both practical and adorable.
From gathering materials to adding the final details, this tutorial walks you through every stage of the process in a beginner-friendly manner. We hope you enjoyed learning how to create your own crochet bear bookmark.
If you try this project, share your experience with us! Leave your honest opinion and suggestions below so we can continue improving and sharing more creative ideas like this one.


