
Crochet Cowboy Hat Pattern

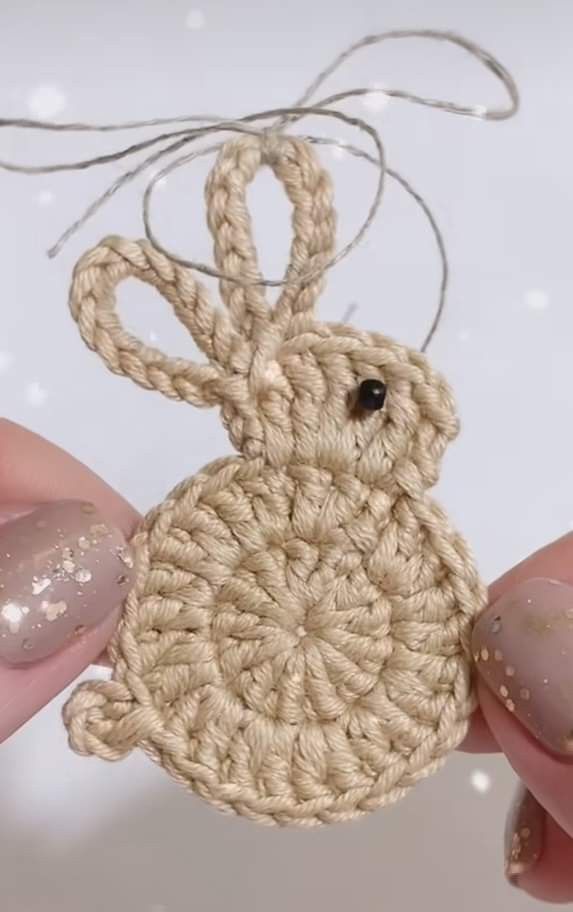
If you have ever wanted to create a cute handmade gift, this Crochet bunny- Step by Step Tutorial is perfect for you. Making a crochet bunny is a fun and rewarding project, especially for beginners who want to learn basic crochet techniques while crafting something adorable. With the right materials and clear instructions, you can create a small bunny toy that works as a decoration, a gift for a child, or even as part of a collection of handmade animals.
The best thing about following a Crochet bunny- Step by Step Tutorial is that it allows you to personalize your bunny. You can choose your favorite yarn colors, adjust the size, and even add small accessories like a bow or scarf. This makes each bunny unique and gives you a chance to experiment with creativity while learning the foundations of crochet.
This article will guide you through every stage of making your bunny, from preparing materials to finishing touches. We will also provide customization ideas and tips for beginners so that the process becomes easy and enjoyable. By the end, you will have a clear understanding of the entire Crochet bunny- Step by Step Tutorial and the confidence to make your own handmade bunny.
Before starting the Crochet bunny- Step by Step Tutorial, it is essential to gather all the materials needed. You will need medium-weight yarn in your chosen colors, a crochet hook that matches the yarn size, a pair of scissors, a tapestry needle for sewing pieces together, and some stuffing material to fill the bunny’s body. Safety eyes or small buttons can be used for the bunny’s face, and a bit of pink yarn or felt can create a cute nose.
Choosing the right yarn is very important for your project. Cotton yarn is often recommended for beginners because it does not split easily and creates neat stitches. However, acrylic yarn is also a popular choice since it is affordable, soft, and comes in many colors. Make sure the yarn is safe and washable, especially if the bunny will be used as a toy for children.
The crochet hook size depends on the yarn thickness. Most yarn labels suggest the ideal hook size, so check this information before starting. A slightly smaller hook than recommended can help create tighter stitches, which is great for toys because it prevents the stuffing from showing through the fabric.
Stuffing material can be polyester fiberfill, which is soft, lightweight, and easy to find. It helps the bunny maintain its shape and makes it cuddly. Avoid using materials that might cause allergies or discomfort if the toy will be handled by kids.
It is also helpful to prepare stitch markers, especially if you are a beginner. They make it easier to keep track of rounds when crocheting the bunny’s body and head. Counting stitches carefully ensures that your bunny turns out even and symmetrical.
Finally, choose a comfortable, well-lit workspace before you begin. Having all your tools organized will make the Crochet bunny- Step by Step Tutorial smoother and more enjoyable from start to finish.
The first step in the Crochet bunny- Step by Step Tutorial is to create the bunny’s body. Most crochet bunnies start with a magic ring to form a small circle, and then you work in rounds to create a spherical shape for the body. Single crochet stitches are usually used for this part because they create a tight and solid fabric that holds the stuffing well.
As you continue crocheting in the round, you will gradually increase the stitch count to make the body wider, then later decrease the stitches to close the shape. It is important to stuff the bunny with fiberfill before completely closing the body to ensure it is firm but still soft to the touch.
Next, you will make the head using a similar technique. The head is often slightly smaller than the body but follows the same principle of increasing and decreasing stitches in the round. This step allows you to practice shaping techniques essential in amigurumi crochet, which is the art of making small stuffed animals.
The ears are what give the bunny its signature look. They are usually crocheted as long oval shapes and then sewn onto the top of the head. You can adjust the length to make the ears floppy or short, depending on the style you want for your bunny.
After attaching the ears, it is time to create small arms and legs. These are crocheted as narrow tubes and then sewn onto the sides and bottom of the body. Making sure all pieces are proportionate will help the bunny look balanced and cute.
Finally, add the facial features. Safety eyes can be inserted before closing the head, or you can use black yarn to embroider the eyes. A small pink triangle for the nose and a stitched smile will give your bunny a friendly expression, completing the main steps of the Crochet bunny- Step by Step Tutorial.
One of the most enjoyable parts of the Crochet bunny- Step by Step Tutorial is customizing your bunny with different colors, sizes, and accessories. For example, pastel shades like baby blue, soft pink, or light yellow give the bunny a sweet and delicate appearance, while bold colors can make it fun and playful.
Adding small accessories can make your bunny even more special. You can crochet a tiny bow, a scarf, or even a little vest to dress it up. These details add personality and allow you to match the bunny’s style to different occasions, such as Easter or birthdays.
You can also vary the size of your bunny by changing the yarn weight and hook size. Using chunky yarn and a larger hook will create a bigger, huggable bunny, while thin yarn and a smaller hook make a tiny bunny that can be used as a keychain or decoration.
Another idea is to make a set of bunnies in different colors. A group of small crochet bunnies can be displayed together as a cute home decoration or given as a collection of handmade gifts to friends and family.
If you enjoy embroidery, you can add flowers, initials, or patterns to the bunny’s body using a tapestry needle and contrasting yarn. This makes each bunny truly one-of-a-kind.
Finally, consider using natural materials like wooden buttons or organic cotton yarn for an eco-friendly version of your crochet bunny. Handmade toys made with sustainable materials are becoming increasingly popular among crafters and gift-givers.
For beginners following the Crochet bunny- Step by Step Tutorial, it is normal to make mistakes in the first few attempts. One common problem is losing count of stitches, which can make the shape uneven. Using stitch markers at the beginning of each round helps prevent this issue.
Another frequent mistake is crocheting with inconsistent tension. If your stitches are too tight, the fabric becomes stiff and difficult to work with, while too-loose stitches create gaps. Practicing with scrap yarn before starting the final project can help you find a comfortable tension.
It is also important to stuff the bunny gradually. Adding too much fiberfill at once can create lumps, while too little stuffing makes the bunny lose its shape. A little patience in this step goes a long way in achieving a smooth and even result.
Beginners sometimes forget to secure yarn ends properly, which can cause pieces to unravel over time. Always weave in the yarn tails neatly with a tapestry needle for a durable finish.
If the bunny looks misshapen after assembly, check that the arms, legs, and ears are sewn symmetrically. Small adjustments can make a big difference in the final appearance.
Finally, remember that practice improves your skills. Each bunny you make will look better than the last, so enjoy the learning process and celebrate your progress.
Q1: Is the crochet bunny project suitable for beginners?
Yes, it uses basic stitches like single crochet and is beginner-friendly with practice.
Q2: How long does it take to make a crochet bunny?
Depending on skill level, it usually takes 3–5 hours to complete one bunny.
Q3: What is the best yarn for crochet bunnies?
Cotton or acrylic yarn works best because they are durable and easy to handle.
Q4: Can I make the bunny without safety eyes?
Yes, you can embroider the eyes with black yarn or use felt pieces for safety.
Q5: How can I make the bunny larger or smaller?
Use thicker yarn and a bigger hook for a larger bunny, or thinner yarn and a smaller hook for a tiny version.
Q6: Are crochet bunnies washable?
Yes, handwashing with mild soap is recommended to keep the shape and colors intact.
Making a Crochet bunny- Step by Step Tutorial is a fun, creative, and beginner-friendly project that results in a cute handmade toy.
We covered everything from materials and step-by-step instructions to customization ideas, beginner tips, and frequently asked questions.
Now it is your turn to try this tutorial and create your own unique crochet bunny. We would love to hear your honest opinion about this guide and any suggestions for future projects. Share your experience and let us know how your bunny turned out!


