
Crochet Cowboy Hat Pattern

Learning how to make a crochet hair band – Step by Step Tutorial is a delightful project that combines practicality and creativity. A crochet hair band is more than just a fashion accessory; it is a handmade piece that reflects personality and style. Whether you are a beginner just starting your crochet journey or an experienced crafter looking for new ideas, making your own hair band can be both relaxing and rewarding.
In this article, you will find detailed guidance on how to create a crochet hair band with simple stitches, easy instructions, and useful tips. By following this step by step tutorial, you will learn how to choose yarn, select the right crochet hook, and assemble your band in a neat way. This project is also versatile because you can customize your crochet hair band in different colors, sizes, and textures to suit your look or even to gift to someone special.
The best part about making a crochet hair band is that it requires very little material, which makes it an inexpensive yet stylish project. With just a small amount of yarn and a crochet hook, you can create something unique that enhances your hairstyle and gives you confidence. Let’s dive deeper into the process and explore how you can make your own beautiful crochet hair band through this step by step tutorial.
Before starting your crochet hair band, it is important to prepare the right materials and tools. Having everything organized will make the crafting process smoother and more enjoyable.
First, choose a soft yarn that feels comfortable against your hair and skin. Cotton yarn is often recommended because it is gentle, durable, and breathable. However, you can also experiment with blended yarns for extra stretch or texture. Picking yarn in bright colors can make your crochet hair band stand out, while neutral tones offer elegance and simplicity.
Second, select a crochet hook size that matches your yarn. The yarn label often suggests the ideal hook size, and following it will ensure your stitches are even and neat. For most hair bands, a 3.5 mm to 4.5 mm hook works well, but you may adjust depending on the thickness of your yarn and the design you prefer.
Third, have additional items such as scissors, a yarn needle for weaving in the ends, and an elastic band if you want extra stretch in your hair accessory. Keeping these tools ready will save time and prevent interruptions during your project.
Fourth, think about embellishments that could add personality to your crochet hair band. Buttons, beads, or small crochet flowers can transform a simple band into a unique fashion piece. While these are optional, they can elevate the overall look of your finished accessory.
Fifth, consider comfort as a priority. Since the crochet hair band will rest against your head, make sure the yarn and design do not cause irritation. Soft stitches and flexible tension help create a comfortable fit that can be worn for long hours without discomfort.
Lastly, plan your workspace. Crocheting in a comfortable, well-lit environment helps you focus on your stitches and prevents mistakes. Now that your materials are ready, you can begin this exciting step by step tutorial for creating your crochet hair band.
Now that the materials are prepared, let’s move into the step by step tutorial. This section explains each stage carefully so you can follow along with ease.
Step one is creating a foundation chain. Measure around your head or the area where you want the band to sit. Chain enough stitches to match this length, but keep in mind that yarn stretches, so you may reduce a few chains for a snug fit. This chain forms the base of your hair band.
Step two involves making the first row of stitches. A common choice for hair bands is the single crochet stitch, as it creates a dense and durable fabric. Insert the hook into each chain, pull up a loop, and complete your single crochet. Continue until the row is complete.
Step three is repeating rows to build the width of the band. You can stick to single crochet for a simple design or alternate with double crochet or half-double crochet for texture. The number of rows depends on how wide you want your hair band to be.
Step four is shaping the ends. Once the band reaches your desired width, fasten off the yarn and leave a long tail for sewing. If you prefer a seamless look, you can crochet the ends together directly, creating a continuous loop.
Step five is adding finishing touches. Use a yarn needle to weave in any loose ends carefully. At this stage, you can also sew on decorative pieces like flowers or beads if you want a more personalized style.
Step six is testing the fit. Place the crochet hair band on your head to ensure it fits comfortably and securely. If it feels too loose or tight, you can adjust by altering the stitch count or adding an elastic insert. This completes the basic crochet hair band step by step tutorial, and now you can enjoy wearing your new accessory.
One of the most exciting aspects of a crochet hair band is how versatile it can be. With a few creative adjustments, you can make a wide range of designs from the same basic tutorial.
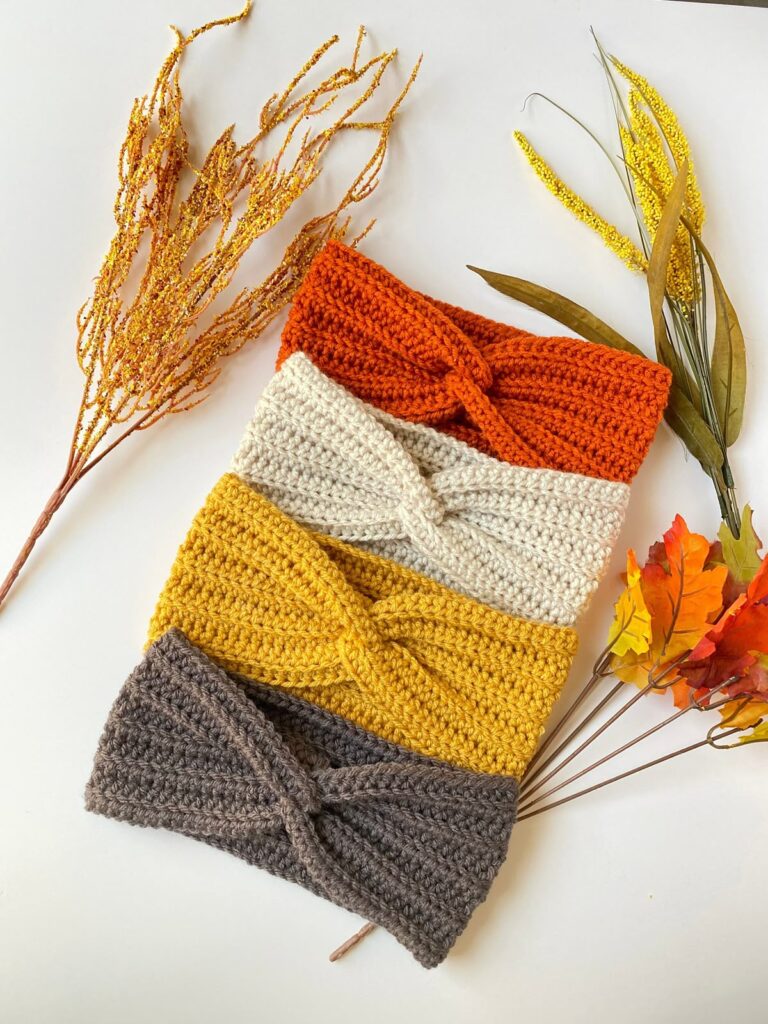
A popular variation is the twisted headband. After crocheting a rectangular strip, you twist the fabric once before sewing the ends together. This creates a stylish front knot effect that looks chic and modern.
Another idea is incorporating multiple colors. You can alternate yarns in stripes or use variegated yarn for a beautiful gradient effect. This allows your crochet hair band to match different outfits and seasons.
Adding texture is also a creative way to enhance your project. For instance, using puff stitches or shell stitches gives your hair band a decorative appearance while keeping it functional. These patterns make the accessory stand out as a statement piece.
Seasonal designs are another option. Lighter cotton yarns work well for summer, while bulkier yarns can create warmer ear-covering bands for winter. This flexibility means you can make crochet hair bands year-round for different occasions.
You can also combine your crochet hair band with other accessories. Attaching small crochet flowers, bows, or even a decorative button at the front adds charm and individuality. These embellishments can make your piece truly one of a kind.
Lastly, crochet hair bands can be practical gifts. Handmade accessories carry sentimental value, and making them for friends or family can be a thoughtful way to show appreciation. They are also quick projects, so you can create multiple pieces in different styles.
If you are new to crochet, making a crochet hair band is an excellent project to start with. However, beginners may face some challenges along the way. Here are helpful tips to guide you through the process.
First, practice maintaining even tension. Uneven stitches can make the band either too tight or too loose. Holding the yarn consistently helps create smooth rows and ensures the band feels comfortable when worn.
Second, count your stitches carefully. Beginners often lose or add extra stitches at the end of rows, which leads to an uneven shape. Using stitch markers or double-checking each row can prevent this mistake.
Third, avoid pulling the yarn too tightly when making the foundation chain. A stiff base makes it hard to insert the hook in later rows. Keep the chain slightly loose for easier stitching.
Fourth, remember to measure as you go. Since hair band sizes vary depending on head circumference, testing the length against your own head ensures the perfect fit.
Fifth, weave in your ends securely. Loose ends can unravel over time, especially in a frequently used accessory like a hair band. Using a yarn needle to weave in ends tightly makes the band more durable.
Finally, do not rush. Crocheting is meant to be enjoyable and relaxing. Taking your time helps avoid mistakes and results in a more polished final product. With practice, you will find the process easier and more natural.
1. How long does it take to make a crochet hair band?
It usually takes 1–2 hours depending on your skill level and the complexity of the design. Beginners may take longer, but with practice, it becomes a quick project.
2. What yarn is best for a crochet hair band?
Cotton yarn is the most recommended because it is soft, breathable, and comfortable. However, you can also use acrylic or blended yarns depending on the look and texture you want.
3. Can I wash my crochet hair band?
Yes, most crochet hair bands can be hand-washed with mild soap. Always check the yarn label for washing instructions to avoid damage.
4. Do I need elastic for a crochet hair band?
Not always. A crochet band made with proper tension fits securely without elastic. However, adding elastic can provide extra stretch for better comfort.
5. Is a crochet hair band suitable for beginners?
Absolutely. This is one of the easiest crochet projects, making it ideal for beginners. It uses basic stitches and requires only a small amount of yarn.
6. Can I sell crochet hair bands I make?
Yes, handmade crochet hair bands are popular in craft fairs and online shops. Since they are quick to make and customizable, they can be a great small business product.
Creating a crochet hair band – Step by Step Tutorial is a rewarding experience that blends creativity, skill, and style. With just yarn, a hook, and a little time, you can design a practical accessory that enhances your look while showcasing your craftsmanship. From simple bands to decorative variations, the possibilities are endless.
This article covered everything you need to know, from materials and instructions to creative ideas and beginner tips. Now it is your turn to put these steps into practice and make your own unique crochet hair band.
I would love to know your thoughts! Please share your honest opinion about this tutorial and feel free to leave suggestions for future projects. Your feedback helps improve and inspire more creative crochet ideas.


