
Crochet Cowboy Hat Pattern

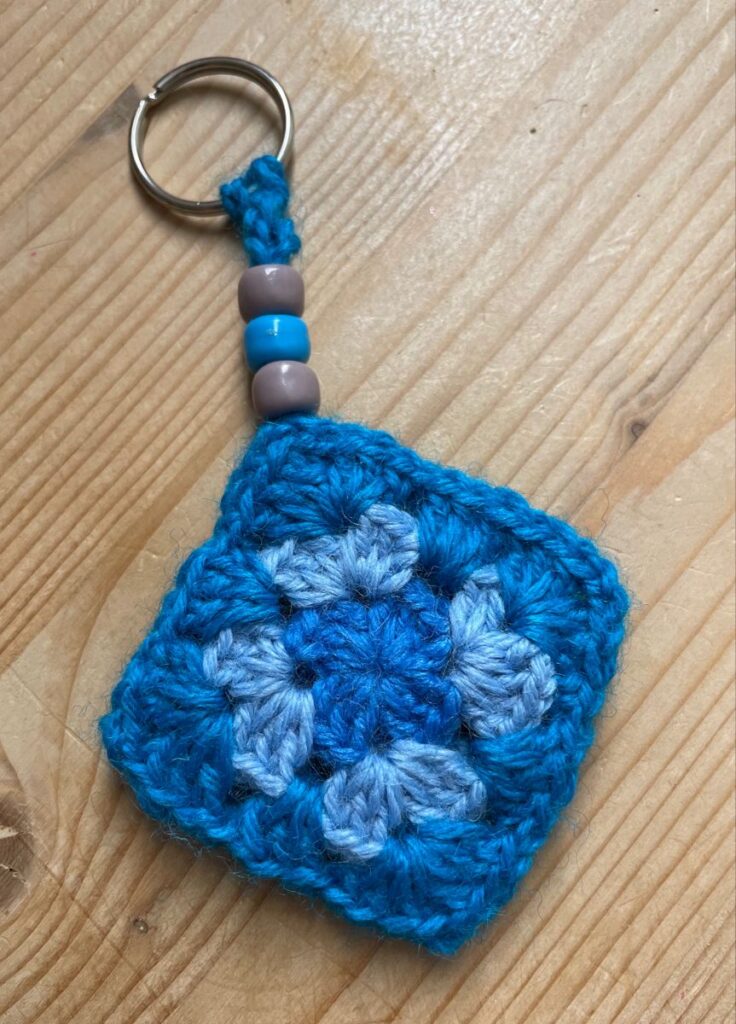
A crochet square keychain – step by step tutorial is a simple, fun, and creative way to bring handmade charm into your everyday accessories. Crochet has always been a beloved craft, offering endless possibilities for making practical and decorative items. When it comes to keychains, the idea of making them with crochet squares allows beginners and experienced crocheters alike to enjoy a project that is small, portable, and satisfying to complete. Not only is this type of keychain adorable, but it also makes a thoughtful gift or even a craft fair product.
One of the reasons why a crochet square keychain is such a popular project is because it requires minimal yarn, just a few basic crochet stitches, and a little imagination. If you’ve ever made a granny square or a small crochet motif, you already have the skills necessary to dive into this project. Each square can be personalized with different colors, textures, or embellishments, making every keychain unique. This allows you to experiment without committing to a large-scale project.
In this step by step tutorial, we will walk through everything you need to know: the materials required, how to create the crochet square, and how to assemble it into a functional and beautiful keychain. Whether you’re crocheting for yourself or as a gift, this tutorial will help you create a practical piece that you can proudly carry or share with friends. Now let’s explore the details and begin this creative journey.
Materials Needed for a Crochet Square Keychain
To start the crochet square keychain – step by step tutorial, it’s important to gather the right supplies before you begin. The good news is that you won’t need a long shopping list, and most materials are items you may already have in your crochet kit. A small project like this is an excellent way to use leftover yarn scraps, which makes it budget-friendly and eco-conscious.
First, you will need yarn. A lightweight or medium cotton yarn is often the best choice because it is durable and maintains its shape. Cotton yarn also provides a clean and defined stitch pattern, which works well for small accessories like keychains. Choose a color that matches your personal style or opt for bright shades that make the keychain easier to spot in a bag.
Second, you will need a crochet hook suitable for the yarn weight you have chosen. Most crochet square patterns work well with hooks ranging from 3.5 mm to 5 mm. Using the right hook size ensures that your stitches are neat and that your square maintains a compact form without being too loose.
Third, you will need some basic hardware: a key ring or lobster clasp. These are the pieces that transform your crochet square into a functional keychain. You can find them at most craft stores, and they are usually inexpensive. Having these on hand will allow you to finish your project quickly once the crochet portion is done.
Additionally, you’ll want a yarn needle for weaving in ends and possibly a small amount of fiberfill if you decide to stuff your square for added dimension. This isn’t necessary, but it can give the keychain a more plush look and feel. Scissors are also essential for cutting yarn neatly at the end of your project.
With all these materials prepared, you are ready to dive into the actual process of making your crochet square keychain. Having everything laid out before you begin will save time and help you enjoy the tutorial smoothly.
The foundation of this crochet square keychain – step by step tutorial lies in creating a neat and attractive crochet square. This part of the project can be as simple or as intricate as you’d like, depending on your skill level and preferences. Beginners may prefer a basic solid square, while more advanced crocheters may want to experiment with granny squares or decorative motifs.
To begin, make a slip knot and chain four. Join the chain with a slip stitch to form a small ring. This ring will serve as the center of your square. The next step is to chain three, which will count as your first double crochet. Work two more double crochets into the center ring, chain two, and continue working three double crochets followed by two chains until you have four groups of three double crochets. This forms the classic granny square base.
Once the foundation is complete, continue building the square by working into the spaces created by the chain stitches. In each corner space, crochet three double crochets, chain two, and another three double crochets. On the sides, crochet three double crochets without chaining. This process repeats until your square reaches the size you want. For a keychain, two to three rounds are usually enough.
If you prefer a solid square instead of a granny style, you can use single crochet or half-double crochet stitches worked in rows. This creates a dense and sturdy square, perfect for a keychain that will be used frequently.
When you’ve finished crocheting your square, fasten off your yarn and weave in the ends using a yarn needle. At this stage, you can also block the square if you’d like to shape it perfectly. Blocking helps even out stitches and gives the square a more polished look.
Remember, one of the joys of this project is customization. Experiment with color changes on each round, use variegated yarn, or even add small embellishments like beads or buttons. Each detail makes your crochet square keychain unique.
Once your crochet square is ready, the next step in this crochet square keychain – step by step tutorial is to assemble everything into a usable accessory. This stage is where your work transforms from a small crochet motif into a functional piece that you can proudly carry around.
Start by deciding whether you’d like to make your keychain double-sided. If so, crochet two identical squares and place them together. You can sew or single crochet around the edges to join them, leaving a small opening if you want to stuff it lightly with fiberfill. Stuffing makes the keychain soft and slightly puffy, giving it a three-dimensional effect.
Once the squares are joined, attach the keychain hardware. Use a small jump ring or directly insert the key ring through one of the stitches at the top corner of the square. If you’d like extra durability, crochet a small loop by chaining six to eight stitches and attaching it securely to the square, then threading the key ring through the loop.
This step ensures that your crochet square is firmly connected to the hardware and won’t fall apart with daily use. Pay attention to securing knots and weaving in any loose ends carefully so the keychain looks neat and professional.
At this point, you may want to add decorative touches. Embroidery on the surface of the square, tiny appliqué flowers, or a contrast border can elevate the look of your keychain. These small details make the project feel personal and unique.
Assembling the keychain is straightforward, but it is also the part that gives the project its purpose. Once complete, you’ll have a handmade keychain that combines functionality and charm, all thanks to a simple crochet square.
With practice, assembling becomes second nature, and you may even find yourself making multiple keychains as gifts, party favors, or items to sell.
A wonderful feature of the crochet square keychain – step by step tutorial is its flexibility. Once you’ve mastered the basics, you can experiment with endless variations to make each keychain distinct. Creativity is at the heart of crochet, and this small project is the perfect canvas to showcase your style.
One fun idea is to make themed sets. For example, crochet squares in holiday colors like red and green for Christmas, pastels for Easter, or bright tones for summer. These themed keychains can also make lovely seasonal gifts.
You can also play with stitch patterns. Instead of a classic granny square, try textured stitches like bobbles, popcorns, or puff stitches to give the keychain a tactile and interesting surface. These stitches create a bold look and make the accessory stand out.
Another variation is size. While small squares are ideal for keychains, you can create slightly larger ones and turn them into bag charms. This gives you more space to showcase intricate designs while still keeping the project practical.
Personalization is another creative option. You can embroider initials on the square, crochet it in someone’s favorite colors, or even add a small motif like a heart or star. These personalized touches turn a simple accessory into a meaningful gift.
Lastly, consider sustainability. By using leftover yarn scraps from larger projects, you not only save money but also reduce waste. Each crochet square keychain becomes part of a bigger effort toward eco-friendly crafting, making the project even more rewarding.
The possibilities are truly endless, and the best part is that each variation only requires a small amount of yarn and a little imagination.
1. How long does it take to make a crochet square keychain?
Most people can complete one in less than an hour, especially after making a few and becoming familiar with the steps.
2. What type of yarn is best for a crochet square keychain?
Cotton yarn is the most recommended because it is sturdy, holds shape well, and resists wear and tear from daily use.
3. Can beginners follow this crochet square keychain – step by step tutorial?
Yes, absolutely. The tutorial is beginner-friendly and requires only basic stitches like chain, single crochet, and double crochet.
4. Do I need special tools to attach the key ring?
Not at all. A regular key ring or lobster clasp is enough. You may use pliers to open and close jump rings, but it’s optional.
5. Can I sell crochet square keychains made from this tutorial?
Yes, handmade keychains are popular at craft fairs, markets, and even as online shop items. Just make sure your work is neat and durable.
6. How do I clean a crochet square keychain?
Since it’s small, handwashing with mild soap and letting it air dry is best. Avoid hot water to prevent shrinking.
In this crochet square keychain – step by step tutorial, we explored everything from gathering materials, crocheting the square, assembling the keychain, and experimenting with creative variations. This small yet meaningful project is perfect for beginners who want to practice basic stitches and for experienced crocheters seeking a quick and fun accessory to make.
Whether you create one for yourself, as a gift, or to sell, the crochet square keychain combines charm, practicality, and creativity in one project. Now that you’ve learned the process, I’d love to hear your thoughts—please share your honest opinion and suggestions so we can continue making this craft journey inspiring and enjoyable for everyone


