
Crochet Cowboy Hat Pattern

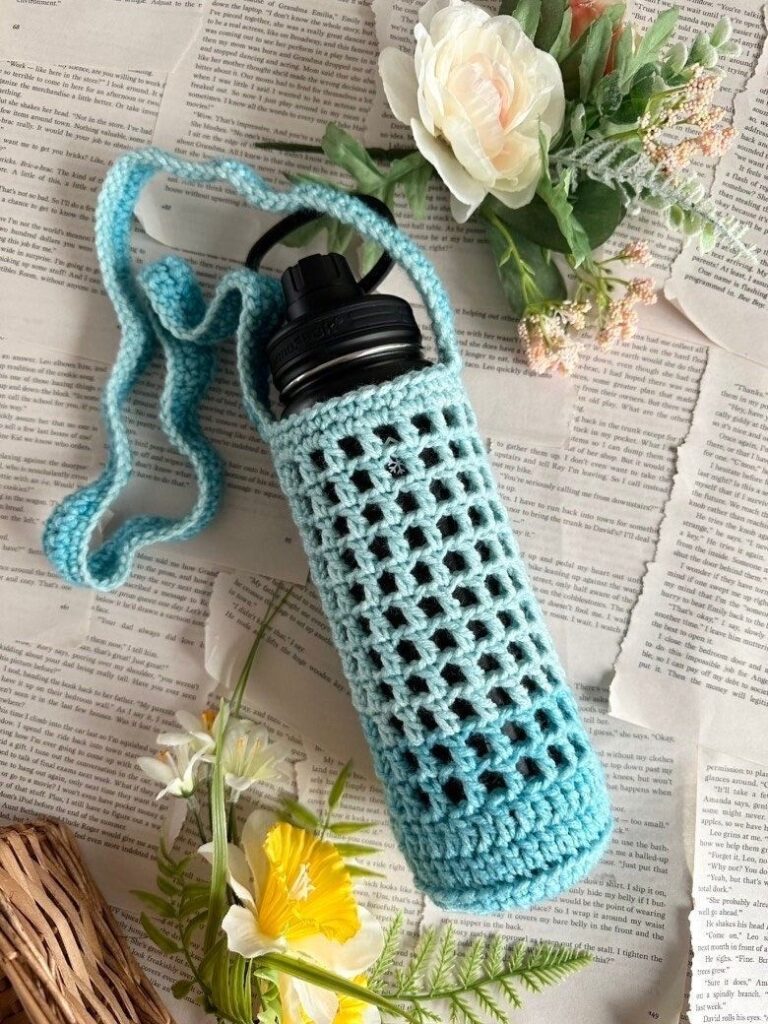
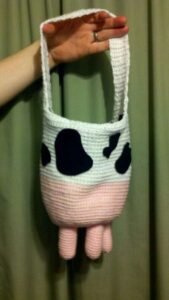
Learning how to make a crocheted water bottle holder – step by step tutorial is a rewarding and creative project for anyone who enjoys crochet. A water bottle holder is not just functional but also stylish, allowing you to carry your drink hands-free while walking, hiking, or running errands. By following this guide, you will learn how to crochet a bag that is both durable and attractive. The best part is that this project is suitable for beginners as well as experienced crocheters who are looking for a quick and fun pattern.
The idea of a crocheted water bottle holder is popular because it combines practicality with creativity. It is lightweight, washable, and can be customized with different colors and yarn textures. You can even personalize it by adjusting the strap length or adding decorative stitches. This means you can create a unique piece that matches your personality while also being eco-friendly by avoiding disposable bags. In this article, you will find a clear explanation of each step to help you make your own handmade water bottle carrier.
In addition to being useful for daily activities, making a water bottle holder step by step teaches you essential crochet techniques. You will practice basic stitches like chains, single crochet, and double crochet, while also learning how to work in the round and create a sturdy strap. Even if you are completely new to crochet, this tutorial will guide you in simple language, ensuring that you can follow along easily. By the end, you will not only have a finished holder but also improved crochet skills that you can apply to future projects.
The first step in making a crocheted water bottle holder – step by step tutorial is gathering your materials. For this project, you will need cotton yarn, as it is strong, washable, and keeps its shape well. Cotton is the preferred choice because it also absorbs moisture, preventing the holder from feeling damp when your bottle sweats. Select a medium-weight yarn to ensure sturdiness without making the bag too bulky.
Next, you will need a crochet hook that matches your yarn weight. Most medium-weight cotton yarns work well with a 4mm to 5mm hook. Choosing the right hook size is important because it affects the tightness of your stitches. A smaller hook creates a denser, sturdier fabric, while a larger hook makes the holder stretchier.
Scissors are also essential for trimming yarn ends neatly. You should have a yarn needle on hand as well, since you will use it to weave in the loose ends once your project is complete. Some people also like to keep a stitch marker nearby, especially beginners, to help keep track of rounds.
In addition to yarn and tools, think about strap adjustments. You can use the same yarn to crochet a strap, but if you want extra durability, you can incorporate a sturdy cord or even attach metal hardware. This makes the bag more resistant to weight, especially if you plan to carry larger bottles.
It is also useful to have your water bottle with you during the process. This allows you to measure the holder as you go, ensuring a perfect fit. Not all bottles are the same size, so making adjustments early on will save you time later.
Finally, choose your yarn colors. You can keep it simple with one color or create a striped or patterned design. This personalization adds a fun touch and makes your crocheted water bottle holder unique.
To begin your crocheted water bottle holder – step by step tutorial, you will start with the base. The base is important because it determines the stability and size of your holder. Most patterns begin with a magic ring or a chain loop to work in the round.
First, create a magic ring and crochet six single crochets into the loop. Pull the yarn to close the circle tightly. If you are unfamiliar with the magic ring, you can also chain four and join with a slip stitch to form a circle. Both methods work for building the base.
Next, you will increase the circle by adding stitches evenly. For example, in round two, make two single crochets in each stitch from the previous round. This will give you twelve stitches. In round three, continue increasing by alternating one single crochet and one increase, creating a flat circle.
The size of the base depends on your bottle. Place your bottle on the growing circle to check if it fits. Keep increasing until the base is just slightly smaller than the bottom of your bottle. This ensures a snug and supportive fit.
Once the base reaches the desired size, stop increasing and start working evenly around. This will cause the edges to rise and form the walls of the holder. Make sure your stitches are tight and even to prevent gaps.
This base step is crucial because it lays the foundation for the entire project. Taking your time here ensures your crocheted water bottle holder will be sturdy and well-shaped.
After completing the base, it is time to create the body of the crocheted water bottle holder – step by step tutorial. The body is usually made using simple stitches that form an open yet supportive structure. This allows flexibility and air circulation, while still keeping the bottle secure.
Many crocheters prefer using double crochet stitches combined with chain spaces to create a mesh-like effect. For example, you can chain three, skip one stitch, and double crochet in the next stitch. Repeat this pattern around to form a net. This design is light and stretches easily, fitting bottles of different sizes.
If you prefer a solid look, you can continue working in single or half-double crochets. This creates a thicker fabric that feels more like a bag. The choice depends on your style and function preference.
As you continue building the body, remember to measure your work against the bottle. The height of the holder should cover most of the bottle, leaving the neck and cap accessible. This makes it easier to drink without removing the bottle completely.
When working in rounds, always join at the end with a slip stitch, then chain up to start the next row. This keeps the work neat and prevents uneven edges. You can also change colors here if you want to create stripes.
The body section is where you can be most creative. Experiment with stitch patterns, color changes, and even add decorative details like small flowers or tassels. This personalization makes your project unique and enjoyable.
The strap is what transforms your crocheted water bottle holder into a practical accessory. Without a strap, it would just be a pouch. You can make the strap short like a handbag or long like a crossbody style, depending on your preference.
To make a crocheted strap, chain the desired length. For a crossbody, this might be 90–120 chains. Once you have the chain, work back with single crochets or half-double crochets to thicken it. Repeat until you achieve the desired strength.
If you want extra durability, you can make two or three rows and then fold them together, sewing along the side. This creates a strap that won’t stretch too much over time.
Attach the strap by sewing each end to the top of the holder with your yarn needle. Make sure the attachment is secure, as this area will bear the most weight. You may reinforce it by sewing over several times.
For finishing touches, weave in all yarn ends with the needle. Trim excess yarn carefully to keep the project clean. At this point, you can also block the holder by lightly wetting it and shaping it, allowing it to dry in the correct form.
Now you have a fully functional and stylish crocheted water bottle holder – step by step tutorial completed.
1. What is the best yarn for a crocheted water bottle holder?
Cotton yarn is the best choice because it is strong, washable, and holds its shape. It also absorbs moisture well when bottles sweat.
2. Can beginners make a crocheted water bottle holder?
Yes, this is an excellent project for beginners. The stitches are basic, and the tutorial explains each step clearly.
3. How long does it take to make a water bottle holder?
Depending on your skill level, it can take between two to four hours. Beginners may take a little longer, while experienced crocheters can finish quickly.
4. Can I wash my crocheted water bottle holder?
Yes, cotton yarn is machine washable. Just make sure to wash on a gentle cycle and let it air dry to maintain its shape.
5. Can I adjust the size for different bottles?
Absolutely. By making the base larger or smaller and adjusting the height, you can fit any bottle size.
6. How can I make the strap stronger?
You can make multiple rows for the strap, use tighter stitches, or even insert a cord for reinforcement.
In this article, you learned how to make a crocheted water bottle holder – step by step tutorial that is both practical and creative. From gathering materials to crocheting the base, building the body, and finishing with a sturdy strap, each step was explained in detail.
This project is beginner-friendly but also enjoyable for advanced crocheters who want a quick and useful item.
Now it is your turn to try this project and create a personalized water bottle holder that matches your style. I would love to hear your honest opinion and suggestions—feel free to share your experience and ideas in the comments.


