
Crochet Cowboy Hat Pattern

projects are a lovely way to add charm and practicality to your table decor. These small yet artistic pieces can protect your surfaces from heat or moisture while showcasing your love for handmade crafts. Whether you’re new to crocheting or a seasoned enthusiast, learning how to make your own crochet flower coaster – Step by Step Tutorial can be both fun and rewarding. This tutorial will walk you through the process in a clear and beginner-friendly way.
Many crafters enjoy working with floral patterns because they can be both versatile and aesthetically pleasing. A crochet flower coaster – Step by Step Tutorial can be customized in endless color combinations to match your kitchen, coffee table, or gift-giving theme. Plus, they’re lightweight and quick to create, making them ideal for selling at craft fairs, using as housewarming gifts, or simply making for your own enjoyment.
The beauty of following a crochet flower coaster – Step by Step Tutorial is that you don’t need much more than yarn, a hook, and a bit of patience. As we go through this tutorial, we’ll break down each step, explain the techniques used, and guide you through the entire pattern with clear instructions. By the end of this post, you’ll have all the knowledge you need to create stunning floral coasters in your own unique style.
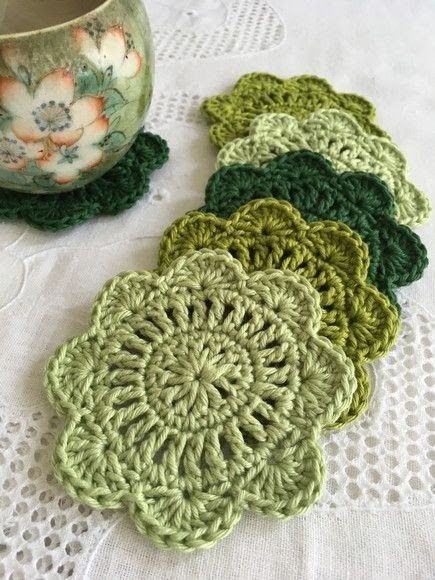
To begin your crochet flower coaster – Step by Step Tutorial, you’ll need to gather the right materials and tools. Choosing the right yarn is essential for achieving a soft yet structured finish that’s suitable for coasters. Cotton yarn is typically recommended because it’s durable, washable, and holds shape well. You can select any color you wish, but bright or pastel shades often enhance the floral design.
Make sure to have a matching crochet hook that corresponds with the yarn weight. Most cotton yarns work well with a 3.5mm or 4mm hook. If you’re using a thicker or thinner yarn, check the label recommendations and adjust your hook accordingly. A smaller hook will create tighter stitches for a firmer coaster, which is often preferable.
You’ll also need a yarn needle for weaving in ends and scissors for trimming. If you want to stiffen your coaster, you can also consider fabric starch spray or a homemade stiffening solution. This isn’t necessary, but some crafters find it helpful to give their crochet flower coaster a crisp shape.
Stitch markers may also come in handy, especially if you’re working in the round. Though not mandatory, they help track the beginning of each round, reducing mistakes. You’ll also benefit from having a flat surface to work on and good lighting so you can clearly see your stitches and follow the pattern easily.
Lastly, always prepare your workspace before you begin. Unwind your yarn slightly to prevent pulling, and keep your tools within reach. This small preparation step can make your crocheting more comfortable and efficient. Now that your materials are ready, it’s time to dive into the pattern!
Creating a crochet flower coaster – Step by Step Tutorial is not only relaxing but also rewarding. You’ll develop confidence in reading patterns, counting stitches, and working in the round — all while producing something beautiful and useful.
To begin the crochet flower coaster – Step by Step Tutorial, we start with a magic ring, also known as a magic circle. This technique allows you to start crocheting in the round with a tightly closed center, ideal for floral patterns. Wrap the yarn around your fingers and pull through a loop to form the circle. Secure it and chain 2 (this will count as your first half double crochet).
Next, you’ll make 11 half double crochet (HDC) stitches into the ring, joining with a slip stitch at the top of the beginning chain-2. You should now have a circle with 12 stitches. This forms the center of your flower. Be sure to pull the yarn tail to tighten the circle so there’s no hole in the middle.
For Round 2, chain 1, then make 2 single crochet (SC) stitches in each stitch around. You’ll end this round with 24 stitches. This creates a solid foundation for the petals to grow from and helps keep the coaster flat. Use your stitch marker if needed to track rounds.
Round 3 involves creating petal shapes. You’ll start with a chain 2, followed by 2 double crochet (DC) in the same stitch, then chain 2 and slip stitch in the next stitch. Repeat this petal sequence around: (sl st, ch 2, 2 DC, ch 2, sl st). By the end, you should have 12 small petals formed.
You can stop here if you want a small crochet flower coaster, or continue to enlarge the petals. For more defined petals, Round 4 will build upon the previous petals by crocheting into the chain spaces from the previous round. Work 3 DCs in the ch-space, chain 2, and slip stitch into the next ch-space.
To finish off the base, fasten off the yarn and weave in the ends using your yarn needle. You can block the piece now if you’d like, especially if the coaster curls. Lay it flat and pin it in shape, then lightly steam it or spray with water and let it dry.
The next part of the crochet flower coaster – Step by Step Tutorial focuses on shaping the petals to resemble a natural bloom. Begin a new round by attaching your yarn in any chain space between petals. This gives the flower more volume and depth.
To create layered petals, chain 3, then make 4 triple crochet (TR) stitches in the same space. This builds height. Chain 3 again and slip stitch in the same space to form one petal. Skip to the next chain space and repeat. Continue this sequence all the way around to get fuller petals.
You should now have larger and more defined petals. The triple crochets help exaggerate the shape, while the chain spaces give flexibility. This enhances the aesthetic appeal of your crochet flower coaster and gives it a rich, handmade texture.
If you want to add a second layer of petals, attach another color in the space between the existing petals. This time, chain 4 and work 5 DC into the space, then chain 4 and slip stitch into the next space. This makes the flower look layered and adds dimension.
Repeat this process around the flower, alternating colors for a vibrant effect. Use colors that complement your decor or event theme. For example, red and white for Valentine’s Day, or orange and yellow for fall. Personalizing your crochet flower coaster makes it even more special.
After completing your desired number of petal layers, fasten off and weave in all ends neatly. Gently block the piece again if necessary. This step helps relax the stitches and maintain the circular shape.
Once the flower portion is complete, you may want to reinforce your crochet flower coaster by adding a backing. This can help the coaster maintain shape and absorb moisture better. You can crochet a solid circle slightly smaller than the flower and sew it to the back using a yarn needle.
Alternatively, you can cut a felt circle and hand-sew it onto the back using matching thread. This is a great option for a professional finish, especially if you plan to sell or gift your coasters. Make sure all threads are secure and edges are smooth.
If you prefer a crisper flower, consider using a fabric stiffener. Spray starch or a homemade cornstarch mixture works well. Lightly mist the coaster, shape it, and let it air dry. This adds structure while maintaining softness.
Another tip is to reinforce just the petals if you want the center to remain flexible. Simply apply the stiffener to the outer edges only and press into shape. This allows for more control over the final look of your crochet flower coaster.
If you plan to wash the coasters, make sure your stiffening method is washable. Cotton yarn is great because it holds up well with regular cleaning. Use mild detergent and lay flat to dry to preserve the shape and texture.
Backing and finishing your coaster properly ensures it looks polished and lasts longer. Taking the time to do this elevates your project and makes your handmade coaster look like a store-bought item — with a handmade heart.
Your finished crochet flower coaster – Step by Step Tutorial is just the beginning. These floral beauties can be adapted for various purposes and events. Use seasonal colors to match holidays or celebrations, making them the perfect home accent.
Consider using variegated yarn for a multicolored effect without changing colors manually. These yarns give a beautiful gradient to your petals and make every flower unique. It’s a great time-saver and adds flair.
You can also experiment with different flower types. By changing the number of petals, stitch types, or petal sizes, you can create daisies, roses, or sunflowers. There are endless possibilities once you master the basics of this crochet flower coaster.
These coasters also make wonderful gifts. Bundle a set of four with a ribbon, and you have a thoughtful handmade present for birthdays, housewarmings, or holidays. They also sell well at craft fairs, especially in spring and summer.
If you have leftover yarn scraps, this is a perfect stash-busting project. Each flower uses a small amount of yarn, allowing you to reduce waste while being creative. It’s a satisfying way to make something beautiful from materials you already have.
Lastly, consider turning your crochet flower coaster into wall art, bunting, or applique for bags and clothing. By sewing or gluing them onto other items, you can incorporate your flower design into a range of handmade projects.
What is the best yarn for a crochet flower coaster?
Cotton yarn is ideal due to its absorbency, structure, and washability. It’s perfect for coasters because it doesn’t pill easily and keeps its shape.
Can I use other stitches for the petals?
Yes! Try using puff stitches, shell stitches, or picots to vary petal textures. Each stitch gives a different effect to the final flower.
How big is the finished coaster?
Most flower coasters measure between 4 to 6 inches in diameter, depending on yarn, hook size, and number of petal layers.
Do I need to block my crochet flower coaster?
Blocking is optional but recommended to help the coaster lay flat and look polished. Especially helpful if the piece curls slightly.
Can I machine wash these coasters?
If made with cotton yarn, yes! Use a delicate cycle and cold water. Lay flat to dry for best results.
Is this project beginner-friendly?
Absolutely! This crochet flower coaster – Step by Step Tutorial is great for beginners who want to practice working in the round and learn decorative stitches.
In this crochet flower coaster – Step by Step Tutorial, we’ve gone through each stage of creating a beautiful and functional floral coaster from scratch. From selecting the right materials and working the magic ring, to shaping petals and adding final touches, you now have everything you need to make your own handmade coasters.
These small but stunning projects are ideal for gifts, markets, or decorating your own space. If you found this guide helpful, feel free to share your feedback below! Your opinion and suggestions help improve future tutorials for all crochet lovers.


