
Crochet Cowboy Hat Pattern

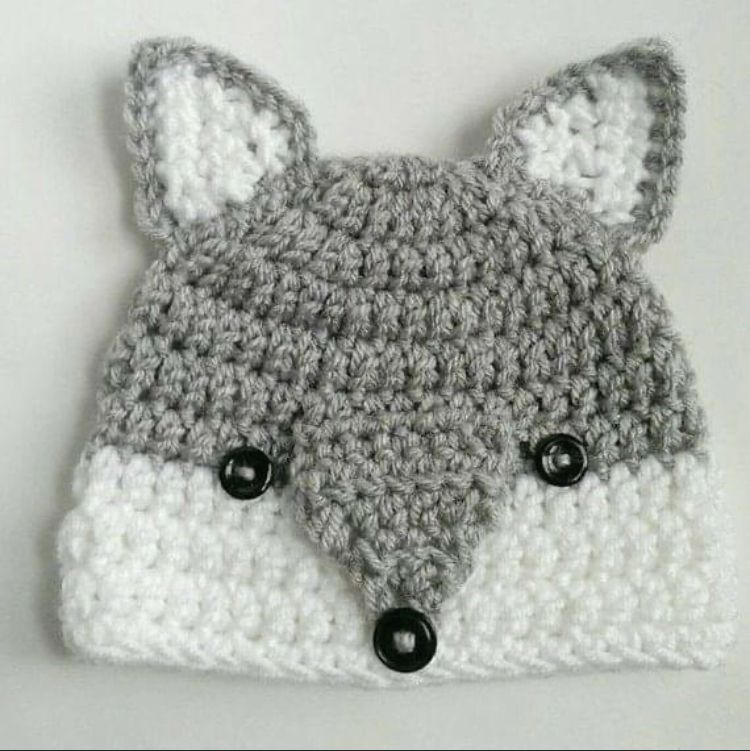
Creating a crochet wolf hat – step by step tutorial is a fun and rewarding project, especially for those who enjoy adding a whimsical and cozy touch to their winter accessories. Whether you’re crafting it for a child, a themed costume, or simply to express your wild side, this project is both practical and playful. In this article, you’ll learn how to make your own crochet wolf hat using beginner-friendly stitches and clear instructions.
Starting your first crochet wolf hat – step by step tutorial may seem intimidating, especially if you’re new to making wearable crochet items. But don’t worry—this guide is designed with simplicity in mind. Even if you’re new to crochet or haven’t made a hat before, you’ll find the instructions easy to follow. We’ll walk you through each stage of the process, from choosing yarn to assembling the final piece.
This crochet wolf hat – step by step tutorial also makes a wonderful handmade gift. It’s customizable, lightweight, warm, and can even be a hit at craft fairs or holiday markets. Plus, wolf-themed accessories are always popular with kids and adults alike. Ready to begin? Let’s gather your materials and dive into this wild and warm crochet adventure.
Before starting your crochet wolf hat – step by step tutorial, it’s important to gather the right materials and understand your sizing needs. This helps ensure your hat fits well and turns out exactly how you imagined it.
To make one crochet wolf hat, you’ll need about 120g of worsted weight (category 4) yarn in three colors: gray (main), white (accent), and black (eyes/nose). This yarn weight offers the perfect balance between warmth and stitch definition. Choose soft acrylic or wool-blend yarn for comfort.
You’ll also need a 5.0 mm (H-8) crochet hook for the main hat body. For smaller details like ears and eyes, a 4.0 mm (G-6) hook helps with precision. Don’t forget a yarn needle for weaving in ends, scissors, and optional stitch markers.
For child size, the finished hat should measure around 18–20 inches in circumference and 7.5–8 inches in height. For an adult, aim for 22 inches around and about 9 inches tall. Adjust hook size or stitch count accordingly to fit the intended wearer.
Use a tape measure to check your gauge: 14 stitches x 16 rows in half double crochet should equal 4×4 inches. This ensures the hat won’t be too small or too big.
If you want earflaps, cut two 12-inch pieces of gray yarn for each side, or crochet extra rows extending downward. Braided tassels can be added at the ends for a playful finish.
Prepare your workspace by keeping your yarns and tools organized. Working in a quiet area with good lighting helps avoid mistakes, especially when switching colors for the wolf’s facial features.
Now that you’re prepared, let’s begin crocheting the base of the crochet wolf hat. This will be a classic beanie shape using half double crochet (hdc) worked in rounds from the top down.
Start with a magic ring. Chain 2 (counts as first hdc) and make 11 hdc into the ring. Join with a slip stitch to the top of the chain 2. (12 stitches)
Round 2: Chain 2, 2 hdc in each stitch around. Join. (24 stitches). This round begins forming the crown of the hat.
Round 3: Chain 2, 1 hdc in the next stitch, 2 hdc in the next, repeat around. Join. (36 stitches). Your circle should now be about 4 inches in diameter.
Round 4: Chain 2, 1 hdc in next 2 stitches, 2 hdc in next, repeat around. Join. (48 stitches). If making an adult size, continue increasing up to 60 stitches.
Work even hdc rounds without increasing until the piece measures 7.5 inches (child) or 9 inches (adult) from the top center to bottom edge. This forms the full body of your crochet wolf hat.
If adding earflaps, chain 1 and work 10 hdc at the front of the hat, turn. Continue decreasing by 1 stitch each row until you have 1 hdc. Repeat on the other side symmetrically.
To finish the base, add a round of single crochet (sc) around the entire edge. This gives the hat a polished look and prepares it for the next step: wolf features.
Fasten off, weave in the ends with your yarn needle, and steam block the piece gently if needed. Your crochet wolf hat – step by step tutorial is well underway!
This section adds personality to your crochet wolf hat—ears, eyes, nose, and optional mouth or eyebrows for character. Small details make a big impact.
To make the ears: With gray yarn and a 4.0 mm hook, chain 6. Work 1 sc in second chain from hook, 1 hdc in next, 2 dc in next, 1 hdc, 1 sc. Fasten off. Make two. You can add a smaller white inner ear by making the same shape but chaining 4 instead.
Sew the ears onto the top corners of the hat using gray yarn. Angle them slightly forward for a playful, alert wolf expression.
For the eyes, use white yarn to make two circles. Start with a magic ring, 6 sc into ring, join. Round 2: 2 sc in each stitch around (12 stitches). Add black circles in the center or use black safety eyes.
Sew the eyes just below the ears, spaced evenly apart. Add small white yarn highlights to make the eyes sparkle with life.
To create the nose, use black yarn and a magic ring. Work 6 sc, tighten and slip stitch to close. Sew it below the eyes in the center. You can also use an oval shape if you prefer a cartoon style.
For an optional mouth or expression, embroider black lines or even a red felt tongue. These extras give your crochet wolf hat its unique flair and character.
Your crochet wolf hat – step by step tutorial is almost complete! It’s time to join everything together and add final embellishments for a complete, polished look.
Double-check that all your pieces are sewn securely. Tug gently on each feature to test stability, especially if the hat will be worn by children or used as a costume.
For the ears, use invisible whip stitch techniques to keep seams neat. Reinforce the base of each ear to make sure it stands upright.
Optional: Add inner padding or extra yarn at the base of the ears to help them stay perky. Some crafters use pipe cleaners, but yarn stuffing is safer and softer.
If you made earflaps, now is the time to braid the tassels. Cut 6 strands of yarn (12 inches each), fold in half, and loop through the flap end. Braid and knot at the bottom.
To personalize your crochet wolf hat, consider adding embellishments like a bow tie (for a cute version), small buttons, or even sparkly thread around the edges.
Finally, try on the hat or gift it to your lucky recipient. Seeing your work in action is the most rewarding part of following this crochet wolf hat – step by step tutorial!
How long does it take to crochet a wolf hat?
For experienced crocheters, it takes around 4–6 hours. Beginners may need a full day depending on complexity and time available.
Can I adjust the pattern for toddlers or adults?
Yes! Simply adjust the number of increase rounds and the total number of stitches per round. Use smaller hooks for toddler sizes and larger for adults.
What’s the best yarn for a crochet wolf hat?
Soft worsted weight yarn (acrylic or wool blend) works well. Avoid overly stretchy or slippery yarns to keep the shape.
How do I make the ears stand up?
Use tighter stitches and reinforce the base of the ears when sewing them. You can also lightly stuff them with yarn to help them stay upright.
Can I sell hats made from this tutorial?
Absolutely! Handmade wolf hats are popular at markets, especially during fall and winter. Just make sure to credit your own work and photos.
What if I don’t know how to make a magic ring?
You can substitute with a chain 2 and make stitches into the first chain, though a magic ring gives a tighter, neater center.
In this crochet wolf hat – step by step tutorial, we’ve explored every detail from materials and sizing to assembling facial features and final embellishments. This fun and creative project is suitable for beginners and seasoned crocheters alike. Whether you’re making it for personal use, gifting, or selling, this hat is sure to bring joy.
You’ve learned how to construct the base, shape expressive ears, sew on eyes and a nose, and add cute custom touches. Now it’s your turn to get creative and make your own version of this adorable wolf design.
We’d love to hear from you—what did you think of this crochet wolf hat – step by step tutorial? Feel free to leave a sincere opinion and share suggestions for future tutorials. Happy crocheting!


