
Crochet Cowboy Hat Pattern

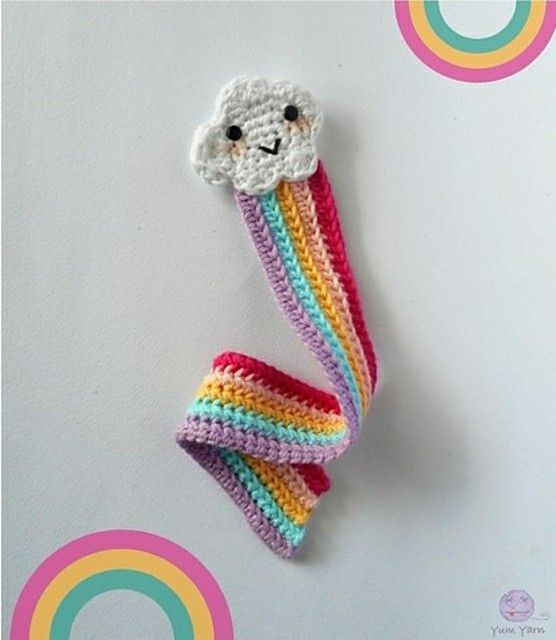
The How to Crochet Rainbow Bookmark – Step by Step Tutorial is a fun and creative project for crochet lovers of all skill levels. This handmade bookmark is not only practical for marking your favorite pages but also adds a colorful and cheerful touch to your reading experience. With its vibrant rainbow colors, it makes a perfect gift for book enthusiasts, students, or anyone who enjoys unique handmade crafts.
Crochet bookmarks are quick projects that use minimal yarn, making them ideal for beginners who want to practice basic stitches while creating something functional. The rainbow design allows you to experiment with different colors and combinations, making each bookmark unique. This project is also a great way to use up leftover yarn scraps from other crochet projects.
In this guide, we will go through everything you need to know to make your own crochet rainbow bookmark. From the materials needed to the step-by-step instructions, you will learn how to create a beautiful and sturdy bookmark. At the end, you will find a helpful FAQ section to answer common questions, followed by a conclusion summarizing the tutorial.
To start this How to Crochet Rainbow Bookmark – Step by Step Tutorial, gather the following materials: multiple colors of cotton yarn to represent the rainbow shades, a 3mm or 3.5mm crochet hook, scissors, and a yarn needle. Cotton yarn is preferred because it is durable, soft, and holds its shape well.
You can use as many colors as you like to represent the rainbow. A traditional rainbow uses red, orange, yellow, green, blue, and purple, but you can personalize it to match your style.
A yarn needle is essential for weaving in ends, as you will be changing colors multiple times throughout the project. Scissors will be used to trim any excess yarn after finishing.
Optional items include stitch markers to help keep track of stitches or a tape measure to ensure the bookmark is the desired length.
Before you begin, make sure you are familiar with basic crochet stitches such as chain (ch), single crochet (sc), and slip stitch (sl st), as these will be used in this project.
Once all your materials are ready, you can begin crocheting the base of the bookmark.
To begin the base of the crochet rainbow bookmark, start with a slip knot using your first color. Chain a length of around 25 to 30 stitches, depending on how long you want your bookmark to be.
Work one row of single crochet stitches across the chain. This will form the foundation of your bookmark and ensure it is sturdy and flat.
When you reach the end of the row, chain one and turn your work. Continue working single crochet stitches across for a total of two rows per color.
After completing two rows, cut the yarn, leaving a small tail, and switch to the next color. Repeat the same process for each color of the rainbow.
Make sure to fasten off each color securely and weave in the ends as you go to prevent tangling.
Once you have added all the colors, the base of your bookmark will be complete, and you will be ready to add the finishing touches.
After finishing the base, this How to Crochet Rainbow Bookmark – Step by Step Tutorial allows you to customize the bookmark further. You can add a border to give it a polished look.
To create a border, use a neutral color like white or black. Attach the yarn to one corner and work single crochet stitches all around the bookmark. When you reach a corner, add two single crochet stitches to help it turn smoothly.
Once the border is complete, fasten off the yarn and weave in the remaining ends. You can also block the bookmark by lightly steaming or pressing it to ensure it lays flat.
For extra decoration, consider adding a small tassel or pom-pom to one end of the bookmark. This gives it a playful and finished look.
Another option is to add small embellishments like beads or charms, especially if you plan to gift the bookmark.
The final result is a colorful, handmade bookmark that is both practical and beautiful.
One of the best parts of the How to Crochet Rainbow Bookmark – Step by Step Tutorial is the ability to customize the design. You can experiment with different yarn weights and hook sizes to create thicker or thinner bookmarks.
Try using glitter or metallic yarn for a more festive look. This is a great way to make bookmarks for special occasions or holidays.
You can also create themed bookmarks, such as pastel colors for spring or bold colors for summer. Personalizing the colors makes the project more meaningful.
If you enjoy embroidery, you can add small stitched designs like hearts, stars, or initials to make each bookmark unique.
Another fun variation is to create matching bookmarks and gift them as sets for friends or family. This makes for a thoughtful and budget-friendly present.
Finally, because the project is so quick and easy, it is perfect for making multiple bookmarks to sell at craft fairs or include in book gift sets.
1. What is the best yarn for crochet bookmarks?
Cotton yarn is recommended because it is durable, soft, and holds its shape well without stretching too much.
2. Is this project suitable for beginners?
Yes, this tutorial uses basic stitches and is perfect for beginners who want to practice color changes.
3. How long does it take to make one bookmark?
It usually takes 30 to 45 minutes to complete one bookmark, depending on your speed.
4. Can I wash crochet bookmarks?
Yes, hand washing in cool water is best to preserve the shape and color of the yarn.
5. How can I prevent the edges from curling?
Blocking your bookmark after finishing helps it stay flat. You can also ensure even tension while crocheting.
6. Can I sell bookmarks made using this tutorial?
Yes, handmade bookmarks are popular craft fair items and make great small gifts for readers.
The How to Crochet Rainbow Bookmark – Step by Step Tutorial is a delightful and beginner-friendly project that combines creativity with practicality. You learned how to prepare materials, crochet the base, add colors, and finish the bookmark with optional decorative touches.
This project is a wonderful way to use leftover yarn while making a colorful accessory for books. It is perfect as a personal craft, a thoughtful gift, or a handmade item to sell.
We hope this tutorial has inspired you to create your own rainbow bookmarks. Please leave your honest opinion and suggestions in the comments—we would love to know your thoughts and see your creations!


