Weathervane Quilt Block Pattern: A Timeless and Striking Design
Advertising
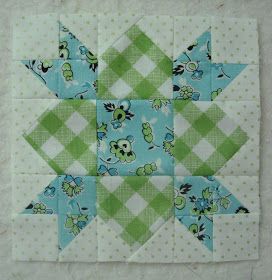
The Weathervane Quilt Block Pattern is a traditional design that continues to inspire quilters of all skill levels. With its bold geometric layout and historical roots, the weathervane quilt block adds a touch of vintage elegance to any quilt project. Its clean lines and dynamic shapes make it an excellent option for both classic and contemporary quilt styles.
Whether you’re crafting a table runner, a baby quilt, or a full-size bedspread, the Weathervane quilt pattern provides structure and charm. It features a large central square, surrounded by half-square triangles (HSTs) and rectangles, giving it the look of a spinning weathervane — hence the name. Its versatility makes it ideal for playing with color contrasts and fabric prints.
Advertising
In this blog post, you’ll learn how to make your own Weathervane Quilt Block Pattern, from fabric cutting and measurements to piecing the block together. Designed with beginners and experienced quilters in mind, this tutorial will guide you through each step clearly. Get ready to elevate your patchwork skills and bring a piece of quilting history into your own home.
The first step in mastering the Weathervane Quilt Block Pattern is understanding its structure. This traditional block is typically made up of a nine-patch layout but includes several components like half-square triangles, flying geese, and central squares.
At the heart of the block is a square, often fussy cut or chosen to showcase a special fabric print. This square measures 4½” x 4½” before piecing and becomes 4″ x 4″ once sewn with seam allowances.
The corner units are composed of half-square triangles (HSTs) that add motion and direction to the design. You’ll need four HSTs, each measuring 4½” x 4½” before sewing.
Side units are made using rectangles and small squares. You will create four side units, each made up of a 2½” x 4½” rectangle and a 2½” square.
The color placement is essential. Choose a light fabric for the background, a medium-tone fabric for the HSTs, and a bold or print fabric for the center square and rectangles. This allows the weathervane design to pop visually.
When assembled, the block will measure 12½” x 12½” unfinished, finishing at 12″ x 12″ in your quilt. Adjust fabric size proportionally if you’d like to create larger or smaller blocks.
This quilt block is suitable for chain piecing, which makes it efficient to produce multiple blocks quickly. It’s perfect for sampler quilts, scrappy projects, or traditional layout repeats.
Fabric Cutting and Preparation
Cutting your fabric accurately is critical to achieving crisp points and straight seams in the Weathervane quilt pattern. Begin with clean, pressed fabric, a rotary cutter, and a ruler for best results.
For one Weathervane quilt block, you’ll need three coordinating fabrics:
Background (light): neutral or low-volume print
Accent (medium): for triangles and small blocks
Focus (bold): center square and side rectangles
Cut the following pieces:
(1) 4½” x 4½” square – focus fabric (center)
(4) 4⅞” x 4⅞” squares – two from background, two from accent fabric (for HSTs)
(4) 2½” x 4½” rectangles – focus fabric (side rectangles)
(4) 2½” x 2½” squares – background fabric (corners of side units)
To make the HSTs, pair one background square with one accent square, right sides together. Draw a diagonal line from corner to corner on the lighter fabric.
Stitch ¼” on both sides of the line. Cut along the line and press open to make two HSTs. Trim them to 4½” square. Repeat with the second set to make four total.
Assemble side units by attaching each small square to a rectangle. Stitch the square to the short end of the rectangle and press seam toward the rectangle.
Lay out all your cut pieces according to the block layout. Doing a mock layout before sewing ensures that colors and angles align properly. This also helps you visualize your finished block.
Step-by-Step Assembly of the Weathervane Block
With all your pieces cut and laid out, you’re ready to sew your Weathervane Quilt Block Pattern together. The process involves sewing in rows and then assembling those rows into a cohesive block.
Advertising
Begin by sewing your four corner HSTs into place. Ensure the diagonal seam is oriented properly so the triangles point outward, creating that signature weathervane look.
Sew the four side units by combining the small squares and rectangles. These should be placed on the middle edges of the block and will frame the center square.
Start assembling the block row by row. The top and bottom rows consist of an HST, a side unit, and another HST. Pay close attention to orientation so the triangles spin correctly.
The middle row includes one side unit on each side of the 4½” center square. Sew them together and press seams outward to reduce bulk.
Once all three rows are complete, sew the rows together to complete the block. Use pins to align seams accurately and ensure a polished finish.
Press the completed block well, checking for any stretching or puckering. Your block should now measure 12½” x 12½” and lie flat, ready to be joined into a quilt top.
Making a Full Quilt with the Weathervane Block
Now that you’ve mastered the block construction, you can begin designing a full quilt using the Weathervane Quilt Block Pattern. There are countless layout possibilities that can enhance the geometry and color movement of the block.
A traditional layout involves sewing blocks together in straight rows with sashing between them. Use 2½” wide sashing strips to separate each block and add visual clarity.
If you’re going for a more modern look, try offsetting rows or adding blank blocks (also known as negative space) between patterned blocks. This makes each quilt pattern more contemporary and minimalist.
Choose a consistent color scheme throughout or make it scrappy by using different fabrics in each block. Both approaches bring unique character to your finished quilt.
When assembling your quilt top, be sure to press seams consistently — either all to one side or open — to reduce bulk and ensure smooth quilting later.
Layer your quilt top with batting and backing fabric to create a quilt sandwich. Baste using pins, adhesive spray, or large stitches to hold everything in place.
Finish the quilt by quilting as desired — echo the weathervane shape with diagonal lines or try a swirling pattern for contrast. Bind the quilt using 2½” wide strips folded in half and sewn around the edges.
The Weathervane Quilt Block Pattern is a classic choice that offers structure, style, and creative freedom. Its timeless appeal has made it a favorite among quilters for generations, and its adaptable design allows you to make it your own with fabric and color variations.
Whether you’re creating a gift, decorating a guest room, or expanding your quilting repertoire, the Weathervane quilt pattern provides a satisfying and eye-catching result. With precise piecing, thoughtful fabric choices, and the step-by-step guide above, you can confidently stitch your way to a beautifully finished block — and eventually, a stunning full-size quilt.
Let this traditional design guide your next quilting journey. Happy quilting!


