Sunbonnet Sue Quilt Block Pattern: A Timeless Classic for Quilters
Advertising
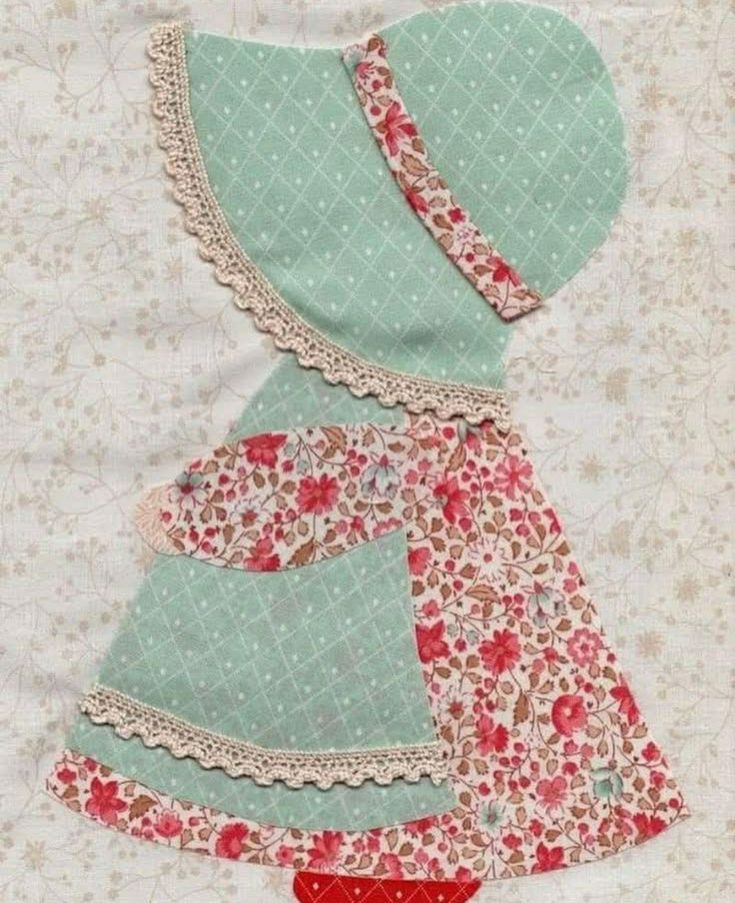
The Sunbonnet Sue Quilt Block Pattern is one of the most enduring and beloved designs in quilting history. From traditional heirlooms to modern interpretations, this charming figure of a little girl in a sunbonnet has captivated quilters for over a century. Whether you’re an experienced quilter or just beginning your journey, the Sunbonnet Sue quilt pattern is a perfect blend of nostalgia and creativity.
This block is unique because it combines both piecing and appliqué techniques. The design features a young girl with a bonnet, dress, and shoes — all of which can be made from scraps of your favorite fabrics. The visual appeal lies in its versatility: you can dress up Sunbonnet Sue in seasonal outfits, floral prints, or even whimsical themes to match your quilt’s personality.
Advertising
In this blog post, we’ll guide you through a complete tutorial on how to make a Sunbonnet Sue Quilt Block Pattern. You’ll learn the necessary materials, fabric measurements, cutting instructions, and step-by-step sewing guidance to create your own beautiful version. Let’s get started with the timeless charm of this classic quilt pattern.
Before you begin stitching your Sunbonnet Sue block, it’s essential to prepare your materials. Having the right supplies on hand makes the process smoother and helps ensure your quilt block turns out beautifully.
First, choose a background fabric that will make Sue stand out. Solid or light-toned fabric works best. For one block, you’ll need a 10” x 10” background square. Cotton quilting fabric is recommended due to its stability and ease of use.
Select fabric scraps in coordinating prints for Sue’s bonnet, dress, and shoes. This is a great opportunity to use leftover pieces from other projects. You’ll need approximately:
Bonnet: 5” x 4”
Dress: 6” x 5”
Arm and Leg: 3” x 2” (skin tone or neutral)
Shoes: 2” x 1.5”
You’ll also need lightweight fusible web or interfacing to stabilize the appliqué pieces. This helps keep the shapes crisp and prevents fraying. Cut it slightly smaller than your fabric pieces to reduce bulk.
A sharp pair of fabric scissors or rotary cutter, heat-resistant pins, and a small iron will make the assembly more precise. Using a pressing cloth is recommended when working with fusible web.
Print or trace the Sunbonnet Sue quilt pattern template onto freezer paper or tracing paper. This helps in accurately cutting the appliqué shapes. You can find free templates online or draft your own.
Choose thread colors that match or contrast with your fabrics for appliqué stitching. A straight stitch, zigzag, or decorative stitch can be used to secure the edges, depending on your desired finish.
Cutting and Assembling the Appliqué Pieces
Once all materials are gathered, it’s time to cut the fabric pieces and build the adorable Sunbonnet Sue silhouette. Accuracy and patience are key here, especially for curved edges and smaller components.
Begin by tracing the pattern pieces onto the paper side of your fusible web. Label each piece (bonnet, dress, arm, leg, and shoe) for easy identification. Cut out roughly around each traced shape.
Press each piece of fusible web onto the wrong side of the corresponding fabric scrap. Use medium heat and press down firmly for about 5–10 seconds. Allow it to cool completely before trimming.
Carefully cut out each shape along the traced lines using small, sharp scissors. Set aside all pieces and keep them in order to avoid confusion during layout.
Fold the background square in half horizontally and vertically to find the center. Use this as a guide to help position Sunbonnet Sue in the middle of the block.
Arrange the appliqué pieces in the correct order: start with the leg and shoe at the bottom, then the dress, arm, and finally the bonnet on top. Adjust spacing until you’re happy with the look.
Once positioned, peel the paper backing off each piece and fuse them to the background fabric with a hot iron. Use a pressing cloth to protect your iron and fabric. Make sure everything is securely bonded before moving to stitching.
Stitching Techniques and Tips
Now that Sue is fused to the fabric, it’s time to secure the edges with stitching. This is where your quilt block will come to life, and you can add decorative details or keep it simple based on your style.
Advertising
Choose your stitch type. A narrow zigzag or satin stitch works well for clean, polished edges. For a vintage look, try a straight stitch about 1/8″ from the edge to allow a light fray over time.
Use a matching thread for a seamless finish, or pick a contrasting color to highlight the appliqué edges. Thread tension should be balanced to avoid puckering the block.
Start by stitching around the bonnet, then the dress, arm, leg, and shoe. Backstitch at the beginning and end of each section for added durability.
If desired, add embellishments such as a bow on the bonnet, embroidery on the dress, or buttons for extra charm. These small details give your quilt block a unique personality.
Once stitching is complete, press the block gently to set the stitches. Avoid stretching the fabric as this may distort the block’s shape.
Trim your block to 9.5” x 9.5” for a finished 9” quilt block, allowing for a 1/4″ seam allowance on all sides. This standard size will help in assembling a quilt top with uniform blocks.
Creating a Full Sunbonnet Sue Quilt
Now that your block is complete, it’s time to think about transforming your Sunbonnet Sue squares into a full quilt. This part of the project allows for personal expression, layout planning, and creative assembly.
A typical baby-sized quilt might use 12 Sunbonnet Sue blocks (3 rows of 4). For a lap quilt, consider 20–30 blocks. You can alternate Sue blocks with solid or pieced blocks to break up the design.
Add sashing between the blocks using 2” wide strips of fabric. This gives each block room to breathe and frames each Sue design beautifully.
Incorporate borders to define the quilt edges. A 4” outer border in a coordinating color or print can enhance the overall look and size of the finished quilt.
Once the layout is finalized, sew your blocks into rows, pressing each seam carefully. Join the rows together, making sure your sashing and corners align neatly.
Make a quilt sandwich with backing fabric, batting, and the quilt top. Baste the layers using pins, spray adhesive, or long basting stitches to keep them secure during quilting.
Quilt as desired — simple grid quilting, free-motion designs, or outlining each Sunbonnet Sue are all great options. Bind the quilt with 2.5” wide strips folded in half and sewn to the edges for a clean finish.
The Sunbonnet Sue Quilt Block Pattern is more than just a nostalgic motif — it’s a storytelling device, a memory keeper, and a celebration of timeless quilting tradition. Whether you dress Sue in floral prints for spring or warm plaids for autumn, each block tells a unique tale.
By using this detailed tutorial, you can create your own charming quilt filled with personality and warmth. With the right quilt pattern, some thoughtful fabric choices, and a little patience, your next quilting masterpiece will come to life one Sunbonnet Sue at a time.


