
How to sew a fabric storage basket tutorial

Step-by-step instructions for making a fabric chicken egg holder are a creative and practical way to combine sewing skills with charming home décor. Step-by-step instructions for making a fabric chicken egg holder help crafters transform simple materials into a functional kitchen accessory that keeps eggs organized while adding a handmade, cozy touch to the home. This project appeals to beginners and experienced sewists alike because it balances creativity, usefulness, and decorative value.
The popularity of Step-by-step instructions for making a fabric chicken egg holder has grown as more people seek sustainable, reusable, and handmade solutions for everyday household needs. A fabric chicken egg holder reduces reliance on disposable packaging and encourages mindful crafting. By following Step-by-step instructions for making a fabric chicken egg holder, anyone can create a personalized item that reflects their style and brings warmth to the kitchen environment.
Another important aspect of Step-by-step instructions for making a fabric chicken egg holder is their adaptability. These instructions can be adjusted for different fabric types, sizes, and decorative elements. Whether designed for a rustic farmhouse look or a playful modern kitchen, Step-by-step instructions for making a fabric chicken egg holder provide a flexible foundation that supports endless creativity while maintaining functionality and charm.
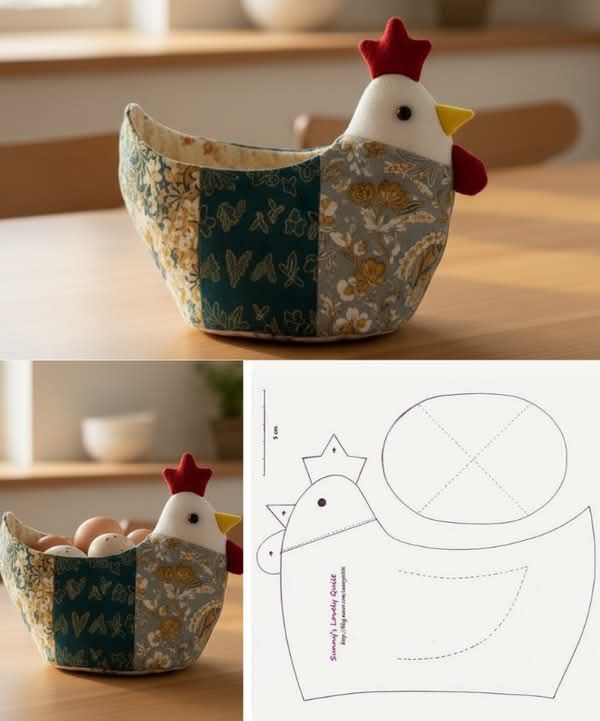
A fabric chicken egg holder is a soft, padded container shaped like a chicken, designed to hold and protect eggs safely. Step-by-step instructions for making a fabric chicken egg holder explain how this whimsical design serves a practical purpose while enhancing visual appeal.
The chicken shape is more than decorative, as it naturally creates compartments for eggs. Through Step-by-step instructions for making a fabric chicken egg holder, crafters learn how structure and form work together to support the eggs securely.
These holders are often placed on kitchen counters or dining tables, making them both storage and décor. Step-by-step instructions for making a fabric chicken egg holder emphasize balancing durability with softness.
Many designs use quilting or padding techniques to protect eggs from minor impacts. By following Step-by-step instructions for making a fabric chicken egg holder, makers can ensure the holder is both sturdy and gentle.
The concept also aligns with sustainable living, as fabric holders are reusable and washable. Step-by-step instructions for making a fabric chicken egg holder often highlight fabric choices that support eco-conscious crafting.
Overall, understanding the purpose behind the design helps crafters appreciate the value of Step-by-step instructions for making a fabric chicken egg holder as more than a novelty item.
Choosing the right materials is essential when following Step-by-step instructions for making a fabric chicken egg holder. Cotton fabric is commonly recommended due to its durability and ease of sewing.
Batting or soft padding is used to give the holder structure and cushioning. Step-by-step instructions for making a fabric chicken egg holder explain how padding protects the eggs while maintaining shape.
Thread selection also matters, as strong stitching ensures longevity. When applying Step-by-step instructions for making a fabric chicken egg holder, matching thread colors can enhance the finished look.
Basic sewing tools such as scissors, pins, needles, and a sewing machine simplify the process. Step-by-step instructions for making a fabric chicken egg holder are designed to work with standard household tools.
Preparing fabric by washing and ironing it beforehand helps prevent shrinkage and ensures smooth sewing. Step-by-step instructions for making a fabric chicken egg holder often stress preparation as a key success factor.
Accurate cutting and marking are essential steps emphasized in Step-by-step instructions for making a fabric chicken egg holder, as precision affects the final fit and appearance.
The first stage in Step-by-step instructions for making a fabric chicken egg holder involves cutting fabric pieces according to a simple pattern that outlines the chicken shape.
Next, layers of fabric and batting are aligned carefully to create the padded structure. Step-by-step instructions for making a fabric chicken egg holder guide this process to avoid uneven thickness.
Sewing begins by stitching the main body sections together, leaving openings where necessary. Step-by-step instructions for making a fabric chicken egg holder emphasize consistent seam allowances.
Once the main shape is formed, the piece is turned right side out. According to Step-by-step instructions for making a fabric chicken egg holder, this step reveals the chicken silhouette.
Egg compartments are then stitched or shaped using seams that divide the interior space. Step-by-step instructions for making a fabric chicken egg holder show how to position these seams for balance.
Finally, decorative details such as eyes, beak, or comb are added. Step-by-step instructions for making a fabric chicken egg holder encourage creativity while maintaining safety and durability.
One of the advantages of Step-by-step instructions for making a fabric chicken egg holder is the opportunity for personalization. Fabric patterns can reflect seasonal themes or personal taste.
Color combinations play a significant role in the overall appearance. Step-by-step instructions for making a fabric chicken egg holder allow crafters to experiment with bright, neutral, or rustic tones.
Size adjustments are another option, making holders suitable for different egg quantities. By modifying Step-by-step instructions for making a fabric chicken egg holder, larger or smaller versions can be created.
Embroidery and appliqué techniques can enhance decorative details. Step-by-step instructions for making a fabric chicken egg holder often inspire embellishments that add character.
Different textures, such as quilted fabrics or linen, offer unique visual effects. Step-by-step instructions for making a fabric chicken egg holder support experimentation with textures.
Customization makes each holder unique, reinforcing the creative value of Step-by-step instructions for making a fabric chicken egg holder.
Beyond decoration, a fabric chicken egg holder is highly practical. Step-by-step instructions for making a fabric chicken egg holder focus on functionality and everyday usability.
The holder keeps eggs organized and easily accessible on the counter. Step-by-step instructions for making a fabric chicken egg holder ensure stability during use.
Cleaning is simple, as most holders can be gently washed. Step-by-step instructions for making a fabric chicken egg holder often recommend care methods based on fabric choice.
Proper maintenance extends the life of the holder. Following Step-by-step instructions for making a fabric chicken egg holder helps preserve shape and stitching.
These holders are also excellent gifts, combining usefulness with handmade charm. Step-by-step instructions for making a fabric chicken egg holder make gifting personal and thoughtful.
Over time, a well-made holder becomes a cherished kitchen accessory, showcasing the value of Step-by-step instructions for making a fabric chicken egg holder.
What is the purpose of a fabric chicken egg holder?
A fabric chicken egg holder is designed to store and protect eggs while adding decorative appeal to the kitchen.
Are step-by-step instructions for making a fabric chicken egg holder suitable for beginners?
Yes, Step-by-step instructions for making a fabric chicken egg holder are beginner-friendly and use basic sewing techniques.
What fabrics work best for a fabric chicken egg holder?
Cotton fabrics are ideal due to durability, ease of sewing, and washability.
How many eggs can a fabric chicken egg holder hold?
Capacity varies, but Step-by-step instructions for making a fabric chicken egg holder can be adapted to hold different quantities.
Is a fabric chicken egg holder washable?
Most holders are washable, depending on materials used, as explained in Step-by-step instructions for making a fabric chicken egg holder.
Can the design be customized?
Yes, Step-by-step instructions for making a fabric chicken egg holder support customization in size, color, and decoration.
This article explored Step-by-step instructions for making a fabric chicken egg holder, covering the concept, materials, construction process, customization options, and practical uses.
You learned how careful preparation, thoughtful design, and creative choices come together to produce a functional and decorative handmade item. By following Step-by-step instructions for making a fabric chicken egg holder, crafters can enjoy a rewarding project that blends creativity with everyday usefulness.
Now it’s your turn to share your thoughts. Leave a sincere opinion about your experience with Step-by-step instructions for making a fabric chicken egg holder, and feel free to suggest ideas, variations, or improvements. Your feedback and suggestions help inspire creativity and support a vibrant crafting community.


