Sawtooth Star Quilt: Complete Step-by-Step Guide and Quilt Patterns
Advertising
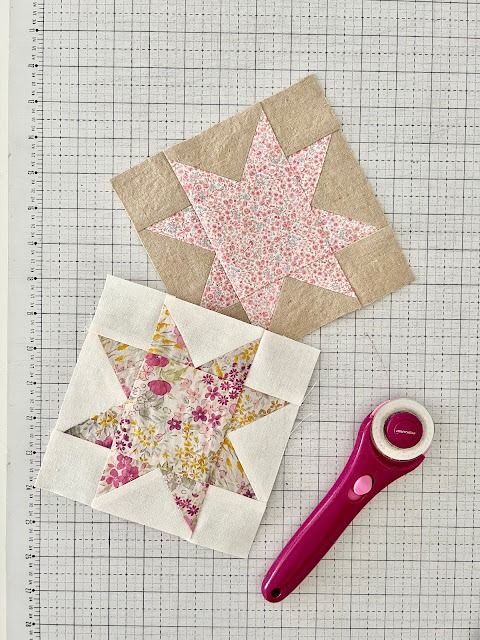
The Sawtooth Star quilt is a timeless and elegant design that has remained popular for generations. This classic quilt pattern, recognized by its beautiful star formation, is both visually striking and surprisingly simple to create. Whether you’re a beginner or an experienced quilter, the Sawtooth Star quilt offers a perfect balance of creativity and technique.
Creating a Sawtooth Star quilt allows you to explore the world of quilt patterns while crafting something meaningful and functional. It’s a versatile design that can be used for bedspreads, baby blankets, wall hangings, or even as part of a modern home decor collection. The simplicity of the block construction makes it an ideal project to improve your quilting skills.
Advertising
In this detailed article, you’ll discover everything you need to know about making a Sawtooth Star quilt. We’ll guide you through fabric selection, cutting measurements, assembling the quilt block, and finishing your quilt. You’ll also find essential tips and a complete step-by-step quilt pattern to help you successfully complete your project.
Image From Pinterest
Materials, Tools, and Fabric Cuts for the Sawtooth Star Quilt
Starting your Sawtooth Star quilt begins with gathering the correct materials and preparing precise fabric cuts. This preparation is key to achieving clean lines and a well-assembled quilt.
Choosing the Fabric for Your Quilt Selecting high-quality cotton fabric is essential for a durable and beautiful quilt. For a traditional look, use contrasting colors for the star and the background. A dark star on a light background creates a striking effect, but you can experiment with modern prints for a contemporary twist.
Essential Quilt Tools You’ll need a rotary cutter, quilting ruler, cutting mat, sewing machine, thread, pins, and an iron. Having accurate cutting tools will ensure that your quilt pieces fit together perfectly, which is especially important in the geometric design of the Sawtooth Star quilt.
Fabric Cutting Measurements For one 12-inch finished Sawtooth Star quilt block, cut:
One 6.5″ x 6.5″ square for the center.
Four 3.5″ x 3.5″ squares for the corners.
Eight 3.5″ x 3.5″ squares for the flying geese units (star points).
Four rectangles, each measuring 3.5″ x 6.5″ (background fabric for flying geese).
Understanding Quilt Patterns The Sawtooth Star quilt pattern is built around the flying geese block, which creates the sharp points of the star. This traditional block is easy to repeat, making it perfect for creating large or small quilts.
Quilt Assembly Layout Arrange your cut pieces in a nine-patch layout: the center square in the middle, the four corner squares around it, and the flying geese units forming the star points between them. This will help you visualize the finished quilt block before sewing.
Additional Quilt Materials For a full quilt, you will also need batting, backing fabric, and quilt binding. The size of these materials will depend on how many Sawtooth Star quilt blocks you plan to make and the final size of your quilt.
Step-by-Step Instructions: How to Make a Sawtooth Star Quilt Block
The heart of the Sawtooth Star quilt is its block construction. Follow these clear, step-by-step instructions to create each star block with precision.
Making the Flying Geese Units
Place two 3.5″ squares on opposite corners of a 3.5″ x 6.5″ rectangle, right sides together.
Draw a diagonal line across each square and sew along the marked lines.
Trim 1/4 inch outside the stitching and press the squares open to form the first half of the flying geese unit.
Completing the Flying Geese
Repeat the same steps with two more 3.5″ squares on the remaining corners of the rectangle.
Sew, trim, and press to complete each flying geese unit.
Make four flying geese units for each Sawtooth Star quilt block.
Assembling the Quilt Block Rows
Layout the quilt block with the center square, flying geese units, and corner squares.
Sew the top, middle, and bottom rows together separately, aligning the points carefully.
Press seams towards the center to help the block lay flat.
Joining the Rows
Sew the top row to the middle row, then the bottom row to the middle.
Be sure the star points align properly at the seams.
Press the final block carefully to maintain its square shape.
Repeating the Quilt Blocks
Continue making as many Sawtooth Star quilt blocks as needed for your quilt size.
Each block should measure 12.5″ x 12.5″ before sewing them together into the quilt top.
Arrange the blocks in your desired layout to complete the quilt top.
Adding Sashing and Borders (Optional)
If desired, add sashing strips between the blocks to separate the stars and give the quilt a modern touch.
You can also add borders around the entire quilt top to increase the overall size.
These additions can enhance the final look and frame the Sawtooth Star quilt beautifully.
Finishing Your Sawtooth Star Quilt: Quilting and Binding
Once you’ve assembled your Sawtooth Star quilt top, it’s time to move on to quilting and binding. This is where your quilt truly comes to life.
Advertising
Preparing the Quilt Sandwich
Lay the backing fabric (right side down), batting, and quilt top (right side up) to create a quilt sandwich.
Smooth each layer carefully to avoid wrinkles.
Pin or baste the layers securely to keep them in place.
Choosing a Quilting Design
You can quilt along the seams (stitch in the ditch) or use free-motion quilting for a more artistic touch.
Straight-line quilting is a simple option that highlights the geometric beauty of the Sawtooth Star quilt.
Choose quilting thread colors that complement your fabrics.
Machine or Hand Quilting
If you’re using a sewing machine, adjust your stitch length and carefully follow your chosen quilting pattern.
For hand quilting, use a quilting hoop and hand-sew small, even stitches throughout the quilt.
Hand quilting can add a lovely traditional touch to your quilt.
Trimming the Quilt
After quilting, trim any excess batting and backing fabric so that all edges are even.
This step ensures your quilt has clean lines for adding the binding.
Double-check the corners to make sure they are square.
Adding the Quilt Binding
Cut fabric strips 2.5″ wide for the binding.
Sew the binding to the front of the quilt, fold it over to the back, and hand-stitch it in place.
Binding frames your Sawtooth Star quilt and gives it a polished finish.
Labeling Your Quilt
Add a small fabric label with your name, the date, and the quilt’s name.
This personalizes your Sawtooth Star quilt and preserves its story for years to come.
It’s a thoughtful finishing touch that many quilters cherish.
Creative Ideas and Practical Tips for Your Sawtooth Star Quilt
Beyond following quilt patterns, you can personalize and adapt the Sawtooth Star quilt to suit your style, preferences, and home decor.
Color Variations and Themes
Try using bold, modern fabrics for a contemporary Sawtooth Star quilt.
Seasonal color schemes can create perfect holiday or themed quilts.
Monochromatic versions can provide a sophisticated look.
Scrappy Sawtooth Star Quilts
Use leftover fabric scraps to create a charming, colorful quilt with a scrappy feel.
This eco-friendly approach adds texture and variety to each star block.
It’s a great way to reduce fabric waste while creating something unique.
Different Quilt Sizes
Make smaller versions for baby quilts, lap quilts, or decorative wall hangings.
Larger quilts can become heirloom bedspreads passed down through generations.
Adjust the number of blocks to achieve your desired quilt size.
Mixing Quilt Patterns
Combine the Sawtooth Star quilt block with other traditional quilt patterns like nine-patch or log cabin blocks.
Mixing patterns can create dynamic quilt designs with added complexity.
This approach allows endless creative possibilities.
Using the Sawtooth Star in Other Projects
The Sawtooth Star quilt block can also be used for cushion covers, tote bags, or table runners.
It’s a versatile design that adapts well to small or large projects.
You can make matching home accessories using the same fabric combinations.
Sharing and Preserving Your Quilt
Share your finished Sawtooth Star quilt on social media or in quilting communities.
Document your quilting journey with photos and notes.
A finished quilt is more than fabric — it’s a story, and sharing it inspires other quilters.
The Sawtooth Star quilt is a beautiful and versatile project that both beginners and seasoned quilters can enjoy. With clear quilt patterns, precise fabric cuts, and a detailed step-by-step process, you can create a stunning quilt that will be cherished for years.
Whether you choose traditional fabrics or modern designs, your Sawtooth Star quilt will shine as a true handmade treasure. Happy quilting!


