
How to sew a fabric storage basket tutorial

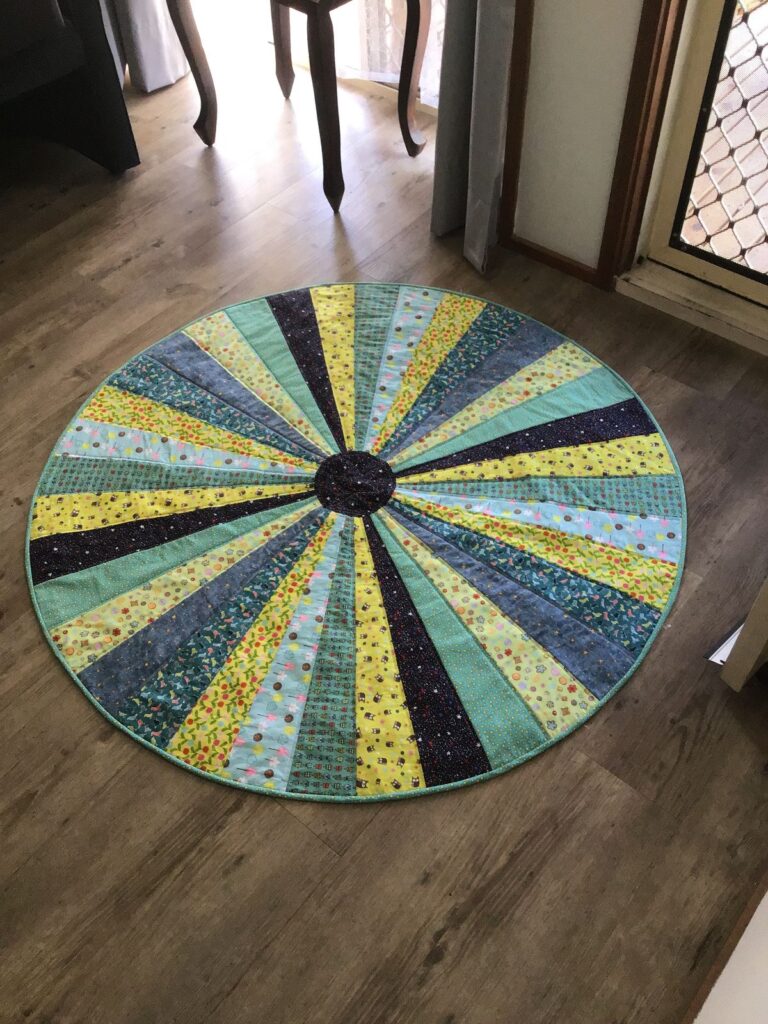
Round patchwork rug tutorial is the perfect way to explore creativity while transforming fabric scraps into something both beautiful and functional. This complete Round patchwork rug tutorial will guide you step by step, helping beginners and experienced crafters create a unique home decor piece. Handmade rugs are becoming increasingly popular because they add personality and warmth to any space. By following this Round patchwork rug tutorial, you will learn how to combine colors, textures, and patterns into a stunning circular design.
Creating a rug using this Round patchwork rug tutorial is not only a creative activity but also a sustainable choice. Many people are looking for ways to reuse leftover fabric, and patchwork is one of the best techniques for that purpose. This Round patchwork rug tutorial encourages eco-friendly crafting while producing something stylish and practical. You can use old clothes, fabric scraps, or quilting leftovers to create a rug that is both meaningful and environmentally conscious.
Another benefit of following this Round patchwork rug tutorial is the flexibility it offers. You can customize the size, color palette, and style according to your needs. Whether you want a bold statement piece or a subtle decorative item, this Round patchwork rug tutorial gives you full control over the final result. With patience and creativity, you can design a rug that reflects your personal taste and enhances your living space.
Before starting your Round patchwork rug tutorial, it is important to gather all the necessary materials. Basic supplies include fabric scraps, scissors, thread, a sewing machine or needle, and a non-slip backing. Having everything ready will make the process smoother and more enjoyable.
Choosing the right fabric is essential in this Round patchwork rug tutorial. Cotton fabrics are highly recommended because they are durable and easy to work with. You can mix different prints and colors to create a visually appealing design that stands out.
Preparation is a key step in this Round patchwork rug tutorial. Wash and iron your fabric pieces before cutting them. This ensures that your rug will maintain its shape and size after washing, preventing future issues.
Cutting your fabric into uniform shapes is another important part of this Round patchwork rug tutorial. Consistent pieces make it easier to assemble the rug and achieve a balanced design. You can use templates to maintain accuracy.
Organizing your fabric pieces by color or pattern can help you visualize your design in this Round patchwork rug tutorial. This step allows you to experiment with different combinations before sewing everything together.
Finally, set up a comfortable workspace for your Round patchwork rug tutorial. Good lighting and an organized area will improve your efficiency and make the crafting process more enjoyable.
The first step in this Round patchwork rug tutorial is creating the center of the rug. Start with a small circular piece and build outward. This forms the foundation of your design and ensures symmetry.
Next, begin sewing additional fabric pieces around the center in your Round patchwork rug tutorial. Attach each piece carefully, making sure the seams are secure and aligned properly. This step requires patience and attention to detail.
As you continue your Round patchwork rug tutorial, gradually expand the circle by adding more layers. Keep checking the shape to ensure it remains round and balanced. Adjust your pieces if necessary.
Maintaining even stitching is crucial in this Round patchwork rug tutorial. Consistent seams not only improve the appearance but also increase the durability of your rug. Take your time to achieve neat results.
Once the top layer is complete in your Round patchwork rug tutorial, attach a backing material. This adds stability and prevents the rug from slipping on the floor. It also gives a professional finish to your project.
The final step in this Round patchwork rug tutorial is trimming any excess threads and inspecting your work. Make sure everything is secure and well-finished before using your rug.
Color selection plays a major role in your Round patchwork rug tutorial. Choose a palette that complements your home decor. You can go for contrasting colors for a bold look or soft tones for a calming effect.
Pattern arrangement is another important aspect of this Round patchwork rug tutorial. Try alternating patterns or creating a gradient effect to add visual interest. Experimentation is key to finding the perfect design.
Texture variation can enhance your Round patchwork rug tutorial. Mixing different types of fabric creates depth and makes your rug more appealing. Just ensure that all materials are suitable for the same level of wear.
Symmetry is essential in a Round patchwork rug tutorial. A well-balanced design looks more professional and pleasing to the eye. Take time to align your pieces properly during assembly.
Adding decorative elements can make your Round patchwork rug tutorial unique. Consider embroidery, appliqué, or quilting details to personalize your rug and make it stand out.
Finally, always test your design before final assembly in this Round patchwork rug tutorial. Lay out your pieces and adjust them until you are satisfied with the overall look.
Once your rug is finished using this Round patchwork rug tutorial, you can place it in various areas of your home. It works well in living rooms, bedrooms, or even entryways, adding a cozy touch to your space.
Cleaning your rug is important to maintain its beauty in this Round patchwork rug tutorial. Regular vacuuming helps remove dust and dirt, keeping your rug fresh and clean.
For deeper cleaning in your Round patchwork rug tutorial, hand washing is recommended. Use mild detergent and avoid harsh chemicals to preserve the fabric quality.
Proper storage is also essential in this Round patchwork rug tutorial. If you need to store your rug, keep it in a dry and clean place to prevent damage or mold.
Repairing small damages is easier when you follow this Round patchwork rug tutorial. Keep extra fabric pieces to fix any worn-out areas and extend the life of your rug.
Finally, enjoy the satisfaction of using something you created with this Round patchwork rug tutorial. Handmade items bring a special sense of accomplishment and uniqueness to your home.
What is the best fabric for a Round patchwork rug tutorial?
Cotton fabric is the most recommended because it is durable, easy to sew, and widely available.
Is the Round patchwork rug tutorial suitable for beginners?
Yes, beginners can follow this tutorial with patience and basic sewing skills.
How long does it take to complete a Round patchwork rug tutorial?
The time varies depending on the size and complexity, but most projects can take a few hours to several days.
Can I use recycled materials in a Round patchwork rug tutorial?
Absolutely, using recycled fabric is a great way to make your project eco-friendly and unique.
How do I keep my rug from slipping?
Adding a non-slip backing is recommended in this Round patchwork rug tutorial for safety and stability.
Can I sell rugs made from a Round patchwork rug tutorial?
Yes, handmade rugs are popular and can be sold as unique home decor items.
This Round patchwork rug tutorial has provided a complete guide to creating a beautiful and functional handmade rug.
You learned about materials, preparation, step-by-step construction, design tips, and maintenance. By following this Round patchwork rug tutorial, you can transform simple fabric pieces into a stunning decorative item that enhances your home.
Crafting your own rug is not only rewarding but also a great way to express creativity and sustainability. If you found this article helpful, please leave your honest opinion and share your suggestions to help improve future tutorials.


