
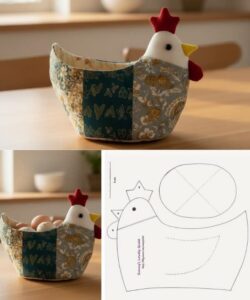
How to sew a fabric storage basket tutorial

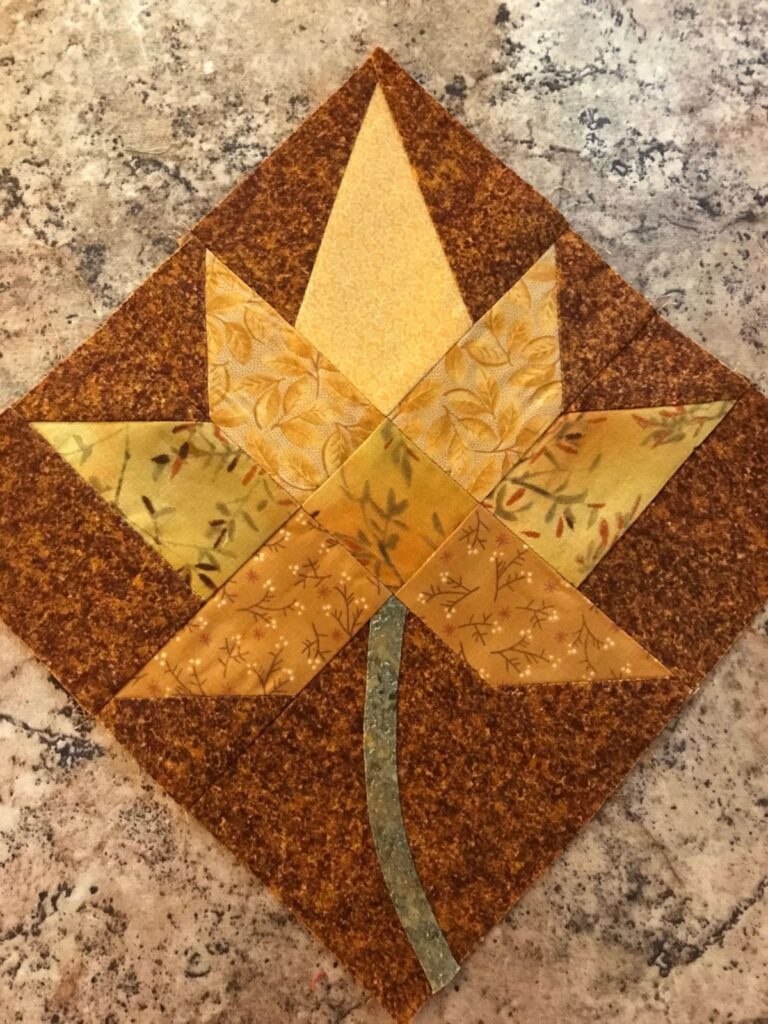
The Maple Leaf Quilt Block – Step by Step Tutorial is one of the most beloved patterns in the quilting world. Inspired by the beauty of autumn and the elegance of nature, this quilt block captures the essence of falling leaves through simple geometric designs. Whether you’re a beginner looking for an easy and fun quilting project or an experienced quilter seeking to add a seasonal touch to your collection, the Maple Leaf Quilt Block is a timeless choice that offers both creativity and satisfaction. This tutorial will guide you through every step, from fabric selection to final assembly, making sure your finished piece is as stunning as a crisp autumn day.
The charm of the Maple Leaf Quilt Block lies in its versatility. It can be used to create full quilts, table runners, wall hangings, or even pillow covers. The design is simple enough for beginners to learn but offers endless opportunities for experienced quilters to play with color, texture, and layout. The block’s geometric composition—a combination of squares and half-square triangles—allows for experimentation with prints, solids, and gradients that mimic real maple leaves in all their colorful glory.
In this Maple Leaf Quilt Block – Step by Step Tutorial, you will learn not only how to piece the block together but also how to achieve clean seams, balanced colors, and a professional finish. By the end of this guide, you’ll have a beautiful quilt block that celebrates craftsmanship and creativity. Take your time, enjoy the process, and watch as your leaf takes shape one stitch at a time.
Before you start sewing, the success of your Maple Leaf Quilt Block begins with selecting the right materials. The beauty of this pattern comes alive through thoughtful fabric and color choices. Opt for high-quality cotton fabrics, which are easy to work with and hold their shape well after sewing. Cotton also presses nicely, ensuring crisp lines for your half-square triangles and squares.
Color plays an essential role in capturing the leaf-like effect. Choose warm autumn tones—such as red, orange, yellow, and brown—for a traditional maple leaf look. You can also use bright greens for a spring-inspired version or even blues and purples for a more artistic interpretation. Don’t be afraid to mix patterned fabrics with solids to add depth and dimension to your block.
Cutting accuracy is crucial. For a standard Maple Leaf Quilt Block, you’ll need one large square for the leaf, four smaller squares for the corners, and several half-square triangles for the edges. Always use a rotary cutter, self-healing mat, and a quilting ruler to achieve precise cuts. Accuracy at this stage ensures all pieces fit together perfectly later.
When choosing background fabric, a light or neutral shade works best. It allows the colors of your maple leaf to pop without overwhelming the design. White, cream, or soft gray backgrounds are popular choices, but feel free to experiment with darker tones for a dramatic effect.
Thread selection should not be overlooked. Use a high-quality cotton thread that matches your fabric or blends well with the overall color palette. A fine thread will minimize bulk and help your seams lay flat. Finally, ensure your sewing machine is equipped with a sharp needle designed for quilting cotton.
Preparing your fabrics before cutting is also essential. Wash and press them to remove any wrinkles or shrinkage that might affect your block’s alignment later. This simple step contributes to a cleaner and more professional result.
Once you’ve gathered your materials and cut your fabric, it’s time to start piecing together the Maple Leaf Quilt Block. Begin with your half-square triangles, as they form the leaf’s points. To create them, place two squares of fabric—one leaf color and one background color—right sides together. Draw a diagonal line from corner to corner, sew a quarter-inch seam on both sides of the line, then cut along it. You’ll end up with two perfectly matched triangles.
Press the seams toward the darker fabric to prevent shadows from showing through on the lighter background. Take your time pressing; this helps the pieces lay flat and ensures your block will assemble neatly later. Consistency in pressing direction is key for achieving sharp points and accurate intersections.
Next, arrange your pieces according to the Maple Leaf Quilt Block layout. Typically, this includes a 3×3 grid with the leaf’s stem in one corner and the pointed sections forming the leaf shape. It can help to lay out your pieces on a flat surface or design board before sewing. This visual aid lets you double-check placement before stitching them together.
Sew the pieces row by row, maintaining a quarter-inch seam allowance. A consistent seam width ensures that your finished block will measure correctly and that the points of your leaf align perfectly. Pin the seams before sewing to avoid shifting during stitching.
After completing each row, press the seams carefully—alternating directions between rows to reduce bulk where seams meet. Then, sew the rows together to complete your Maple Leaf Quilt Block. Take a moment to admire how the simple combination of squares and triangles forms such an elegant pattern.
Finally, press your completed block flat from both sides. This gives it a crisp, polished appearance and makes it easier to incorporate into a larger quilt or project. If you plan to make multiple blocks, use this one as your reference for consistent sizing and style.
The Maple Leaf Quilt Block is a design that lends itself beautifully to creativity. You can adapt it to fit various themes, seasons, or color schemes. One popular variation is using different shades of the same color to create a gradient effect. This technique makes your quilt look dynamic and adds depth to the leaf design.
Another creative approach is to alternate the direction of the leaves when assembling multiple blocks. Some leaves can point up, others down or sideways, mimicking the natural randomness of falling leaves. This layout gives your quilt a whimsical and natural appearance.
You can also play with the background fabric. For instance, try a dark navy or forest green to make bright leaves pop even more. Using a patchwork-style background with different neutral tones can add visual interest and texture.
For quilters who love embroidery, consider adding hand-stitched veins to your maple leaf. This detail enhances realism and adds a personal, handmade touch. Use embroidery floss in a slightly darker or lighter shade than your leaf fabric for subtle contrast.
Another fun variation is to create a “scrappy” Maple Leaf Quilt Block, using leftover fabric from previous projects. Each block will have its own personality, and when combined, they create a lively, colorful quilt full of memories.
Lastly, think about how you’ll use your finished block. You can turn it into a wall hanging for fall, a cozy table topper, or part of a full-sized quilt. The design’s simplicity means it adapts easily to any project you have in mind.
After finishing your Maple Leaf Quilt Block, it’s important to focus on the finishing touches that make your work look professional and long-lasting. Start by trimming any uneven edges or stray threads. Accurate trimming ensures your block will align perfectly with others if you plan to join them into a quilt.
If you’re assembling multiple blocks, consider adding sashing—thin strips of fabric between blocks—to help define each leaf and create a cohesive look. Choose a color that complements your leaf fabrics but doesn’t overpower them.
Quilting the block is the next step. You can use simple straight-line quilting to enhance the geometric pattern or opt for free-motion quilting to add swirls and leaf-like veins. Either method adds texture and stability to your piece.
Once quilted, bind the edges neatly using bias tape or coordinating fabric strips. Take your time during this step, as clean binding is what gives your project that polished, finished appearance.
Caring for your quilt is also essential. Always wash it gently with mild detergent and cold water. Line drying or tumble drying on a low setting will help preserve the fabric’s colors and prevent shrinkage.
Store your quilt or blocks in a cool, dry place away from direct sunlight. Proper care ensures your Maple Leaf Quilt Block creations will remain beautiful for years to come.
1. What size should a Maple Leaf Quilt Block be?
A common size is 12 inches by 12 inches, but you can easily scale it up or down depending on your project.
2. Can beginners make the Maple Leaf Quilt Block?
Absolutely! It’s one of the best beginner-friendly patterns, focusing on simple squares and half-square triangles.
3. What fabrics are best for this quilt block?
High-quality cotton quilting fabrics are recommended because they’re durable, easy to sew, and maintain shape.
4. Can I hand sew the Maple Leaf Quilt Block instead of using a machine?
Yes, hand sewing is possible, though it requires more time and precision. Use small, even stitches for best results.
5. How many Maple Leaf blocks do I need for a full quilt?
The number depends on the desired quilt size. For example, a throw quilt might require around 20 to 25 blocks.
6. Can I mix different leaf colors in one quilt?
Definitely! Mixing colors adds vibrancy and makes your quilt resemble a pile of real autumn leaves.
The Maple Leaf Quilt Block – Step by Step Tutorial teaches you everything you need to create a timeless, nature-inspired quilt design. From choosing your fabrics and assembling pieces to exploring creative variations and proper finishing, each step celebrates craftsmanship and creativity.
This pattern is not only beginner-friendly but also a joy for experienced quilters who want to express their love for the beauty of nature through fabric.
If you followed this tutorial, you now have a beautiful Maple Leaf Quilt Block ready to showcase. I’d love to hear your thoughts—share your honest opinion and any suggestions for future tutorials. Your feedback helps inspire even more creative quilting ideas for everyone to enjoy!


