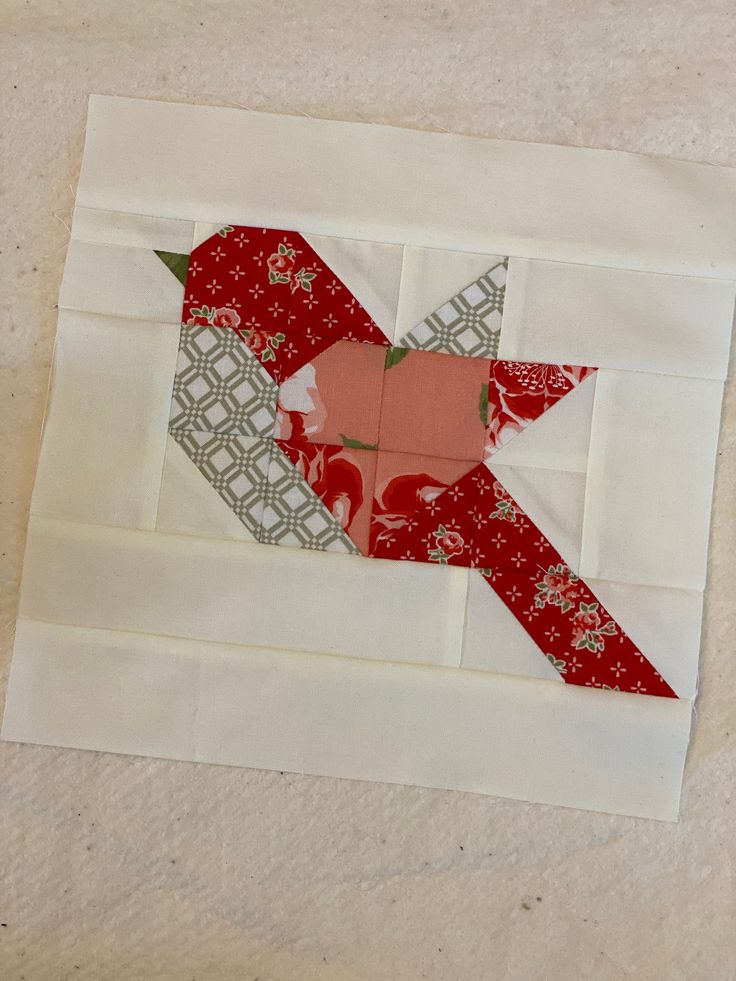
Little Slow Stitch Bird Using a Quilt Block Pattern
Advertising
Creating a little slow stitch bird using a quilt block pattern is a heartwarming and meditative way to blend the charm of hand embroidery with traditional quilting. This delightful project combines slow stitching, applique, and patchwork into a soft, rustic art piece that’s perfect for home décor or gifting. Whether you’re a seasoned quilter or a beginner looking for a creative entry point, this project is as enjoyable as it is rewarding.
What makes this project especially special is its focus on the process. Unlike fast-paced projects, slow stitching invites you to slow down, savor each moment, and embrace the imperfections that make handmade art so unique. With a simple quilt pattern, a handful of scraps, and a bit of thread, you can craft a bird full of personality and texture.
Advertising
In this article, we’ll explore how to create your own little slow stitch bird using a quilt block pattern, including material selection, cutting guides, stitching techniques, and creative tips. This step-by-step guide will walk you through everything from block layout to final embellishments—designed to be beginner-friendly and creatively liberating.
Before you begin crafting your charming bird, you’ll need to gather your materials and prepare your quilt block foundation. This block serves as the canvas upon which your slow-stitched bird will perch.
Fabric Scraps: Choose a variety of cotton fabrics in soft tones or contrasting patterns. Stick with natural fibers like linen or cotton for ease of stitching. Aim for at least 5″ x 5″ pieces for block construction.
Quilt Block Dimensions: The ideal size for your quilt base is around 8″ x 8″, though you can go larger or smaller. You can use a traditional nine-patch quilt pattern or improvise with log cabin or courthouse steps for texture.
Cutting Guide: For a basic nine-patch block, cut nine 3″ x 3″ fabric squares. If using a log cabin style, begin with a 2″ square and add 2″ wide strips around the center piece, trimming as you go.
Thread and Needles: Embroidery floss or pearl cotton works beautifully for slow stitching. Use a size 5–9 embroidery needle, depending on thread thickness and fabric weave.
Batting and Backing: Use lightweight batting and a backing fabric for a quilted effect. Cut both slightly larger than your finished quilt block (around 9″ x 9″).
Embroidery Hoop (optional): A small hoop can help stabilize your stitches and make the process more comfortable.
Once your quilt block is assembled and pressed, layer it with batting and backing, securing the edges with pins or temporary adhesive. Now, you’re ready to add the whimsical stitched bird.
🐦 Designing and Stitching the Bird Appliqué
This is where your creativity shines—designing the bird that will be the focal point of your slow stitch art. You can draw your own bird shape or use a printable template for guidance.
Advertising
Sketch Your Bird: Lightly sketch the shape of your bird directly onto the quilt block with a fabric marking pen. Start with an oval body, then add a wing, tail, and small beak.
Cut the Appliqué Pieces: Choose contrasting fabric for the bird body and wings. Cut one main body shape (about 3″ long) and a smaller wing. Use fusible web or glue stick to lightly adhere them in place.
Stitching the Appliqué: Use a whip stitch, running stitch, or blanket stitch around the bird edges. Embrace visible stitches—they add handmade charm. Choose a contrasting thread for extra pop or tonal thread for subtlety.
Add Details: Use French knots or seed stitches for eyes, backstitch for beaks and feet, and decorative stitches like fly stitch or chain stitch for feathers and wings.
Layered Texture: Add small scraps under or over the appliqué to create dimension. Don’t be afraid to layer fabrics loosely—frayed edges add to the rustic look.
Freestyle Stitching: Let your needle guide you. The slow stitching method is about mindfulness and expression, not perfection.
This step is highly personal, and each bird will be one-of-a-kind. Whether you prefer a minimalist or heavily embellished style, let the bird reflect your unique creative voice.
🌼 Embellishing the Quilt Block with Slow Stitching
Now that your bird is secured in place, it’s time to enrich the quilt block background with slow stitching, embellishments, and even storytelling elements.
Border Embellishments: Add running stitches along the seam lines of your block to enhance the structure. This also subtly echoes traditional quilting motifs.
Nature-Inspired Details: Add stitched flowers, leaves, or suns around your bird to create a whimsical environment. Simple detached chain stitches or lazy daisies work great for this.
Use of Color: Incorporate a variety of thread colors to bring depth to your piece. Earthy tones give a vintage look, while brights add a playful touch.
Buttons and Lace: Attach small buttons for berries or eyes, or add lace scraps as decorative trim. Always stitch securely to ensure they stay in place over time.
Sashiko or Kantha Stitches: Include patterns from these traditional stitching styles to add cultural flair and texture. Repeat geometric lines or arcs for cohesion.
Text Elements: Consider stitching a word or phrase into the background—like “peace,” “joy,” or the bird’s imagined name. Use backstitch or stem stitch for clarity.
This embellishment stage is where your project evolves into an expressive art piece. Take your time, work intuitively, and let the block develop naturally.
🪡 Final Assembly and Display Ideas
Your little bird is now nestled into its quilt block home, and it’s time to finish the edges and prepare it for display. Whether you frame it, make a mini pillow, or add it to a larger quilt, this piece is meant to be enjoyed.
Trim the Edges: Square up your layers, trimming excess batting and backing to match the quilt block. Use a rotary cutter and ruler for precision.
Finishing Methods:
Pillow: Add a backing piece, stitch around with right sides together, leave an opening, turn inside out, and stuff.
Wall Hanging: Add a fabric sleeve or corner triangles to the back to insert a dowel for hanging.
Raw Edge Finish: Zigzag stitch around the edge or use pinking shears for a raw, rustic look.
Binding Option: If you prefer a clean edge, bind the piece as you would a traditional quilt. Cut 2.5″ wide strips, fold in half, and sew around the edge with mitered corners.
Attach Label: Add a small tag with your name, date, and any special message on the back. It adds a personal, heirloom-quality touch.
Display: Hang on a wall, rest on a shelf, or use as a patch in a larger quilted composition. These birds make perfect gifts or seasonal decorations.
Make a Series: Each bird can reflect a mood, season, or theme. Create a flock to tell a story across multiple quilt blocks.
🧵 In Conclusion: A Quilt Project to Soothe the Soul
Creating a little slow stitch bird using a quilt block pattern is more than just a craft—it’s a gentle invitation to pause, reflect, and create beauty with your hands. This project bridges traditional quilt techniques and modern hand-stitching trends, offering a relaxing and joyful experience for makers of all skill levels.
The project’s adaptability makes it perfect for beginners and seasoned quilters alike. It allows you to explore color, texture, and shape while grounding yourself in the rhythmic, meditative art of slow stitching. There’s no pressure to be perfect—each stitch is a step toward a uniquely expressive creation.
Whether you use your bird in a wall hanging, quilt collage, or handmade gift, it carries your story in every fiber. It’s a celebration of simplicity, creativity, and the beauty of imperfection. So grab your fabrics and threads, and let your next quilt pattern sing with the soft flutter of a handmade bird.


