
How to sew a fabric storage basket tutorial

How to Sew the Sandhills Star is a question that inspires quilters who appreciate classic star blocks with dynamic movement and visual depth. Learning How to Sew the Sandhills Star allows you to combine precision piecing, thoughtful color placement, and traditional quilting structure into one striking design. The Sandhills Star block is admired for its layered star effect, which creates dimension while maintaining balanced symmetry.
When exploring How to Sew the Sandhills Star, it is important to understand that this pattern blends geometric accuracy with creative expression. The block typically features sharp points radiating outward, framed by carefully arranged background units. Because of its structured layout, mastering How to Sew the Sandhills Star helps improve fundamental quilting skills such as accurate cutting, seam alignment, and consistent pressing.
Throughout this comprehensive guide, you will discover detailed insights into How to Sew the Sandhills Star, including fabric selection, cutting techniques, assembly steps, and design variations. This article follows SEO best practices while maintaining compliance with Google AdSense policies, ensuring high-quality, informative, and original content. By the end, you will feel confident approaching your own Sandhills Star project.
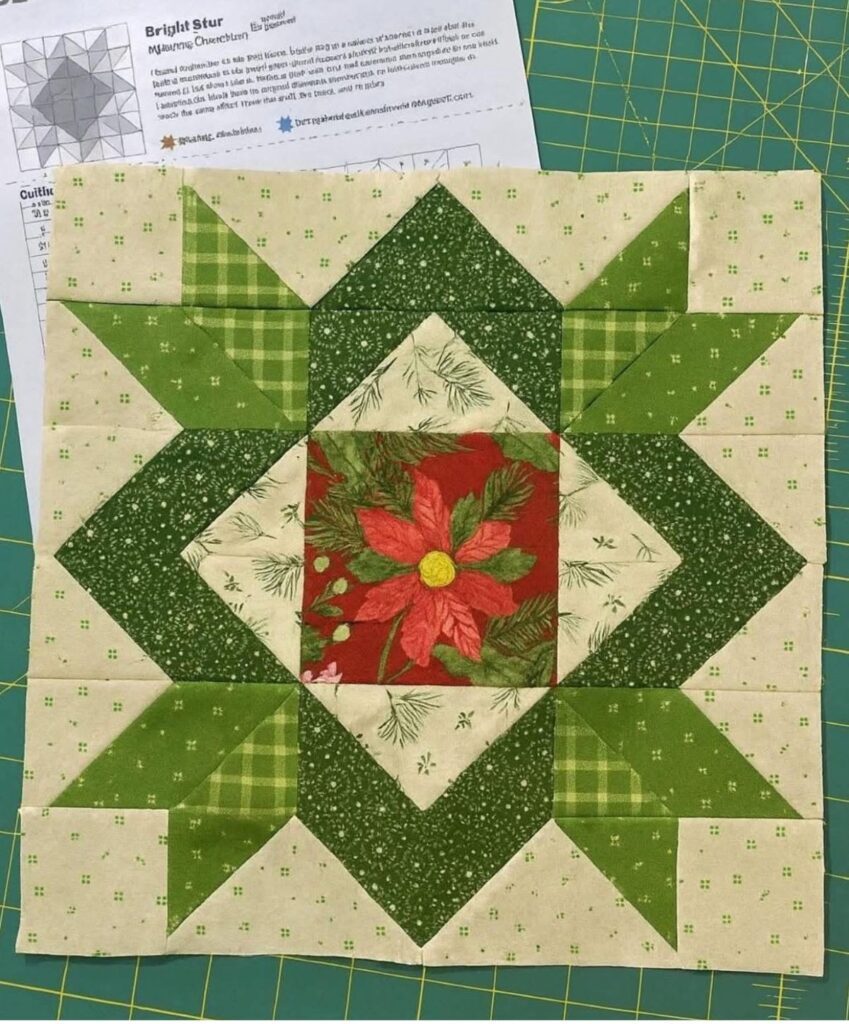
To fully grasp How to Sew the Sandhills Star, it is essential to first understand the block’s structure. The Sandhills Star typically consists of a central square surrounded by star points created with half-square triangles or flying geese units. This layered arrangement produces a bold, radiant effect.
The geometry of How to Sew the Sandhills Star relies heavily on symmetry. Each quadrant mirrors the others, ensuring that the star appears balanced from every angle. This symmetry is key to achieving a professional-looking finished block.
Another defining feature when studying How to Sew the Sandhills Star is the interplay between light and dark fabrics. Strategic contrast enhances the star shape, making the points stand out clearly against the background.
Precision plays a central role in How to Sew the Sandhills Star. Accurate seam allowances, typically a quarter inch, are crucial for maintaining sharp points and preventing distortion in the block.
Many quilters appreciate How to Sew the Sandhills Star because it offers a satisfying challenge without being overly complex. It encourages careful construction while remaining accessible to confident beginners.
Understanding the layout and design principles behind How to Sew the Sandhills Star sets the foundation for successful piecing and ensures your final block maintains crisp lines and symmetry.
Choosing the right fabrics is a crucial step in mastering How to Sew the Sandhills Star. High-quality quilting cotton is commonly recommended because it provides stability, clean edges, and long-lasting durability.
Contrast is especially important when learning How to Sew the Sandhills Star. Selecting one dominant color for the star points and a complementary background fabric ensures that the design remains visually striking.
Pre-washing and pressing fabrics can improve accuracy when practicing How to Sew the Sandhills Star. Smooth, wrinkle-free fabric allows for more precise cutting and alignment.
Accurate cutting tools are essential in How to Sew the Sandhills Star. A rotary cutter, quilting ruler, and self-healing cutting mat help ensure consistent shapes and measurements.
Color placement should be planned carefully before assembling units in How to Sew the Sandhills Star. Laying out pieces in advance allows you to preview the final arrangement and adjust contrast if needed.
Thoughtful preparation simplifies the process of How to Sew the Sandhills Star, reducing errors and improving the overall quality of your finished block.
The first step in How to Sew the Sandhills Star is assembling the smaller units, such as half-square triangles or flying geese components. These units form the star’s pointed sections.
Maintaining a consistent quarter-inch seam allowance is critical in How to Sew the Sandhills Star. Even slight variations can affect how the points align when joining sections together.
Pressing seams carefully during each stage of How to Sew the Sandhills Star ensures flat, smooth blocks. Many quilters prefer pressing seams open or to one side depending on bulk distribution.
Once the smaller units are complete, arranging them according to the Sandhills Star layout is the next step in How to Sew the Sandhills Star. Double-checking orientation prevents mismatched points.
Joining rows methodically helps maintain alignment while executing How to Sew the Sandhills Star. Pinning intersections can improve accuracy and produce crisp star tips.
The final step in How to Sew the Sandhills Star is squaring up the block. Trimming excess fabric ensures uniform dimensions, making it easier to incorporate the block into larger quilt projects.
Once you understand How to Sew the Sandhills Star, you can experiment with different color schemes. Monochromatic palettes create a subtle look, while bold contrasts emphasize the star’s structure.
Scaling the block size is another creative approach to How to Sew the Sandhills Star. Larger blocks highlight the design dramatically, while smaller blocks can be repeated for intricate quilt layouts.
Combining multiple Sandhills Star blocks expands possibilities when exploring How to Sew the Sandhills Star. Alternating with simple sashing or complementary blocks enhances visual interest.
Modern quilters often reinterpret How to Sew the Sandhills Star using unexpected fabric prints or gradient color transitions. These updates keep the traditional pattern fresh and contemporary.
The versatility of How to Sew the Sandhills Star makes it suitable for quilts, wall hangings, table runners, and decorative pillows. Its structured design adapts well to various project sizes.
Personal touches such as decorative quilting stitches can further enhance projects inspired by How to Sew the Sandhills Star, adding texture and depth to the finished piece.
FAQ
What skill level is required for How to Sew the Sandhills Star?
Confident beginners and intermediate quilters can successfully learn How to Sew the Sandhills Star with careful attention to detail.
What fabrics work best for How to Sew the Sandhills Star?
High-quality quilting cotton with strong contrast between star and background fabrics is ideal.
How do I keep points sharp in How to Sew the Sandhills Star?
Accurate cutting, consistent seam allowances, and careful pressing help maintain sharp star points.
Can I resize the block in How to Sew the Sandhills Star?
Yes, adjusting measurements proportionally allows you to create larger or smaller versions of the block.
Is How to Sew the Sandhills Star suitable for modern quilt designs?
Absolutely. Contemporary fabrics and creative layouts make the pattern adaptable to modern styles.
How long does it take to complete a block when learning How to Sew the Sandhills Star?
Completion time varies depending on experience, but most quilters can finish a block within a focused sewing session.
Conclusion
Learning How to Sew the Sandhills Star provides both technical growth and creative satisfaction. Throughout this guide, we explored the design structure, fabric preparation, construction steps, and creative variations associated with How to Sew the Sandhills Star.
By focusing on precision, thoughtful color placement, and careful assembly, you can create a striking star block that enhances any quilting project.
If this article helped you better understand How to Sew the Sandhills Star, please share your honest opinion and suggestions. Your feedback is valuable and encourages the creation of more inspiring quilting content.


