
How to sew a fabric storage basket tutorial

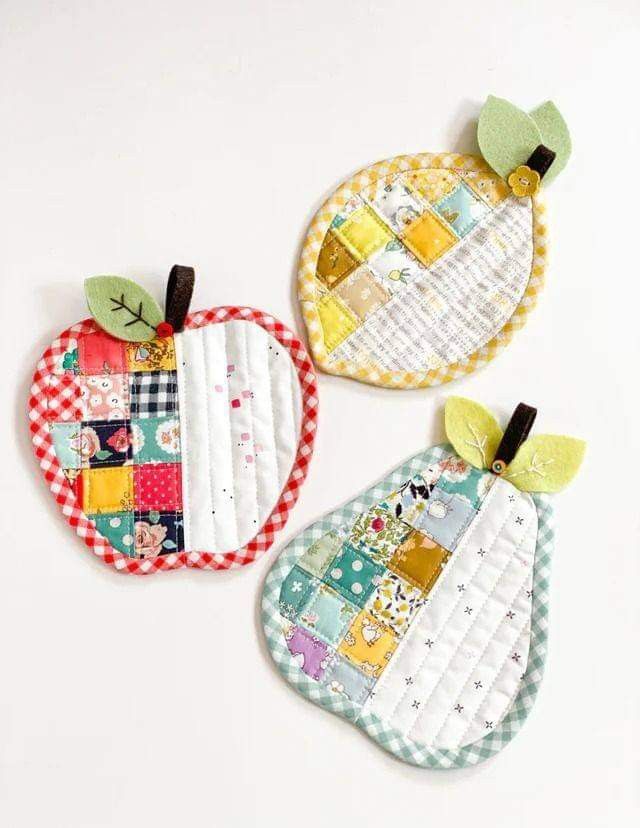
How to sew Apple Lemon and Pear Coasters – Step by Step Tutorial is a delightful and beginner-friendly project that combines functionality and charm. These fruity coasters are perfect for brightening up any kitchen or dining table. With their vibrant shapes and soft curves, they add a cheerful touch to your home while protecting surfaces from heat or moisture. If you love practical crafts and seasonal décor, this tutorial will be a joy to follow.
Making fruit-themed coasters is not only fun but also a great way to use up fabric scraps. Whether you’re working with cotton, felt, or patterned fabric, you can easily bring your apple, lemon, and pear designs to life. Each coaster follows the same basic construction method, with only slight variations in shape. By the end of this How to sew Apple Lemon and Pear Coasters – Step by Step Tutorial, you’ll have a full set of adorable, reusable coasters that make excellent gifts or personal keepsakes.
Even if you’re new to sewing, this guide breaks everything down in a simple and easy-to-follow format. The use of bright colors, soft batting, and hand stitching makes this a versatile project for all skill levels. Whether you’re using a sewing machine or hand sewing each piece, these coasters come together quickly and bring instant satisfaction. Let’s dive into the steps and bring these charming fruits to life!
To begin this How to sew Apple Lemon and Pear Coasters – Step by Step Tutorial, you’ll first need to gather all your materials. For each fruit, choose fabrics in the corresponding colors: red or green for apples, yellow for lemons, and green or beige for pears. Felt works wonderfully for the leaves and stems.
Print or draw simple fruit outlines on paper, about 4 to 5 inches in height. Cut them out and trace them onto your fabric. Remember to add a 1/4-inch seam allowance all around for stitching. Don’t forget to trace and cut out the small pieces like leaves and stems, which will be appliquéd or stitched on.
For batting, use cotton or polyester—anything lightweight that adds a little thickness. It gives the coasters a nice padded feel. Cut one batting piece per coaster using the same template, without seam allowance.
After cutting all your fabric and batting pieces, you should have fronts and backs for each fruit, along with batting layers and embellishment pieces. Organize each fruit in its own pile to keep things simple and efficient.
Next, pin the batting to the wrong side of the front fabric piece for each fruit. Baste it in place with a few stitches or temporary adhesive. This helps everything stay aligned during sewing.
Now it’s time to attach the small decorative pieces. Sew the leaf and stem onto the top edge of the front fabric. You can use a zigzag stitch or simple straight stitch. Choose thread colors that either blend in or add contrast, depending on your desired look.
Once all the pieces are prepped, stack them together: back piece face up, front piece with batting face down on top. Pin them together, and you’re ready to begin sewing the full fruit shape.
In this section of the How to sew Apple Lemon and Pear Coasters – Step by Step Tutorial, we’ll go through how to stitch and turn your coasters. Start by sewing around the edge of each fruit shape, leaving a 2-inch gap for turning.
Use a 1/4-inch seam allowance and go slowly around curves. Backstitch at the start and end of your stitching to secure it. After sewing, trim the seam allowance down slightly and clip the curves so they turn smoothly.
Turn the coaster right-side out through the opening. Use a chopstick or blunt pencil to gently push out the curves and corners. Take your time here—this step makes a big difference in the final appearance.
Once turned, press the coaster flat with an iron. Tuck in the raw edges of the opening and pin it closed. At this point, the coaster should look like a soft fruit shape.
To close the opening and add a finished look, topstitch around the edge of the coaster about 1/8 inch from the edge. This secures the layers and keeps everything in place. It also strengthens the overall structure.
Repeat these steps for each fruit—apple, lemon, and pear—ensuring you match the topstitching thread color for a polished look. By now, your fruit coaster shapes should be firm, colorful, and adorable.
Finally, give each coaster another gentle press to set the stitches. This also helps smooth out any puckering and gives the project a neat and tidy finish.
This portion of the How to sew Apple Lemon and Pear Coasters – Step by Step Tutorial covers adding fun details and giving your coasters personality. These small extras bring your fruit designs to life.
Consider using embroidery thread to add facial features or seeds. For lemons, you can stitch small white lines to mimic citrus sections. For apples and pears, tiny brown or black seed shapes work beautifully.
If you want to add names, use a fabric marker or embroider initials onto the fruit body. This is a cute idea for making personalized gifts, especially for teachers or holiday baskets.
Another idea is to quilt the surface of the coaster. Use a contrasting thread to add spiral or linear designs that mimic the texture of real fruit. Just keep your lines evenly spaced to maintain balance.
For a touch of sparkle, consider sewing on a few sequins or tiny beads. These look lovely as dewdrops or highlights and work best for display coasters rather than daily use ones.
Don’t forget about the leaves and stems. You can add stitching veins to the leaves for a realistic look. Use a slightly darker shade of green for a subtle effect.
By now, your fruit coasters should feel unique and full of character. With these extra touches, you turn simple fabric shapes into delightful, handmade artwork.
In the final stage of our How to sew Apple Lemon and Pear Coasters – Step by Step Tutorial, we’ll discuss care and display tips. Handmade items last longer with proper care, and these coasters are no exception.
To clean the coasters, gently hand wash them in cold water with mild soap. Lay them flat to dry and avoid wringing, which can misshape them. If using a washing machine, place them in a mesh bag and use a gentle cycle.
For ironing, use low heat and avoid pressing directly on any embellishments like sequins or embroidery. A pressing cloth is useful if you’ve added beads or metallic thread.
When not in use, store the coasters flat in a dry, cool area. Avoid stacking heavy items on them to preserve their shape. Felt pieces especially can lose their crispness if crushed.
To display your coasters when not in use, consider placing them in a fruit bowl or a small basket on your dining table. They look lovely as part of your kitchen decor.
If gifting, wrap them in tissue paper and tie them with twine or ribbon. You could also place a few in a small box with a handwritten label.
These small storage and display tips help extend the life of your coasters and keep them looking as fresh as the day you made them.
Can I make these coasters without a sewing machine?
Yes! You can hand stitch these coasters using a backstitch or whipstitch. It might take longer, but the result will still be adorable.
What type of fabric works best for these coasters?
Cotton, felt, or quilting fabric work wonderfully. Felt is great for beginners because it doesn’t fray, while cotton offers a more polished finish.
Do I need to use batting?
Batting adds thickness and helps absorb moisture. If you don’t have batting, you can substitute with flannel or another soft fabric layer.
How can I adjust the size of the coasters?
Resize your fruit templates before cutting the fabric. Just make sure to maintain the proportions of the fruit shapes for visual appeal.
Are these coasters washable?
Yes, but it’s best to hand wash them gently to preserve the shape and embellishments. If you machine wash, use a gentle cycle and air dry.
Can kids help with this project?
Absolutely! Children can help trace, cut, and even decorate the coasters. It’s a fun and educational way to introduce them to sewing basics.
This How to sew Apple Lemon and Pear Coasters – Step by Step Tutorial walked you through every detail of crafting adorable fruit-shaped coasters by hand. From choosing your fabrics to adding final details, each step has been designed to be simple, creative, and rewarding.
By now, you should have a beautiful collection of coasters shaped like apples, lemons, and pears. They are not only practical for everyday use but also a delightful addition to any space. Handmade items like these bring a personal touch to home decor and make thoughtful, memorable gifts.
If you enjoyed this tutorial, please leave a sincere opinion in the comments. Your suggestions and experiences help others in the crafting community and inspire new projects. Happy sewing!


