
How to sew a fabric storage basket tutorial

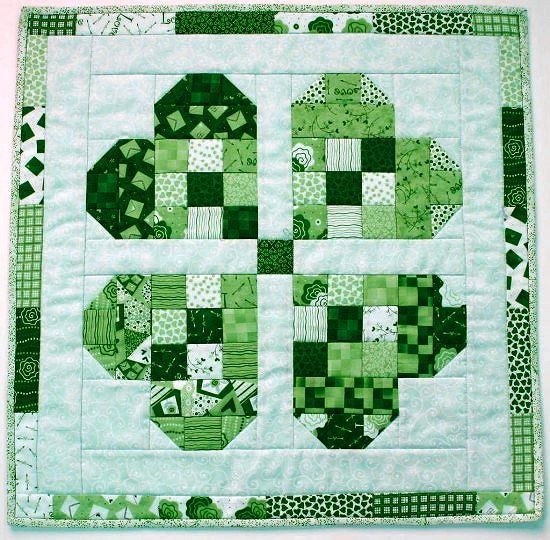
If you have been looking for a creative and meaningful quilting project, this Four Leaf Clover Quilt Block- Step by Step Tutorial is the perfect choice. Quilt blocks are the building blocks of any quilt, and the four-leaf clover design adds a touch of charm, luck, and beauty to your creations. Whether you are making a wall hanging, a table runner, or a full-sized quilt, this block brings a sense of tradition combined with a fresh, modern look.
One of the best things about this Four Leaf Clover Quilt Block- Step by Step Tutorial is that it is beginner-friendly while also allowing experienced quilters to add personal touches. With a few basic tools and some fabric scraps, you can create a block that looks professional and polished. The design is versatile, making it suitable for seasonal projects, gifts, or even St. Patrick’s Day decorations.
In this article, we will walk you through everything you need to make your own Four Leaf Clover Quilt Block- Step by Step Tutorial from start to finish. We will cover the materials required, essential techniques, the complete step-by-step process, and creative ideas to personalize your quilt block. At the end, you will also find a FAQ section with answers to common questions about this pattern.
Before starting the Four Leaf Clover Quilt Block- Step by Step Tutorial, it is important to gather all the necessary materials. Having everything ready before you begin makes the process smoother and ensures you can work without interruptions.
First, you will need fabric in at least two colors: green for the clover leaves and a contrasting background color, such as white or cream, to make the clover design stand out. Quilting cotton is ideal because it is easy to work with and comes in many prints and shades.
You will also need a rotary cutter, cutting mat, and quilting ruler to cut your fabric pieces accurately. Straight, precise cuts are essential for creating a clean and professional-looking quilt block.
Thread in a matching or neutral color works best for piecing the block. A sewing machine with a quarter-inch presser foot will help maintain consistent seam allowances, which is critical in quilting.
Optional tools include an iron and ironing board for pressing seams as you go. Pressing your seams flat gives the block a neat finish and helps everything line up correctly.
Finally, if you plan to make multiple blocks for a larger quilt, it is helpful to prepare all your fabric pieces in advance so you can sew them assembly-line style for efficiency.
To successfully complete the Four Leaf Clover Quilt Block- Step by Step Tutorial, you need to be comfortable with a few basic quilting techniques. Don’t worry if you are a beginner—these skills are easy to learn and will be useful in many other quilting projects.
The first technique is accurate cutting. Use your rotary cutter, ruler, and mat to cut all your fabric pieces to the correct size. Precision here will make sewing much easier and help your block come together perfectly.
Next, you need to understand the quarter-inch seam allowance. In quilting, seams are typically sewn a quarter-inch from the edge of the fabric. Using a special presser foot or marking your machine’s needle position helps maintain this consistency.
Chain piecing is another useful technique, especially if you are making several blocks. It involves sewing pieces together in a continuous chain without cutting the thread between each unit. This saves time and thread while keeping everything organized.
Pressing your seams is also essential. After sewing each seam, use an iron to press it flat. Some quilters press seams to one side, while others prefer pressing them open—either method works as long as you are consistent.
You will also use half-square triangles (HSTs) in this quilt block. These are small squares made by sewing two triangles together along the diagonal, forming a square with two colors. HSTs are common in quilting and add a lot of design possibilities.
Finally, assembling the block involves sewing smaller units together into rows and then joining the rows to form the final square block. Careful alignment during this step ensures a neat and balanced design.
Now let’s begin the Four Leaf Clover Quilt Block- Step by Step Tutorial with clear and simple instructions that anyone can follow.
Start by cutting your fabric into the required pieces. For one block, you will need squares for the leaves, background pieces, and smaller squares for the stem section. Refer to your pattern or decide on the block size beforehand.
Make the half-square triangles for the leaves by pairing a green square with a background square, drawing a diagonal line on the back of the light fabric, and sewing a quarter-inch on each side of the line. Cut along the line, press, and trim to size.
Lay out all your pieces on a flat surface to see the clover shape taking form. This helps you check color placement and avoid mistakes before sewing.
Sew the smaller units together first, such as pairs of half-square triangles and rectangles, pressing seams as you go. This makes the final assembly easier and more accurate.
Join the units into rows, making sure points and corners align correctly. Pin pieces if needed to keep everything in place while sewing.
Finally, sew the rows together to complete the block, pressing the entire block flat when finished. Square it up to the correct size if necessary for a polished look.
One of the best things about the Four Leaf Clover Quilt Block- Step by Step Tutorial is how easy it is to customize. Small changes in color, fabric choices, or block arrangement can completely transform the design.
Try using different shades of green for each leaf to create a scrappy, textured look. This is a great way to use up fabric scraps from other projects.
Consider making a reverse-color version with a dark background and light-colored leaves for a modern twist on the traditional design.
Add decorative quilting stitches after assembling the quilt top. For example, you can quilt along the leaf shapes or add swirls and curves to give the block extra dimension.
Make several blocks and sew them together for a table runner or wall hanging. Alternating the blocks with plain squares creates a striking layout.
Personalize your quilt block by adding embroidery or appliqué details, such as a small ladybug or bee on one of the leaves for a whimsical touch.
Finally, you can use this block in combination with other traditional quilt blocks to create a sampler quilt full of variety and visual interest.
1. Is the Four Leaf Clover Quilt Block suitable for beginners?
Yes, this block is beginner-friendly because it uses simple shapes and basic techniques like half-square triangles and straight seams.
2. What size should I make my quilt block?
Common sizes range from 8 to 12 inches, but you can adjust the measurements to fit your project needs.
3. Can I sew the block by hand instead of using a sewing machine?
Yes, hand-sewing works, but it will take longer. Use small, even stitches and a consistent seam allowance for best results.
4. How do I make sure my points line up correctly?
Accurate cutting, consistent seam allowances, and careful pressing help keep points sharp and seams aligned.
5. Can I use this block for projects other than quilts?
Absolutely! It works well for pillows, tote bags, table runners, and wall hangings too.
6. What fabrics work best for quilt blocks?
Quilting cotton is the most popular choice because it is easy to sew, presses well, and comes in many colors and prints.
This Four Leaf Clover Quilt Block- Step by Step Tutorial has guided you through everything from gathering materials and learning basic techniques to assembling and customizing your quilt block.
With just a few tools and some fabric, you can create a beautiful block full of charm and meaning.
We hope you enjoyed this tutorial and feel inspired to try it yourself. Please leave your honest opinion in the comments and share any suggestions for future quilting tutorials. Your feedback helps us create even better content for quilting enthusiasts like you!


