
How to sew a fabric storage basket tutorial

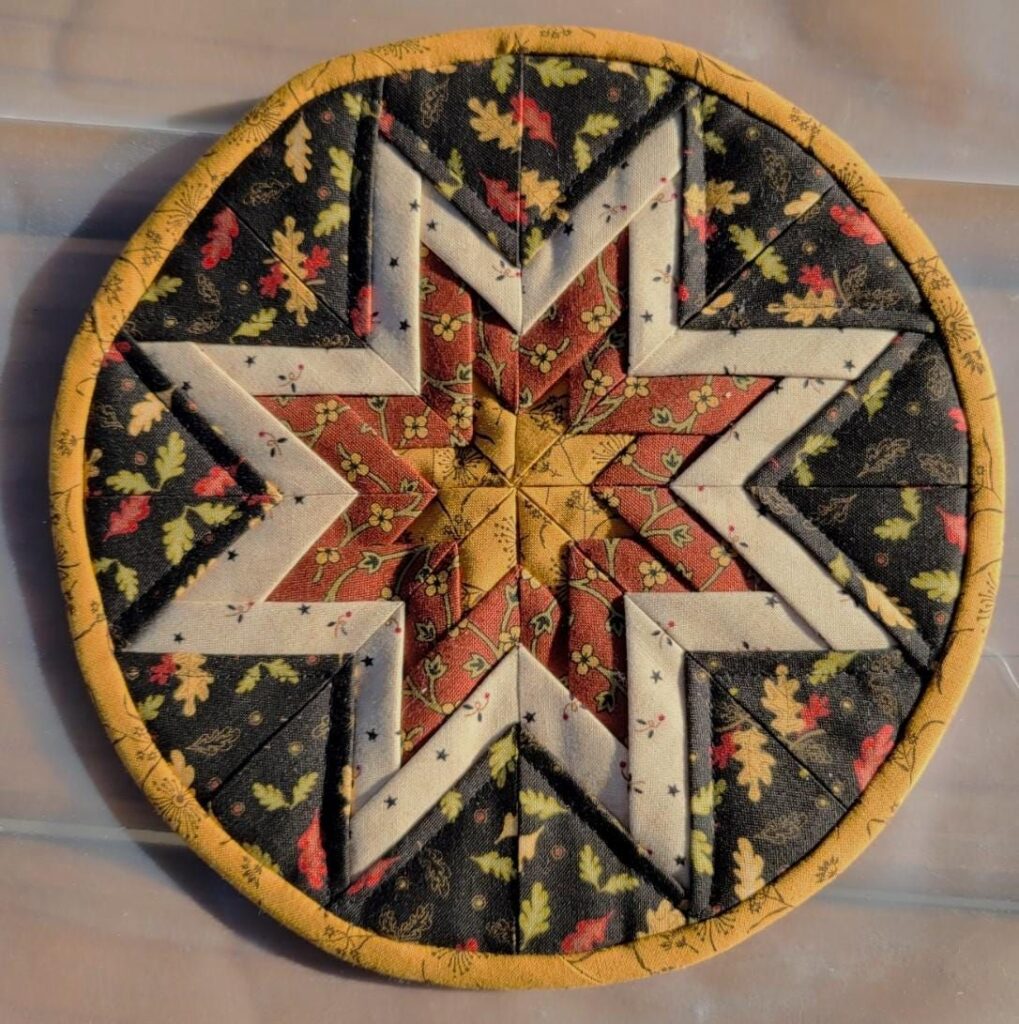
If you’re looking for a quilt design that combines tradition, texture, and creativity, this Folded Star Quilt Pattern – Step by Step Tutorial is the perfect project to explore. The folded star quilt is a timeless design that gives a beautiful 3D effect and adds depth to your quilting creations. Whether you’re a beginner wanting to learn new techniques or an experienced quilter seeking a visually striking pattern, this tutorial will guide you through each stage clearly and simply.
The folded star quilt pattern stands out for its layered, dimensional look. It’s made by folding and layering fabric pieces to form a radiant star pattern that appears almost sculptural. This type of quilt can be used for wall hangings, pillow covers, table toppers, or even incorporated into larger quilt projects. Its versatility makes it one of the most fascinating quilt techniques to master. Plus, it’s a wonderful way to use up fabric scraps while creating something elegant and eye-catching.
In this Folded Star Quilt Pattern – Step by Step Tutorial, you’ll learn everything you need to know—from selecting fabrics and preparing your pieces to folding, assembling, and finishing your quilt block. You’ll also get practical tips for achieving sharp folds and perfect alignment. By the end, you’ll have not only a stunning folded star design but also the satisfaction of having created a handmade piece that reflects patience, precision, and creativity.
Before you begin your Folded Star Quilt Pattern – Step by Step Tutorial, it’s essential to gather the right materials. You’ll need several fabric pieces in different colors or prints, a square base fabric, scissors or a rotary cutter, pins, a sewing machine or needle and thread, and an iron. Choosing the right fabric combination is key to achieving a visually appealing star effect. Pick fabrics with contrasting colors to make each layer stand out.
For the base, select a sturdy cotton fabric that can hold the folded layers securely. This foundation supports the entire design, so make sure it’s durable and smooth. You’ll also need fabric squares for the folded sections. Typically, quilters use four to six different fabric colors, cutting multiple squares from each color to create depth and contrast in the star pattern.
Once your fabrics are chosen, iron each piece to remove wrinkles. Flat fabrics ensure that your folds are clean and precise. Use a rotary cutter for accurate square cuts; most folded star designs use 3-inch or 4-inch squares, depending on how large you want your final project to be. Accuracy is crucial because even small variations can affect how neatly the star aligns in the center.
Organize your fabric pieces by color before you start folding. This helps you maintain a consistent pattern throughout the project. Many quilters prefer to lay out their fabrics on a design board or flat surface to visualize how the colors will appear once folded and layered. This planning stage makes a huge difference in achieving a balanced final result.
Finally, make sure your workspace is clean and well-lit. Since this quilt pattern involves a lot of folding and layering, having ample space to work will make the process more comfortable and enjoyable. Once you’ve prepared everything, you’re ready to begin folding and assembling your beautiful star.
Now let’s move on to the most creative part of this Folded Star Quilt Pattern – Step by Step Tutorial—folding your fabric squares. Each folded piece forms part of the intricate layers that make up the star design. Start by taking one fabric square and folding it in half diagonally, forming a triangle. Then, fold the two outer corners toward the center point to form a smaller triangle with a layered front. Press with an iron to hold the shape.
Repeat this process for all your fabric squares. Ironing each fold ensures that they keep their shape while you work. Once you have all your folded pieces ready, sort them by color and layer sequence. This organization helps you easily pick the next color as you build your star.
Begin placing the folded triangles onto the base fabric, starting from the center. Typically, four folded pieces form the first layer of the star, positioned to create a diamond shape in the middle. Use pins to hold each folded triangle in place. Ensure that the folded edges align neatly to form sharp points at the star’s center.
As you continue, place the next color layer around the center star, overlapping each triangle slightly to cover the raw edges beneath. This creates a smooth, polished appearance and a sense of depth. Continue layering in this manner, alternating colors as you go, until your folded star reaches the desired size.
Press each layer gently with an iron after pinning to set the folds. Be careful not to flatten the dimensional texture too much—light pressing is enough to keep everything secure. The folding technique is what makes this quilt pattern so unique, giving it a textured, three-dimensional look that catches the eye.
By the time you’ve added all your layers, you’ll see your folded star beautifully emerging on the fabric base. It’s a mesmerizing process—watching a flat piece of fabric transform into a radiant star through nothing more than folds and patience.
After folding and layering, the next part of this Folded Star Quilt Pattern – Step by Step Tutorial involves securing the layers in place. Begin by carefully pinning all the folded fabric pieces onto the base so that none move out of alignment. Check that the edges of each folded triangle overlap evenly. Consistency is key for a clean, symmetrical star design.
Once everything is pinned, use a sewing machine or hand stitching to secure each layer. Start from the outermost layer and work your way toward the center, stitching close to the folded edges. This ensures that the folds stay intact and that the star design remains crisp and dimensional.
If you prefer a no-sew option, you can use fusible fabric adhesive or fabric glue between layers. However, stitching is generally more durable and long-lasting, especially for items like quilted pillows or wall hangings that may be handled frequently.
After securing the layers, trim any excess fabric from the base, keeping the star’s shape centered. You can now attach your folded star block to a larger quilt project, frame it as wall art, or use it as a decorative element in a cushion cover. The possibilities are endless.
Press the entire block once more after sewing, being careful not to flatten the folds too much. The goal is to enhance the structure while keeping the raised, textured appearance that defines a folded star quilt.
At this stage, you can add additional embellishments if you like. Some quilters sew beads or buttons in the center of the star to add sparkle and personality. A carefully chosen centerpiece can highlight your craftsmanship and make the design truly unique.
What makes this Folded Star Quilt Pattern – Step by Step Tutorial so enjoyable is its versatility. Once you’ve mastered the basic folding technique, you can experiment with different designs, colors, and arrangements. For example, try using gradient fabrics that transition from light to dark tones for a beautiful ombré effect. This variation adds depth and gives your star a glowing appearance.
Another creative idea is to use printed fabrics featuring small patterns. Floral prints, holiday motifs, or geometric designs can add an extra layer of interest. Mixing textures, like cotton and linen, can also create unique visual and tactile effects.
You can also play with the star’s size. A small folded star works beautifully as a coaster or keychain accent, while a larger one makes a striking centerpiece for a quilt or wall hanging. Adjusting the number of layers or the size of your fabric squares lets you control how big or intricate your star becomes.
If you enjoy experimenting, try arranging multiple folded stars together in a single quilt. Different color combinations and placements can form stunning patchwork effects. This approach creates a cohesive yet dynamic quilt full of movement and personality.
For a more traditional style, stick to classic colors like red, white, and blue or rich holiday tones such as gold, green, and burgundy. If you prefer a modern touch, go for pastel shades or monochromatic themes. The folded star design adapts easily to any style preference.
Finally, remember that every folded star quilt you make can tell a story. Whether it’s inspired by nature, holidays, or a special memory, each project is an opportunity to express your creativity while preserving the beauty of handmade craftsmanship.
1. What is a folded star quilt pattern?
It’s a quilting technique where fabric squares are folded and layered to form a three-dimensional star pattern. It’s both decorative and functional.
2. Can beginners make a folded star quilt?
Yes! The Folded Star Quilt Pattern – Step by Step Tutorial is beginner-friendly. It requires patience but only basic sewing and folding skills.
3. What type of fabric is best for this pattern?
Cotton fabric is ideal because it holds folds well and is easy to work with. Avoid slippery fabrics like satin for best results.
4. Do I need a sewing machine for this project?
Not necessarily. You can hand stitch the layers or use fabric glue if you prefer a no-sew version, though machine stitching is more durable.
5. How can I make the folds stay in place?
Press each fold firmly with an iron and pin it before sewing. Using starch spray can also help keep folds crisp.
6. Can I combine folded star blocks in a larger quilt?
Absolutely! Many quilters use multiple folded star blocks to create large, decorative quilts or bed covers.
In this Folded Star Quilt Pattern – Step by Step Tutorial, we explored how to create a stunning, dimensional quilt design using simple fabric folds. From choosing the right materials and preparing your pieces to folding, layering, and sewing, you’ve learned every step to craft your very own folded star masterpiece. This technique beautifully combines creativity, precision, and tradition.
Whether you’re crafting a wall hanging, pillow cover, or full quilt, the folded star pattern adds elegance and charm to any project. It’s a rewarding process that allows you to express your artistic side while honing your quilting skills.
Now that you know how to create this beautiful folded star quilt, we’d love to hear from you! Share your honest opinions, experiences, and suggestions below—your feedback inspires and helps our creative quilting community continue to grow.


