
How to sew a fabric storage basket tutorial

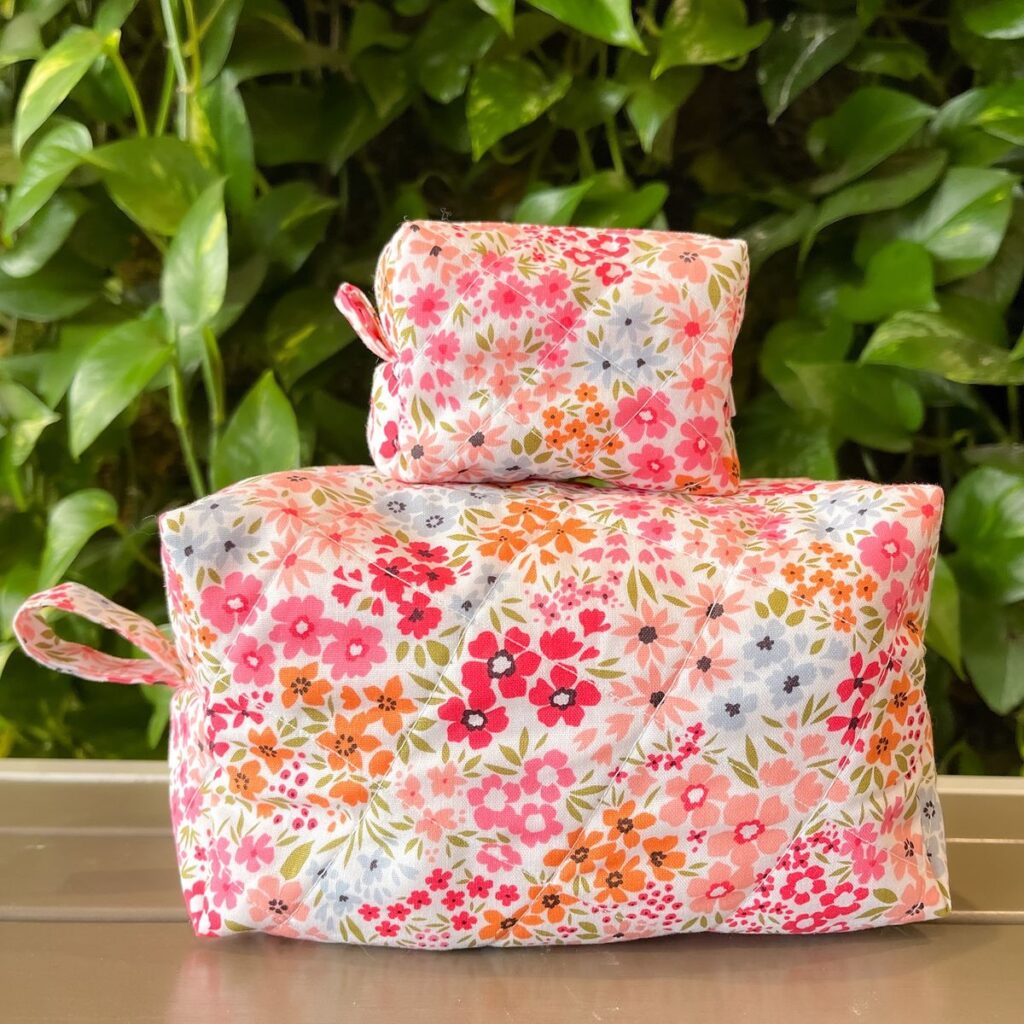
Creating a personalized and practical accessory for travel or everyday use has never been easier with this Flora Toiletry Bag in Two Sizes-Step by Step Tutorial. This guide will walk you through crafting a versatile toiletry bag that is both stylish and functional, available in two convenient sizes. Whether you are a beginner or an experienced sewer, this tutorial emphasizes clear instructions, making it simple to follow along. The Flora Toiletry Bag in Two Sizes-Step by Step Tutorial combines creativity with practicality, resulting in a handmade piece that can serve as a thoughtful gift or a personal organizational tool.
One of the most appealing aspects of the Flora Toiletry Bag in Two Sizes-Step by Step Tutorial is its adaptability. You can select fabrics that match your personal style or experiment with different textures to create a truly unique accessory. The smaller size is perfect for makeup essentials or toiletries for short trips, while the larger version accommodates full travel kits, making it a versatile addition to your collection. Each bag is carefully constructed to provide durability, aesthetic appeal, and ease of use.
Before beginning the Flora Toiletry Bag in Two Sizes-Step by Step Tutorial, gathering the necessary materials is essential. You will need fabric for both the exterior and lining, interfacing for structure, zippers for closure, thread, scissors, and sewing tools. Having all supplies organized ensures a smooth crafting experience. Taking the time to select coordinating fabrics and quality zippers enhances the final product, creating a polished and professional-looking toiletry bag.
The first step in the Flora Toiletry Bag in Two Sizes-Step by Step Tutorial involves preparing your materials and cutting the fabric pieces accurately. Precision at this stage ensures your bag assembles correctly.
Start by washing and ironing your chosen fabrics to prevent shrinkage and remove wrinkles. This step is crucial for maintaining the shape and finish of your final bag.
Measure and cut the exterior fabric, lining fabric, and interfacing according to the desired bag size. Accurate measurements will ensure that all pieces fit together seamlessly during assembly.
Label each piece to avoid confusion. It is easy to mix up the lining and exterior pieces, especially when working with multiple sizes.
Attach the interfacing to the wrong side of the exterior fabric using an iron-on method or sewing, depending on your interfacing type. This gives the bag stability and helps it maintain shape over time.
Double-check all cut pieces and interfacing placement before proceeding. Ensuring that each component is correctly prepared will save time and prevent frustration during sewing.
Once your materials are ready, the next phase of the Flora Toiletry Bag in Two Sizes-Step by Step Tutorial is assembling the bag body. This step involves sewing the exterior and lining together to form the main compartment.
Begin by sewing the side seams of the exterior fabric with a straight stitch. Ensure edges are aligned precisely for a professional finish.
Repeat the process with the lining fabric, leaving a small gap at the bottom for turning the bag right side out later. This gap is essential for the final finishing step.
Press all seams with an iron to flatten and set the stitches. A well-pressed seam contributes to a cleaner, more refined appearance.
Optional: Topstitch along the edges of the exterior to reinforce the seams and add a decorative touch. This detail can enhance both the strength and aesthetic appeal of the bag.
Check that the exterior and lining pieces are proportionate and align correctly. Minor adjustments at this stage can prevent uneven corners or misaligned seams in the final assembly.
Prepare for zipper installation by aligning the top edges of the exterior and lining, ensuring a smooth transition for the closure mechanism. Proper alignment is critical for a functional and attractive finish.
The zipper is a central feature in the Flora Toiletry Bag in Two Sizes-Step by Step Tutorial, providing secure closure and easy access to contents.
Start by pinning the zipper to the top edge of the exterior fabric, right sides together. This ensures the zipper is sewn neatly and functions correctly.
Use a zipper foot on your sewing machine for precision stitching close to the zipper teeth. This step prevents the zipper from catching fabric and maintains a professional look.
Once the zipper is attached to the exterior, pin and sew the lining to the opposite side of the zipper. Make sure all layers are smooth and flat to avoid puckering.
Test the zipper by sliding it open and closed to ensure smooth operation. Correct any stitching issues before moving on to avoid complications during final assembly.
Optional: Add decorative stitching along the zipper edge to enhance durability and visual appeal. This small detail can elevate the overall look of your Flora Toiletry Bag in Two Sizes-Step by Step Tutorial.
Check that the zipper aligns perfectly with both exterior and lining pieces. A properly installed zipper guarantees a functional and polished finish.
The final step of the Flora Toiletry Bag in Two Sizes-Step by Step Tutorial involves assembling the remaining parts of the bag and adding finishing touches for a professional result.
Sew the bottom seam of the lining, leaving the gap open for turning the bag right side out. Carefully trim excess fabric at corners to reduce bulk.
Turn the bag right side out through the lining gap, ensuring all corners are pushed out neatly. This step reveals the fully assembled bag.
Hand-stitch the lining gap closed using a slip stitch or ladder stitch for an invisible seam. This ensures a clean interior finish.
Press the entire bag with an iron to flatten seams and give it a crisp, structured look. Proper pressing enhances the overall appearance.
Optional: Add a small handle, loop, or embellishment to the side of the bag. These details increase functionality and personalize the accessory.
Inspect the bag thoroughly for any loose threads or imperfections, making final adjustments as needed. Your Flora Toiletry Bag in Two Sizes-Step by Step Tutorial is now complete and ready for use or gifting.
1. Can beginners make this bag?
Yes, the Flora Toiletry Bag in Two Sizes-Step by Step Tutorial is suitable for beginners with clear instructions and step-by-step guidance.
2. What fabric works best for durability?
Medium-weight cotton, canvas, or fabric with interfacing works best for structure and durability.
3. How do I customize the bag size?
The tutorial provides two size options, and you can adjust dimensions by scaling measurements proportionally.
4. Can I use a different zipper type?
Yes, either a nylon coil or metal zipper works well as long as it matches the bag length.
5. How do I care for the bag?
Hand wash gently or spot clean, then air dry to maintain the bag’s shape and colors.
6. Can this bag be a gift?
Absolutely! Handmade Flora Toiletry Bag in Two Sizes-Step by Step Tutorial items make thoughtful and practical gifts for friends and family.
The Flora Toiletry Bag in Two Sizes-Step by Step Tutorial provides a complete guide for creating a functional and stylish accessory.
From preparing materials and cutting fabric to constructing the body, installing the zipper, and adding finishing touches, each step is designed for clarity and success. This tutorial allows crafters to produce a durable, attractive bag in two versatile sizes, perfect for travel or everyday use.
Now it’s your turn to try the project. Experiment with different fabrics, colors, and embellishments, and enjoy the satisfaction of crafting a practical, personalized accessory. Leave your feedback and suggestions to share your experience and inspire others in the crafting community.


