
How to sew a fabric storage basket tutorial

If you have ever wanted to create a practical and eco-friendly solution for organizing your reusable bags, this Fabric shopping bag holder – Step by Step Tutorial is the perfect project for you. Sewing your own bag holder not only helps keep your kitchen tidy but also adds a personal and creative touch to your home. Throughout this tutorial, we will guide you with simple instructions to ensure you can complete this project even if you are new to sewing. By following this Fabric shopping bag holder – Step by Step Tutorial, you will learn how to transform a piece of fabric into something functional, pretty, and very useful.
Making a fabric shopping bag holder is an excellent beginner-friendly sewing project. It requires only basic materials and sewing skills, yet the final product can make a big difference in your home organization. The best part about this Fabric shopping bag holder – Step by Step Tutorial is that you can customize the size, color, and pattern according to your style. Whether you love bright colors, floral prints, or minimalist designs, this project allows you to express your creativity while creating something practical for everyday use.
Another advantage of making a fabric shopping bag holder is its sustainability aspect. Instead of buying new plastic bag organizers, you can repurpose fabric scraps from previous projects, reducing waste and helping the environment. Plus, this Fabric shopping bag holder – Step by Step Tutorial will save you money because you will no longer need to purchase ready-made holders. It is a simple project with long-term benefits, making it perfect for families, craft lovers, and anyone looking for easy DIY home projects.
Before starting this Fabric shopping bag holder – Step by Step Tutorial, gathering all the necessary materials is important. Having everything ready will make the sewing process faster and more enjoyable. The good news is that you probably already have most of these materials at home, especially if you enjoy crafting or sewing regularly.
You will need a piece of fabric for the main body of the bag holder. Cotton fabric is the most recommended because it is easy to sew and durable. You will also need elastic for the top and bottom openings so the bags can be inserted and removed easily. Elastic ensures the bags stay in place and do not fall out. Another essential material is a ribbon or fabric strip for creating the hanging loop, allowing you to attach your bag holder to a hook or handle.
Other materials include scissors for cutting the fabric, pins or clips to hold the pieces together, and a sewing machine for stitching everything in place. If you do not have a sewing machine, you can sew by hand, although it will take a little longer. A measuring tape or ruler is also helpful to ensure your fabric pieces are cut to the right size. Having all these materials prepared before starting this Fabric shopping bag holder – Step by Step Tutorial will help make the process smooth and efficient.
Choosing the right fabric design is another fun part of the project. You can select patterns that match your kitchen décor or choose something cheerful and colorful to brighten up your space. Some people even use holiday-themed fabrics to make seasonal bag holders, adding a festive touch to their homes. With this Fabric shopping bag holder – Step by Step Tutorial, the possibilities are endless, and your creativity can shine.
Finally, make sure to wash and iron your fabric before cutting. This prevents shrinkage after sewing and makes the fabric easier to work with. Once everything is ready, you can move on to the next step of this Fabric shopping bag holder – Step by Step Tutorial and start assembling your project.
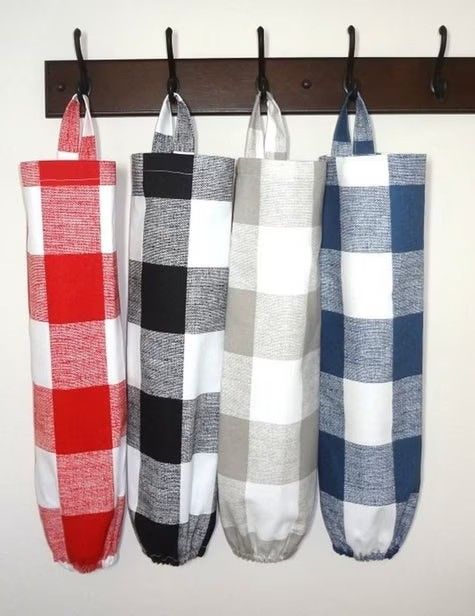
The next stage in this Fabric shopping bag holder – Step by Step Tutorial involves cutting and preparing the fabric pieces. Accurate measurements will ensure that your final product looks neat and works perfectly. Most fabric shopping bag holders measure about 18 to 20 inches in length and 16 inches in width, but you can adjust the size according to your needs.
Start by laying the fabric flat on a clean surface. Use your measuring tape and fabric marker or chalk to outline the rectangle for the main body of the bag holder. Make sure to add half an inch to each side for seam allowance. This will make it easier to sew the edges later on.
Once the main rectangle is marked, cut the fabric carefully using sharp fabric scissors. Cutting straight lines is essential for a professional-looking result. If you want to add a lining for extra durability, cut a second piece of fabric the same size as the main one. This step is optional but can make your bag holder sturdier.
Now, prepare the elastic pieces for the top and bottom openings. Usually, a 6- to 8-inch length of elastic is enough for each side, but you can adjust the tightness depending on how wide you want the openings to be. Cut the elastic pieces and set them aside for now.
If you want a hanging loop for your bag holder, cut a strip of fabric or ribbon about 6 inches long. Fold the edges inward and stitch along the sides to prevent fraying. This loop will be attached to the top of the bag holder later, allowing you to hang it conveniently in your kitchen or pantry.
At this stage, you should have all your fabric pieces cut and ready: the main rectangle, elastic bands, and the hanging loop. Double-check your measurements to ensure everything is correct before moving on to the sewing part of this Fabric shopping bag holder – Step by Step Tutorial.
Now comes the most exciting part of this Fabric shopping bag holder – Step by Step Tutorial: sewing the pieces together to create the final product. Start by folding the main rectangle in half lengthwise with the right sides facing each other. Pin or clip the edges together so the fabric stays in place while sewing.
Using your sewing machine, stitch along the long edge with a half-inch seam allowance to create a tube shape. If you are sewing by hand, use a backstitch for strength and durability. After sewing, turn the tube right side out so the seams are hidden inside.
Next, work on the top and bottom openings where the elastic will go. Fold the edge of the fabric about half an inch inward and then fold it again to create a casing for the elastic. Sew along the folded edge, leaving a small opening to insert the elastic later. Repeat this process for both the top and bottom edges of the tube.
Using a safety pin, thread the elastic through the casing on each side. Once the elastic is fully inserted, overlap the ends and stitch them together securely. Then close the small opening in the casing with a few stitches. The elastic will create a gathered effect, forming the openings of your bag holder.
Attach the hanging loop to the top seam by folding it in half and stitching the ends securely to the inside of the top opening. Make sure it is positioned evenly so the bag holder hangs straight. This simple step in the Fabric shopping bag holder – Step by Step Tutorial ensures your project is not only functional but also convenient to use.
Finally, inspect your bag holder for any loose threads or uneven stitching. Trim any excess threads and give the entire piece a quick press with an iron for a neat finish. Your fabric shopping bag holder is now ready to use!
The last step in this Fabric shopping bag holder – Step by Step Tutorial is to decorate and start using your creation. Adding decorative elements can make your bag holder unique and stylish. You can sew on buttons, lace, or fabric flowers to match your kitchen décor. If you enjoy embroidery, personalize your bag holder with your initials or a fun design.
Another creative idea is to use contrasting fabrics for the top and bottom casings. This adds a pop of color and makes your project visually interesting. Some people even add small pockets on the outside for storing coupons or shopping lists, making the bag holder multifunctional.
Once decorated, hang your fabric shopping bag holder in a convenient spot such as your kitchen, pantry, or laundry room. Fill it with your reusable shopping bags, which can now be stored neatly in one place instead of cluttering drawers or cabinets.
The elastic openings make it easy to pull out one bag at a time while keeping the rest securely inside. This simple yet effective design keeps your home organized and ensures you always have a shopping bag ready when you need one.
Because this project is so quick and easy, you can make several bag holders for different rooms or gift them to friends and family. Homemade gifts like these show thoughtfulness and creativity, and they are always appreciated.
With this Fabric shopping bag holder – Step by Step Tutorial, you now have the skills to create a functional, decorative, and eco-friendly item for your home.
1. What is the best fabric for a shopping bag holder?
Cotton fabric is recommended because it is easy to sew, washable, and comes in many designs.
2. Can I make a bag holder without a sewing machine?
Yes, you can sew by hand using a strong backstitch, but it will take more time.
3. How do I clean my fabric shopping bag holder?
Most fabric bag holders can be machine washed on a gentle cycle and air-dried.
4. How much fabric do I need for one bag holder?
A piece about 18 x 16 inches is enough for a standard-size bag holder.
5. Can I make a larger or smaller bag holder?
Absolutely! Simply adjust the measurements to fit your storage needs.
6. Do I have to use elastic for the openings?
Elastic is recommended because it keeps the bags secure, but you can use drawstrings as an alternative.
This Fabric shopping bag holder – Step by Step Tutorial has shown you how to create a practical, eco-friendly, and attractive solution for storing your reusable bags.
From choosing materials and cutting the fabric to sewing and decorating, every step is simple enough for beginners yet enjoyable for experienced crafters.
Now that you have learned the process, why not make one for yourself or as a thoughtful handmade gift? We hope this tutorial has inspired you to try more sewing projects. Please leave a sincere opinion and share your suggestions for future tutorials—we would love to hear your thoughts!


