
How to sew a fabric storage basket tutorial

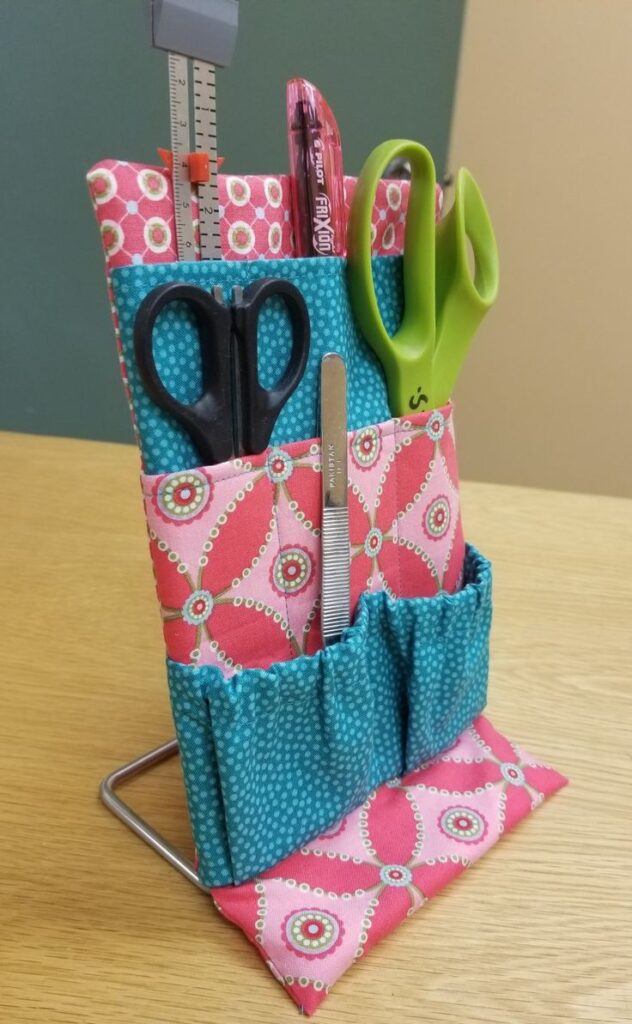
Fabric organizer kit tutorial is a practical and creative guide designed for anyone who wants to improve organization at home while exploring a rewarding handmade project. This Fabric organizer kit tutorial demonstrates how simple fabrics and basic sewing techniques can be transformed into a functional storage solution. Organizers made with fabric are extremely versatile and can be used in many areas of the home, including craft rooms, closets, offices, or bedrooms. By following this Fabric organizer kit tutorial, you can learn how to create a personalized organizer that helps keep everyday items neatly arranged.
The idea behind the Fabric organizer kit tutorial is to combine functionality with creativity. Many people struggle with clutter and disorganized spaces, but a well-designed organizer can make a significant difference. A handmade organizer also offers the benefit of customization. Instead of purchasing generic storage solutions, the Fabric organizer kit tutorial allows you to design pockets, compartments, and layouts that suit your specific needs.
Another important advantage of the Fabric organizer kit tutorial is that it is suitable for different skill levels. Beginners can practice fundamental sewing skills such as cutting fabric and stitching straight seams, while more experienced crafters can experiment with decorative details and creative pocket designs. In this complete Fabric organizer kit tutorial, you will learn about the materials required, the step-by-step sewing process, creative customization ideas, and helpful tips to achieve a durable and attractive organizer.
Before starting the Fabric organizer kit tutorial, it is essential to gather the materials required for the project. Having everything prepared will make the crafting process smoother and more efficient.
The most important material in the Fabric organizer kit tutorial is fabric. Durable fabrics such as cotton, canvas, or denim are commonly recommended because they provide structure and long-lasting durability.
Another essential component in the Fabric organizer kit tutorial is interfacing or stabilizer. This material is added between layers of fabric to strengthen the organizer and help it maintain its shape.
Thread is also required when completing the Fabric organizer kit tutorial. Strong sewing thread ensures that the seams remain secure even with regular use.
Fabric scissors are an important tool in the Fabric organizer kit tutorial. Precise cutting allows the fabric pieces to align correctly during assembly.
Pins or sewing clips are useful while following the Fabric organizer kit tutorial because they keep the layers of fabric in place before sewing.
Finally, a sewing machine or hand-sewing needle is necessary to complete the Fabric organizer kit tutorial. Both options can produce a sturdy and reliable organizer.
The first step in the Fabric organizer kit tutorial is planning the layout of the organizer. This includes deciding how many pockets or compartments you want to include.
Once the design is planned, the Fabric organizer kit tutorial continues with cutting the main fabric panels. These panels form the base structure of the organizer.
The next stage in the Fabric organizer kit tutorial involves preparing the pockets. Different pocket sizes can be created to hold various items such as stationery, sewing tools, or personal accessories.
After preparing the pockets, the Fabric organizer kit tutorial focuses on attaching them to the base panel. Careful stitching ensures that each pocket is strong and evenly aligned.
The following step in the Fabric organizer kit tutorial includes reinforcing the edges and seams. This step improves the durability of the finished organizer.
The final step in the Fabric organizer kit tutorial is trimming loose threads and checking that all compartments are securely attached and ready for use.
One of the most enjoyable aspects of the Fabric organizer kit tutorial is choosing fabrics that match your personal style. Colorful patterns can add personality to the organizer.
Another creative idea in the Fabric organizer kit tutorial is combining different fabric textures. Mixing materials such as cotton and canvas can create an interesting visual effect.
Decorative stitching can also enhance the Fabric organizer kit tutorial. Quilting lines or embroidery can add artistic details to the organizer.
Another option in the Fabric organizer kit tutorial is creating labeled pockets. Labels help identify where each item should be stored.
Some crafters like to add zipper compartments when following the Fabric organizer kit tutorial. Zipper pockets provide extra security for smaller items.
Finally, the Fabric organizer kit tutorial can inspire matching storage solutions such as fabric baskets or drawer organizers.
Choosing durable fabric is one of the most important tips when completing the Fabric organizer kit tutorial. Strong materials help ensure the organizer lasts longer.
Pressing the fabric before sewing is another useful recommendation in the Fabric organizer kit tutorial. Smooth fabric improves accuracy during cutting and stitching.
Maintaining consistent seam allowances is essential while following the Fabric organizer kit tutorial. Even seams give the project a professional appearance.
Testing pocket placement before sewing is another helpful step in the Fabric organizer kit tutorial. This ensures the organizer meets your storage needs.
Working slowly and carefully can greatly improve the results of the Fabric organizer kit tutorial.
Finally, creativity and patience are key when completing the Fabric organizer kit tutorial, allowing you to design a truly personalized organizer.
Is the Fabric organizer kit tutorial suitable for beginners?
Yes, the Fabric organizer kit tutorial can be completed by beginners who know basic sewing techniques.
What type of fabric works best for this project?
Durable fabrics such as cotton, canvas, or denim are recommended for the Fabric organizer kit tutorial.
How long does it take to complete the organizer?
Most people can complete the Fabric organizer kit tutorial within a few hours depending on the complexity of the design.
Can the organizer be customized?
Yes, the Fabric organizer kit tutorial allows you to adjust pocket sizes, layout, and decorative elements.
Is the organizer washable?
Most organizers created using the Fabric organizer kit tutorial can be gently washed when durable fabrics are used.
Can this project be used as a gift idea?
Yes, an item created through the Fabric organizer kit tutorial can be a thoughtful and practical handmade gift.
This article presented a complete Fabric organizer kit tutorial, explaining the materials required, the step-by-step sewing process, creative design ideas, and helpful tips for achieving the best results. By following this guide, you can transform simple fabric into a functional organizer that helps keep your home tidy and organized.
The Fabric organizer kit tutorial shows how handmade projects can combine creativity with practicality. This type of craft not only improves organization but also allows you to create something unique and personalized.
If you enjoyed learning from this Fabric organizer kit tutorial, feel free to leave your honest opinion and suggestions. Your feedback is valuable and helps inspire new tutorials and creative crafting ideas.


