
How to sew a fabric storage basket tutorial

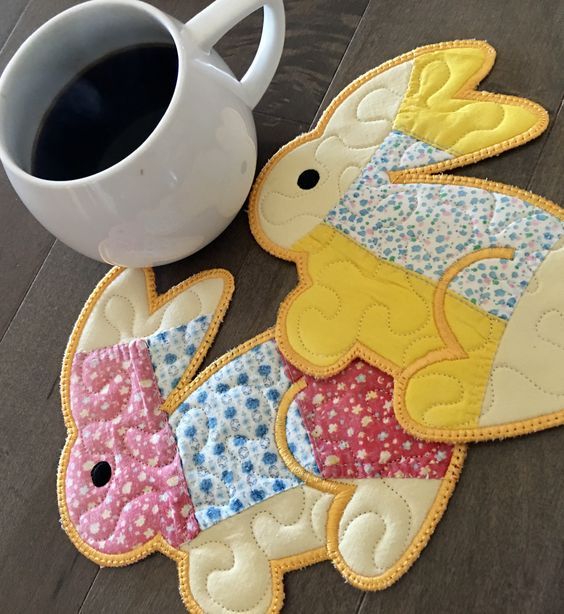
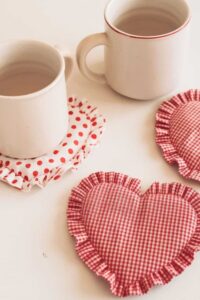
Easy-to-make rabbit coaster is a delightful and beginner-friendly craft project that brings charm and functionality to your home décor. If you are looking for a seasonal or playful accessory for your table, an Easy-to-make rabbit coaster is the perfect combination of creativity and practicality. This project allows you to explore simple techniques while creating something useful that protects surfaces from heat and moisture. Whether for spring decorations, Easter celebrations, or everyday use, this adorable coaster design adds warmth and personality to any setting.
Creating an Easy-to-make rabbit coaster is not only enjoyable but also highly customizable. You can experiment with soft pastel shades, neutral tones, or bold color combinations depending on your style. The rabbit shape adds a whimsical touch that appeals to both children and adults. Since coasters are small projects, they are ideal for beginners who want to practice basic stitches or sewing skills without committing to a large and complex pattern.
In this comprehensive guide, you will learn how to design, create, assemble, and finish an Easy-to-make rabbit coaster using safe and durable materials. This article follows high-quality content standards and SEO best practices, ensuring clear explanations and practical advice. By the end, you will feel confident in your ability to craft charming rabbit-shaped coasters that are both decorative and functional.
Selecting the right materials is essential when crafting an Easy-to-make rabbit coaster. Since coasters are meant to protect surfaces from warm mugs and moisture, cotton yarn or cotton fabric is the best choice. Cotton is heat-resistant, absorbent, and durable, making it ideal for kitchen and dining use.
If you are crocheting your Easy-to-make rabbit coaster, choose a medium-weight cotton yarn. This ensures tight stitches that create a firm and sturdy structure. Avoid synthetic yarns that may lose shape or react poorly to heat.
For those who prefer sewing, quilted cotton fabric combined with a layer of insulated batting provides excellent protection. The batting adds thickness and enhances safety, especially when placing warm cups on the coaster.
You will need essential tools such as scissors, a measuring tape, pins, a yarn needle, or a sewing machine depending on your method. Proper tools ensure clean edges and professional-looking results.
Color selection plays a big role in the final appearance. Soft white, beige, gray, or pastel pink shades work beautifully for the rabbit body. Adding subtle contrasting colors for ears or facial details enhances the playful effect.
Finally, ensure that all materials are washable. Since coasters may experience spills, easy cleaning is important for maintaining both hygiene and appearance over time.
The charm of an Easy-to-make rabbit coaster lies in its recognizable and adorable silhouette. Begin by deciding whether you want a full rabbit shape or a circular coaster with rabbit ears attached. Both options are simple and effective.
If crocheting, start with a circular base using single crochet stitches. This creates a flat and sturdy foundation. Consistent increases help maintain an even round shape without curling.
For sewn versions, trace a circle onto your fabric and add two elongated ear shapes at the top. Precision in cutting ensures symmetry, which is important for a polished look.
Ears can be made separately and attached later or integrated into the base pattern. Keeping proportions balanced ensures the coaster remains functional while still looking like a rabbit.
To enhance realism, you may add light embroidery for facial features such as eyes and whiskers. Keep embellishments minimal to avoid interfering with the flat surface required for cups.
Testing the size before finishing is essential. Standard coasters measure about four to five inches in diameter. Adjust the size as needed to suit different cup or mug dimensions.
To begin crocheting an Easy-to-make rabbit coaster, create a magic ring and work several single crochet stitches into it. Gradually increase stitches in each round to form a flat circle.
Maintain even tension throughout your work. Tight, consistent stitches help the coaster remain flat and sturdy. Uneven tension can cause curling or warping.
Once the base reaches your desired size, fasten off and weave in the ends carefully. Clean finishing ensures durability and enhances the professional appearance of your Easy-to-make rabbit coaster.
For the ears, create small oval shapes separately. Attach them securely at the top of the coaster using tight stitches. Make sure they are evenly spaced and symmetrical.
If sewing, stitch fabric pieces with right sides together, leaving a small opening. Insert batting before turning the piece right side out. Press gently to flatten edges and close the opening neatly.
Finally, reinforce the edges with topstitching or an additional crochet border. This strengthens the structure and prevents fraying or stretching over time.
One of the best aspects of an Easy-to-make rabbit coaster is its versatility. You can adapt colors and textures to match different seasons or occasions. Pastel tones are ideal for spring, while neutral shades suit year-round décor.
Consider creating matching sets in coordinated colors. Sets of four or six coasters make thoughtful handmade gifts for friends and family. Presentation in simple packaging adds a special touch.
You can also add subtle texture using back-loop-only stitches or quilted patterns. Texture not only enhances visual appeal but also improves grip and insulation.
Mini versions of the Easy-to-make rabbit coaster can be used as decorative appliqués on table runners or kitchen towels. Adjusting the pattern slightly allows for creative expansion.
Personalization is another wonderful idea. Embroidering initials or adding a small bow detail makes each coaster unique and meaningful.
Lastly, pairing rabbit coasters with other themed kitchen accessories creates a cohesive decorative collection. Coordinated designs elevate your table setting and showcase your creativity.
Is an Easy-to-make rabbit coaster suitable for beginners?
Yes, this project uses simple stitches or straight seams, making it ideal for beginners learning crochet or sewing.
What is the best yarn for an Easy-to-make rabbit coaster?
Cotton yarn is the best choice due to its heat resistance, durability, and absorbency.
How do I prevent my coaster from curling?
Maintain consistent tension and use evenly spaced increases. Blocking the finished piece can also help flatten it.
Can I machine wash my rabbit coaster?
If made with washable cotton materials, it can typically be machine washed on a gentle cycle. Always check the care instructions.
How long does it take to complete one coaster?
Depending on skill level, it usually takes between 30 minutes and one hour to finish a single coaster.
Conclusion
In this detailed guide on Easy-to-make rabbit coaster, you learned how to select appropriate materials, design the perfect rabbit shape, follow step-by-step assembly instructions, and explore creative variations.
By using durable cotton materials, maintaining consistent stitching, and adding thoughtful details, you can create a charming and functional coaster for any occasion. This project combines practicality with seasonal charm, making it ideal for gifts or home décor.
If you found this article helpful, please leave your honest opinion and share your suggestions. Your feedback is valuable and helps inspire future creative ideas.


