
How to sew a fabric storage basket tutorial

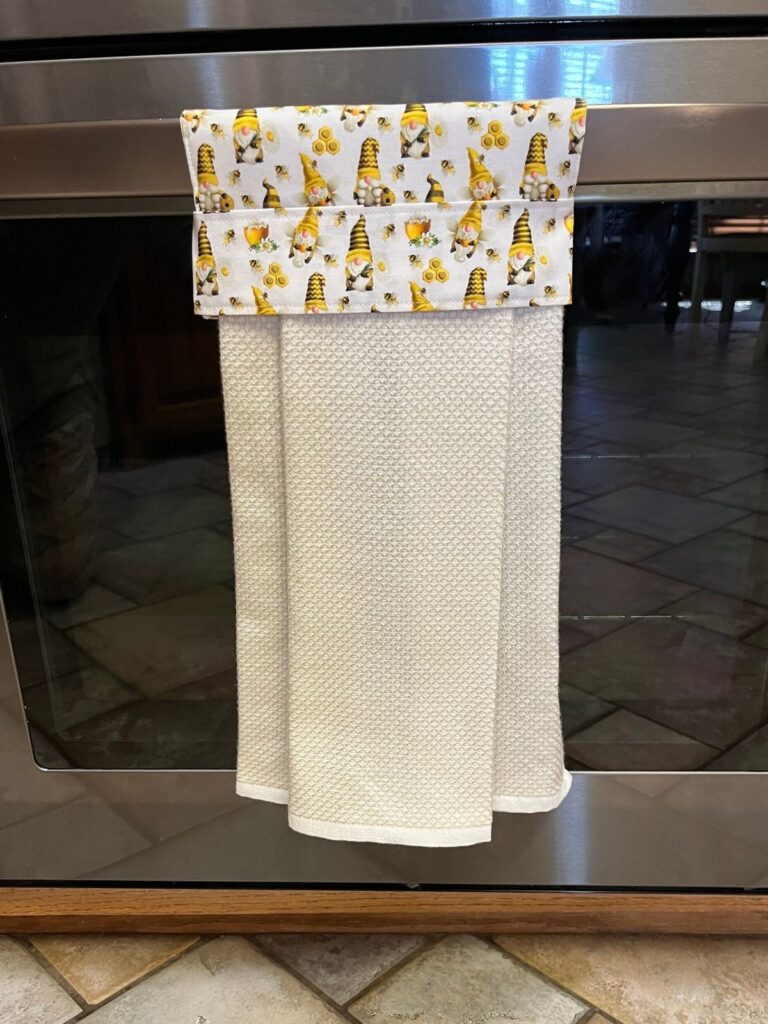
Dish towels for hanging: learn how to make them.-Step by Step Tutorial is a creative and practical project that transforms simple dish towels into functional and beautiful kitchen accessories. These towels are designed to stay securely in place, making them perfect for busy households, decorative purposes, or gift-giving occasions. In this article, you will follow a complete Dish towels for hanging: learn how to make them.-Step by Step Tutorial, exploring materials, techniques, sewing tips, and ways to personalize your final piece. Whether you are a beginner or someone experienced in sewing and crafting, this guide will help you create durable and stylish hanging dish towels.
Crafting your own hanging towels is not only enjoyable but also an excellent way to reduce waste and make use of leftover fabrics. Throughout this Dish towels for hanging: learn how to make them.-Step by Step Tutorial, you’ll learn how to choose the right materials to ensure durability and ease of use. Customizable in shape, length, and decorative details, these towels can match any kitchen theme or color palette. With basic sewing skills and a few simple tools, you can easily create a set of hanging dish towels to decorate your home or offer as handmade gifts.
Before diving into each step of the project, it’s important to understand why this Dish towels for hanging: learn how to make them.-Step by Step Tutorial has become so popular. Hanging towels solve a very common household problem: towels constantly falling off the oven handle or cabinet door. These designs include a secure closure—usually a button, snap, or Velcro—that keeps the towel neatly in place. By learning this technique, you not only improve your crafting skills but also create practical everyday items that make routines more efficient. Now, let’s begin exploring the materials and techniques you will need.
To begin your Dish towels for hanging: learn how to make them.-Step by Step Tutorial, start by selecting a high-quality dish towel. Cotton towels are the most recommended, as they absorb water well and are easy to wash and maintain.
Choose a coordinating fabric for the hanging flap. This fabric should be sturdy enough to support the weight of the towel and resist frequent use. Quilting cotton or canvas are great options.
You will also need a button, snap, or Velcro strip to create the closure. Each closure type works well, so select the one that matches your preference and sewing skill level.
A sewing machine will speed up the process, but hand stitching is also possible for those who prefer a slower, more detailed method. Both techniques result in durable and beautiful towel tops.
Basic sewing supplies such as scissors, sewing pins, a measuring tape, thread, and a fabric marker are essential. These tools help ensure accuracy and neat finishing.
Once you have gathered all materials, organize them on a clean workspace. This will make the next steps easier to follow and more enjoyable.
Start this stage of your Dish towels for hanging: learn how to make them.-Step by Step Tutorial by measuring the top section of your dish towel. You will fold or gather this area to attach it to the fabric flap.
Next, cut the hanging flap according to your chosen size and shape. A simple rounded flap or a rectangular shape works well. Remember to add seam allowance on all sides.
Fold the flap fabric in half, right sides together, and pin it to keep the layers aligned. This ensures a clean and even shape when you sew.
Use your fabric marker to draw the outline of the flap, making sure both layers are symmetrical. Accuracy at this stage makes assembly easier and improves the final appearance.
Sew around the edges of the flap, leaving a small opening to turn it inside out. This opening allows the fabric to look smooth and professional.
Turn the flap right side out, press it with an iron, and close the opening with a topstitch. Your flap is now ready for attachment to the towel.
In the next part of your Dish towels for hanging: learn how to make them.-Step by Step Tutorial, fold or gather the top portion of your dish towel to match the width of the fabric flap. This ensures a stable and balanced connection.
Pin the towel to the open end of the flap, securing it in place. Make sure the towel is centered so it hangs evenly.
Sew along the edge to join the towel and flap securely. A double stitch or reinforced seam is recommended for durability, especially if the towel will endure frequent washing.
After attaching the towel, fold the flap in half to simulate the closed position. Check if the closure point aligns properly before adding the button or snap.
Mark the closure point using a fabric marker. This prevents misalignment and ensures the towel can hang neatly once completed.
Add your chosen closure, whether a button, snap, or Velcro. Test it several times to ensure it opens and closes easily and stays secure when hanging.
Personalizing your Dish towels for hanging: learn how to make them.-Step by Step Tutorial is one of the most enjoyable parts of the process. Consider adding decorative stitching along the edges of the flap.
Embroidery is another lovely option. Small flowers, initials, or simple lines can make the hanging towel unique and special.
If you prefer a more modern look, choose contrasting thread colors for topstitching. This adds a subtle decorative touch without overwhelming the design.
You may also choose to add decorative trims or lace at the bottom of the towel. This gives the towel a more delicate and handmade appearance.
Be sure to iron the finished piece carefully. Pressing smooths the seams, sharpens the shape, and gives a professional finish to your handmade kitchen accessory.
Once your towel is complete, hang it on your oven handle or cabinet door to test its appearance and functionality. It should hang neatly, stay secure, and add charm to your kitchen space.
1. Are hanging dish towels easy for beginners to make?
Yes, the Dish towels for hanging: learn how to make them.-Step by Step Tutorial is very beginner-friendly.
2. What type of fabric works best for the flap?
Quilting cotton, canvas, or any medium-weight fabric provides great stability.
3. Can I use hand sewing instead of a machine?
Absolutely. Hand stitching takes longer but gives beautiful results.
4. How can I make the towel more decorative?
You can add embroidery, lace trim, contrasting fabric, or decorative stitches.
5. Do these towels stay secure when hanging?
Yes, especially when using a strong button, snap, or Velcro closure.
6. Can I wash the towel normally?
Yes, but make sure closures and embellishments are securely attached.
7. What size should the flap be?
Most flaps are around 4–6 inches wide, but you can adjust based on preference.
8. Can children help with this project?
They can assist with simple steps like choosing fabrics or pinning pieces.
9. Are hanging towels good gift ideas?
Yes, they are practical, beautiful, and well-loved gifts for all occasions.
10. Can I sell handmade hanging towels?
Yes, many crafters successfully sell them due to high demand and practicality.
This complete Dish towels for hanging: learn how to make them.-Step by Step Tutorial has shown you every step needed to create functional, beautiful, and long-lasting hanging dish towels.
From selecting materials to designing the flap, attaching closures, and adding decorative elements, you now have all the knowledge needed to craft stunning kitchen accessories.
I hope this guide has inspired you to create your own versions with creativity and confidence. Please leave your sincere opinion and share suggestions—I would love to hear your feedback!


