
How to sew a fabric storage basket tutorial

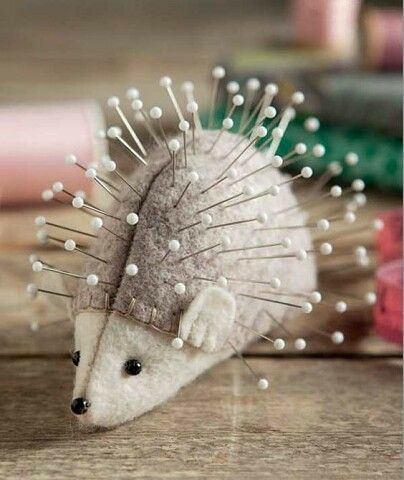
Cute Mouse Pincushion-Step by Step Tutorial is the perfect project for anyone who loves sewing, crafting, and creating functional handmade items with personality. This beginner-friendly guide helps you make an adorable mouse-shaped pincushion that not only keeps your pins organized but also adds charm to your workspace. Throughout this article, the phrase bold Cute Mouse Pincushion-Step by Step Tutorial will guide your learning experience, making each step clear, creative, and easy to follow. Whether you are new to crafting or already experienced, this cute mouse pincushion is a delightful project you’ll enjoy making again and again.
Creating your own pincushion can be incredibly rewarding, especially when the result is as charming as a tiny handmade mouse. This bold Cute Mouse Pincushion-Step by Step Tutorial focuses on helping you understand each step in a simple and humanized way, so you enjoy the entire creative process. You will discover how to choose the right materials, cut your fabric, sew the pieces together, and fill the mouse so it becomes a stable and functional pincushion. The detailed instructions ensure you can follow along with ease, even if you have never sewn a small stuffed figure before.
Before you begin, it’s important to prepare your materials and understand the fundamentals that will make your mouse pincushion sturdy and well-shaped. This article will guide you through everything you need to know, ensuring that your final product looks neat, balanced, and adorable. With this bold Cute Mouse Pincushion-Step by Step Tutorial, you’ll gain not only the skills to complete this specific project but also useful techniques you can apply to many future sewing and craft creations. Get ready for a fun and inspiring crafting experience that blends creativity, precision, and joy.
To start this bold Cute Mouse Pincushion-Step by Step Tutorial, you need to gather a few simple materials that are easy to find and beginner-friendly. Soft cotton fabric works beautifully for this project because it is easy to sew and creates a smooth finish. You may choose solid colors or patterned fabric depending on the style you want for your mouse. Small prints work especially well because they add personality without overwhelming the design.
Next, you will need stuffing material to fill the body of your mouse pincushion. Polyester fiberfill is commonly used because it is lightweight, holds its shape well, and is comfortable to work with. The right amount of stuffing ensures that your pincushion stays firm enough to hold your pins securely without becoming too hard to pierce. This is one of the key details highlighted in the bold Cute Mouse Pincushion-Step by Step Tutorial.
A basic sewing kit is also essential for this project. You will need scissors, pins, a needle, and matching thread. If you prefer using a sewing machine, you can, but hand sewing works perfectly fine for a small project like this. Having clear, sharp scissors makes cutting easier and helps produce clean edges, which is important for neat assembly. These small details make a big difference in the final result.
For the mouse’s details, such as the eyes, ears, and nose, you can use small buttons, embroidery thread, or felt. These decorative touches bring your mouse pincushion to life and give it a unique expression. This bold Cute Mouse Pincushion-Step by Step Tutorial encourages creativity, allowing you to personalize your mouse with cute accessories or colors.
You will also need a small piece of felt or fabric for the mouse’s tail. This detail adds personality and charm to the final design. The tail can be sewn, braided, or even made from yarn depending on the style you want. Many crafters find this step enjoyable because it lets them add their own creative signature to their handmade piece.
Finally, it’s helpful to work on a clean, well-lit surface where you can easily keep track of all small pieces. A comfortable workspace helps you stay organized and makes the crafting process relaxing and enjoyable. With all these materials prepared, you are ready to begin the sewing steps of your bold Cute Mouse Pincushion-Step by Step Tutorial.
The first step in the bold Cute Mouse Pincushion-Step by Step Tutorial is cutting your fabric pieces. You will need two shapes for the mouse’s body: a triangular main piece and two ear pieces. Taking your time with this step ensures the final shape is symmetrical and well-proportioned. Even small differences can affect the overall look of your pincushion.
Once the pieces are cut, place the body pieces right sides together and pin them in place. Pinning helps keep the fabric from shifting as you sew. Using small, even stitches is important here because they help create a strong seam that will hold the stuffing inside securely. This step is clearly emphasized in the bold Cute Mouse Pincushion-Step by Step Tutorial because good stitching results in a smooth, stable shape.
Sew along the edges of the triangle, leaving one small opening at the bottom. This opening will be used later to turn the fabric right side out and insert the stuffing. If you are sewing by hand, take your time and keep your stitches tight and consistent. A neat seam makes the mouse look professionally crafted once completed.
After sewing the main body, turn it right side out through the opening. This is always a satisfying step because you can finally see the shape of your mouse begin to form. Use a tool like a pencil or the back of a crochet hook to gently push out the corners so they look sharp and clean. The bold Cute Mouse Pincushion-Step by Step Tutorial recommends doing this carefully to avoid tearing the fabric.
Now it’s time to fill the mouse with stuffing. Insert small amounts of fiberfill at a time to ensure the shape stays smooth and even. Overstuffing can distort the mouse’s shape, while understuffing can make it too soft to hold pins properly. Aim for a firm but flexible finish.
Once the body is filled to your liking, sew the opening closed using small invisible stitches. This final seam should blend in with the rest of the mouse, giving it a seamless and polished appearance. Your mouse body is now complete and ready for decorative details.
This section of the bold Cute Mouse Pincushion-Step by Step Tutorial focuses on giving your mouse its adorable personality. Start with the ears by folding each ear piece slightly to give it shape. Sew or glue each ear onto the top of the mouse’s head. Positioning the ears symmetrically helps your mouse look well-balanced and cute.
For the eyes, you can use small beads, tiny buttons, or simply embroider them with black thread. Embroidered eyes often give the mouse a soft, friendly appearance. This adds charm and makes your pincushion feel more like a little handmade character. The bold Cute Mouse Pincushion-Step by Step Tutorial encourages you to choose eye styles that best match your creative vision.
Adding the nose is another delightful part of the project. You can embroider a small nose using pink or black thread, or attach a tiny felt piece. This small detail enhances the mouse’s expression and brings the design together. A neatly stitched nose adds professionalism to your finished pincushion.
Next, attach the tail to the back of the mouse. Depending on your preference, the tail can be thin and simple or decorative and playful. Some crafters use braided yarn, while others prefer a strip of fabric or felt. The tutorial gives you complete freedom to experiment with tail styles, allowing you to add your own artistic touch.
Make sure all decorative parts are securely attached, especially if your pincushion will be used frequently. Strong stitching ensures the mouse remains intact even after many uses. A durable design is one of the goals of this bold Cute Mouse Pincushion-Step by Step Tutorial, ensuring your creation holds up over time.
Once everything is attached, take a moment to smooth the fabric and adjust the stuffing if needed. Your adorable mouse pincushion is almost complete, and these final touches help make it look tidy and well-crafted.
The last section of the bold Cute Mouse Pincushion-Step by Step Tutorial focuses on optional enhancements and creative ideas. If you enjoy decorating your crafts, you can add small accessories like a ribbon around the mouse’s neck or a tiny flower on one ear. These accents can give your mouse a unique personality and make it stand out.
You can also experiment with different fabric textures and patterns. For example, using polka-dot fabric creates a playful design, while pastel colors give the mouse a soft and sweet look. Changing the fabric allows you to make multiple pincushions with different styles, which is fun for gifts or craft fairs.
If you want your pincushion to be extra functional, consider adding a weighted base inside the mouse. A small amount of rice or tiny pebbles placed inside the bottom portion can make the mouse sit firmly on your desk. This keeps your pincushion steady when inserting or removing pins.
Another creative idea is to make a matching set of mice in different sizes. A family of mouse pincushions not only looks adorable but also provides several storage areas for your pins and needles. This bold Cute Mouse Pincushion-Step by Step Tutorial inspires you to explore endless possibilities for personalization.
You can also embroider initials or small designs onto the body of the mouse. This adds a custom touch and makes your pincushion truly one-of-a-kind. Personalizing your crafts is a great way to express your creativity and build meaningful handmade items.
Finally, take a photo of your completed mouse pincushion to document your progress and creativity. Sharing your finished project with friends or fellow crafters can inspire others and bring joy to the crafting community.
How long does it take to make a mouse pincushion?
Most people can complete it in about one to two hours, depending on their sewing experience.
Can beginners make this pincushion?
Yes, this bold Cute Mouse Pincushion-Step by Step Tutorial is written with beginners in mind and uses simple techniques.
What fabric works best?
Cotton fabric is recommended because it is easy to sew, durable, and holds its shape well.
How firm should the stuffing be?
Your mouse should be firm enough to hold pins securely, but not so hard that it becomes difficult to use.
Can I wash the pincushion?
Hand washing is possible, but avoid soaking it. Spot cleaning is the safest method.
Is it safe to add small decorations?
Yes, as long as they are securely attached, especially if the pincushion will be used often.
This bold Cute Mouse Pincushion-Step by Step Tutorial has shown you how to create a charming, functional, and customizable pincushion from start to finish.
You learned how to choose materials, sew the mouse body, add decorations, and personalize your final piece. With clear steps and creative ideas, this tutorial offers both structure and inspiration for crafters of all levels. I hope you enjoyed making your cute mouse pincushion.
Please leave your sincere opinion and share suggestions so I can continue creating content that supports and inspires your crafting journey.


